Showing posts with label fried. Show all posts

Friday, April 19, 2013

Frugal Foodie Friday - Tuna Cakes


From the kitchen of One Perfect Bite...Most of you are too young to be familiar with the malady called the Walton Syndrome. While it is not a mental or physical problem, the syndrome is a state of mind that periodically afflicts those of us who followed the television series, The Waltons, back in the 1970's. The show centered on the lives of a large extended family who lived in rural Virginia during the Great Depression and World War II. The series focused on love of family and how family needs, as well as those of the larger community, were met in difficult times. The show, whose message focused on endurance and the common good, struck a chord with viewers who yearned for a simpler time and, for years, they faithfully followed the family as they overcame the obstacles placed in their way. That yearning was called the Walton Syndrome and those aspects of their lifestyle that emphasized harmonious communal living were considered to be a prescription for surviving difficult times. Now, I haven't thought about the Waltons in years, and it is a bit embarrassing to admit that a can of tuna fish is what seemed to spark my reverie. Tuna cakes disappeared from my table years ago, but I thought they'd make a wonderful feature for Frugal Foodie Friday. Canned tuna is still cheap and the cakes are simple to make. I stopped making them because I, quite simply, tired of them. They were a weekly feature in my mother's kitchen and the Silver Fox and I had then often in the early years of our marriage. Canned tuna is one of the items found in supplemental food boxes, so I thought these tuna cakes would make a great frugal Friday feature. The recipe is put together from taste memory and it is really easy to follow. The only point at which you might encounter trouble comes while the cakes are frying. If you attempt to turn the cakes before the bottom has crusted, they will fall apart on you. While that will not affect their flavor, it may affect your appetite. I like to serve these with Brazilian Tomato Rice which you can find, here. I do think the cakes need a sauce of some type. While tartar sauce is a nice accompaniment I prefer to serve the cakes with salsa, which I think is a better match for the cilantro in the recipe. If you are looking for something that is fast, easy and inexpensive to make I hope you'll give these tuna cakes a try. They are really nice. Here is the recipe.

Tuna Cakes...from the kitchen of One Perfect Bite

Ingredients:
2 cans (6-oz. each) tuna packed in water, drained
1/4 cup plain dried bread crumbs
1/3 cup chopped cilantro
2 tablespoon chopped chives or green onion tops
Juice and zest of one small lemon
2 tablespoons mayonnaise
Salt and pepper to taste
1 large egg, beaten
2 squirts of hot sauce (i.e. Texas Pete)
1 tablespoon butter
1 tablespoon olive oil
1/2 cup prepared salsa

Directions:
1) Combine tuna, bread crumbs, cilantro, chives, lemon juice and zest, mayonnaise in a medium bowl Season to taste with salt and pepper (I used 1/2 teaspoon salt and 1/4 teaspoon pepper). Combine egg with hot sauce and add to tuna mixture, mixing gently until ingredients come together.
2) Form into six (1/3 cup each ) tuna cakes.
3) Heat oil and butter in a large non-stick skillet set over medium heat. When hot, add tuna cakes and cook until golden brown and crisp, about 2 minutes per side. Serve hot with salsa. Yield: 6 cakes to feed 3 people.


One Year Ago Today: Buckeye Brownie Bars


Two Years Ago Today: Boulettes - Meatballs with Tomato Sauce


Three Years Ago Today: Eggs in Purgatory


Four Years Ago Today: Lemon Rice Cake with Warm Blackberry Sauce

Friday, January 11, 2013

Rösti - Swiss Hash Brown Potatoes


From the kitchen of One Perfect Bite...It takes a while to work your way through ten pounds of potatoes. Despite all the potatoes I used last week, there was still a couple of pounds left in the sack that I wanted to finish up. I didn't want to repeat any of the dishes I had already made, so I skimmed through my files looking for a specific recipe for the Swiss version of hash brown potatoes that's called rösti. The recipe comes from Saveur magazine and I have had and used it for over a decade now. I love these potatoes, but I don't make them as often as I'd like because of the time required to get them on the table. There is nothing hard about the recipe, but the potatoes cook twice and must be chilled before they are finally browned. I usually boil and chill the potatoes the day before I plan to serve them, but, even with advanced planning, you still need the better part of an hour to complete their cooking. That being said, they are worth waiting for. The Silver Fox and I first had them years ago in a ski resort where we spent a completely unplanned day. Bad weather had forced us off the road and this was the only place to stay. We refer to the interlude as our introduction to après skiing and rösti and the meaning of the word fleeced. Rösti is a Swiss dish that consists mainly of potatoes. It is a common breakfast dish and many consider it to be the national dish of Switzerland. It was originally considered to be a complete breakfast, but over time it became an accompaniment to other dishes and was served with meals throughout the day. The dish is made with coarsely grated potatoes which can be cooked or raw. They are shaped into rounds or cooked as a large cake in a frying pan. While some add additional ingredients, the dish traditionally is seasoned only with salt and pepper before it is slowly fried in lard or butter. The process produces a wonderful crust and creamy interior that distinguishes it from standard hash browns. If you are a breakfast lover and have never tasted these potatoes, I hope you'll give this recipe a try. You will be wowed. I promise. Here's how rösti are made.

Rösti - Swiss Hash Brown Potatoes...from the kitchen of One Perfect Bite courtesy of Saveur magazine

Ingredients:
2-1/4 pounds russet potatoes
2 tablespoons unsalted butter
2 tablespoons canola oil
1 tablespoon kosher salt + more to taste if needed

Directions:
1) Place potatoes in a large saucepan, cover with cold water, and bring to a boil over medium-high heat and cook until tender, about 30 minutes. Drain potatoes and set aside to cool for about10 minutes. Peel potatoes, then refrigerate until chilled, at least 1 hour. Grate potatoes using large holes on a cheese grater. Set aside.
2) Heat butter and oil in an 9 to 10-inch nonstick skillet over medium-low heat. When butter is melted, add potatoes, sprinkle with salt, and mix well, coating potatoes with fat. Using a metal spatula, gently press potatoes, molding them to fit the skillet. Cook, shaking skillet occasionally, until edges are golden brown, about 20 minutes.
3) Cover skillet with a large inverted plate, invert rösti over onto plate, then slide it back into skillet, cooked side up. Cook until golden brown on bottom, about 20 minutes longer. Transfer to a cutting board, sprinkle with salt if desired, and cut into wedges to serve. Yield: 4 to 6 servings.


One Year Ago Today: Cream of Garlic Soup


Two Years Ago Today: Moroccan Lamb Stuffed Peppers

Thursday, April 12, 2012

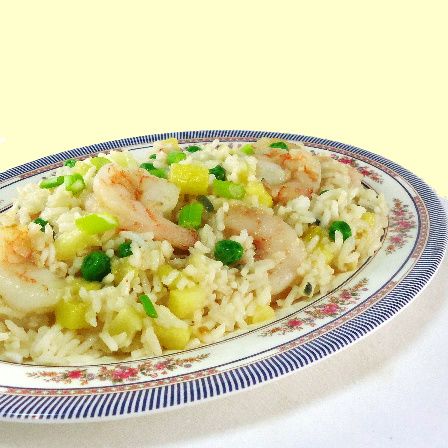
Thai-Style Pineapple and Shrimp Fried Rice


From the kitchen of One Perfect Bite...This is another easy Asian knock-off. This version of fried rice is adapted from a recipe originally develop by Nancie McDermott, one of my favorite food writers. I don't have great luck with most cookbooks and rarely walk away with more than two recipes to show for the time and  money I've spent, but her books, like those of Julia, Ina, Dorie and Mark Bittman, are treasures, and the trick is to find a bad recipe between the covers. I say that without need for a disclaimer. I simply appreciate the ease with which her recipes come together. Her books target everyday cooks who want something special to serve their families, and while her food is not sophisticated, it is delicious and almost always quick to prepare. If you'd like to learn more about Nancie, pay a visit to her website, which you can find here. I really like this recipe and often serve it for lunch or a light supper. The trick to any good fried rice is using leftover rice that has firmed and can be separated into individual grains. I personally think it is necessary to control the amount of liquid that goes into this kind of stir-fry. I really dislike wet and gummy rice, so I use fresh or well-drained canned pineapple to make it. The shrimp helps make the dish more substantial and adds some much needed texture texture to the mix. In the real world, I coarsely chop them so they are the same size as the pineapple and peas. I hope you will try this simple dish. I really think you'll like it. Here's the recipe.

Thai-Style Pineapple and Shrimp Fried Rice
...from the kitchen of One Perfect Bite inspired by Nancie McDermott

Directions:
4 cups cooked (preferably leftover) rice, chilled
2 tablespoons vegetable oil
1 tablespoons coarsely chopped garlic
1/2 cup chopped onion
1 small jalapeno, stemmed, seed and chopped chopped (optional)
1/2 pound medium shrimp, peeled and deveined
2 tablespoons fish sauce
1 tablespoon lime juice
1/2 teaspoon sugar
1-1/2 cups diced fresh pineapple
1/2 cup frozen peas, thawed
Garnish: Chopped green onions

Directions:
1) Break clumps of chilled rice into a bowl and separate into individual grains.
2) Heat a wok or large high-sided skillet over high heat. Add oil and heat until it shimmers. Add garlic, onion and jalapeno and toss or stir until shiny and fragrant, about 1 minutes. Add shrimp and toss or stir-fry until onions wilt and shrimp turns pink and is cooked through, about 2 to 3 minutes.
3) Add rice, fish sauce, lime juice and sugar and toss to combine well. Stir in pineapple and peas and stir-fry until rice is heated through, about 2 minutes longer. Turn rice onto a serving platter. Garnish with chopped green onions. Serve hot or warm. Yield: 4 servings.


One Year Ago Today: Crustless Cheese and Broccoli Quiche


Two Years Ago Today: Black-Eyed Pea Casserole


Three Years Ago Today: Gluten-Free Pancakes

Monday, November 14, 2011

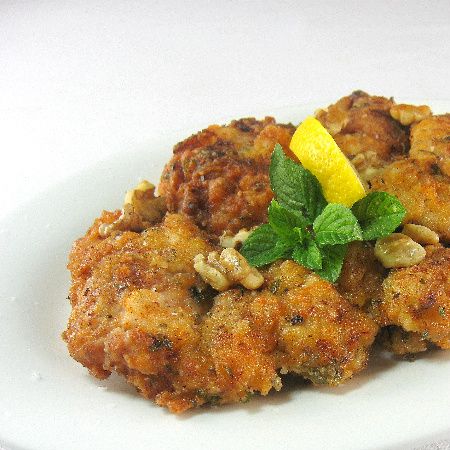
Persian Fried Chicken


The Valley of the Fairy Chimneys

From the kitchen of One Perfect Bite...This is an absolutely wonderful dish that I first sampled while we were in the Valley of the Fairy Chimneys in Turkey. The dish is actually Persian, but I had the good fortune to have a cooking instructor whose husband was Iranian and she often prepared this chicken for him. Working on the assumption that all Americans love fried chicken, she also made the dish for us. Strangely, despite requests, she refused to share her recipe with us. Her rationale was that the dish was Persian and we had come to her kitchen to learn Turkish cooking. Her logic may have been convoluted, but her resolve was a straight as an arrow and she refused to be swayed. After the fact, I realized that her language skills were limited and that while she spoke English, she couldn't write it. Her wonderful recipes had been translated for us by someone else and her refusal was not as arbitrary as I first had thought. I so liked the chicken that I refused to give up on it, and, once home, began to search for something like it. Thanks to Google and The New York Times I've found it and can now share the recipe with you. I think you, too, will love the dish. The chicken is very easy to prepare, but it is a bit pricey and requires some advance planning. The chicken must marinate for several hours before it can be cooked and the marinade contains that costliest of spices, saffron. I promise the wait and cost are worth it, and as long as you don't serve it every week, I think a good case can be made for an occasional caloric splurge. Here's the recipe. Enjoy and hold onto your socks!

Persian Fried Chicken...from the kitchen of One Perfect Bite courtesy of The New York Times

Ingredients:
1/2 teaspoon saffron
2 cups plain whole-milk yogurt
1 tablespoon chopped garlic
2-1/2 pounds boneless, skinless chicken thighs
2 cups flour
2 teaspoons paprika
1 tablespoon dried mint
1 tablespoon salt, more for sprinkling
1/2 teaspoon black pepper
Oil for frying
1 cup walnut pieces
1 lemon, cut into wedges

Directions:
1) In a small bowl, combine saffron with 1 tablespoon water and let soak 10 minutes. Place in food processor with yogurt and garlic and purée until smooth and yellow. Place chicken in glass or ceramic bowl; pour yogurt mixture on top, turn to coat; cover and refrigerate at least 3 hours or overnight.
2) In a medium bowl, combine flour, paprika, mint, salt and pepper. Heat a generous half-inch oil in a deep skillet over medium heat. Drop in a bit of bread to test temperature; oil should bubble vigorously. Working in batches to avoid crowding, dredge chicken pieces in flour mixture, then fry until golden brown on both sides, about 7 minutes a side. Remove and drain on paper towels.
3) Sprinkle with salt and serve immediately, topped with walnuts and lemon wedges. Yield: 6 servings.


***The photo of the Fairy Chimneys was taken by Dick Wolfe who traveled with us throughout Turkey. He is a great photographer and an even better companion. Thanks Wolfie :-)***


One Year Ago Today: Tibetan Momo


Two Years Ago Today: Mulled Cranberry and Apple Cider

Wednesday, July 6, 2011

Salmon Cakes


From the kitchen of One Perfect Bite...I had about a 1/2 pound of salmon left after my holiday cooking spree. It wasn't enough to make any of the dishes we usually enjoy, but I was determined to use it up and I wanted to find a recipe that turned a very small quantity of salmon into something unusual and delicious. I did some searching and finally settled on a recipe for the most pedestrian use of salmon, the ubiquitous salmon cake. While I had to sacrifice the unusual portion of my quest, I ended up with something really delicious. As it turned out, these cakes aren't anything like the dreadful canned creations remembered from so long ago. So, I'm going to ask you to put the can opener away, replace it with a chef's knife and prepare your taste buds for a real, if simple, treat. The recipe I found was developed by Ina Garten and it is chock full of ingredients that pack these cakes with flavor. I basically followed the recipe as it was written. The few changes I made were the result of necessity rather than intent. While I used some already poached salmon and did away with the yellow pepper called for in the recipe, I still ended up with delicious cakes. I heartily recommend this recipe to you. It is an easy, if time consuming, way to turn a small quantity of fish into something really memorable. Avoid the temptation to add more bread crumbs than the recipe calls for. If the mixture seems too soft to form, stick it in the freezer until it holds its shape and when you cook the the cakes make sure the bottom has crusted before you flip them over.These demand to be served warm. They are so flavorful you won't need a sauce to accompany them. I served ours with roasted potatoes and the first sweet corn of the year. It was a really nice meal. Here's the recipe I used for the salmon cakes.

Salmon Cakes...from the kitchen of One Perfect Bite courtesy of Ina Garten

Ingredients:
1/2 pound fresh salmon
4 tablespoons olive oil + olive oil to brush salmon
Kosher salt and freshly ground black pepper
4 tablespoons unsalted butter
3/4 cup small-diced red onion
1-1/2 cups small-diced celery
1/2 cup small-diced red bell pepper
1/2 cup small-diced yellow bell pepper
1/4 cup minced fresh flat-leaf parsley
1 tablespoon capers, drained
1/4 teaspoon hot sauce (i.e.Tabasco)
1/2 teaspoon Worcestershire sauce
1-1/2 teaspoons crab boil (i.e. Old Bay) seasoning or see Cook's Notes below
3 to 4 slices stale bread, crusts removed
1/2 cup mayonnaise
2 teaspoons Dijon mustard
2 large eggs, lightly beaten

Directions:
1) Preheat the oven to 350 degrees F.
2) Place salmon on a sheet pan, skin side down. Brush with olive oil and sprinkle with salt and pepper. Roast for 15 to 20 minutes, until just cooked. Remove from the oven and cover tightly with aluminum foil. Allow to rest for 10 minutes and refrigerate until cold.
3) Meanwhile, place 2 tablespoons butter, 2 tablespoons olive oil, onion, celery, red and yellow bell peppers, parsley, capers, hot sauce, Worcestershire sauce, crab boil seasoning, 1/2 teaspoon salt, and 1/2 teaspoon pepper in a large saute pan over medium-low heat and cook until the vegetables are soft, approximately 15 to 20 minutes. Cool to room temperature.
4) Break bread slices in pieces and process in a food processor. Spread crumbs in a single layer on bottom of a cookie sheet. Toast in oven for 5 minutes until lightly brown, tossing occasionally.
5) Flake chilled salmon into a large bowl. Add 1 cup bread crumbs, mayonnaise, mustard, and eggs. Add vegetable mixture and mix well. Cover and chill in the refrigerator for 30 minutes. Shape into 10 cakes of equal size.
6) Heat remaining 2 tablespoons butter and 2 tablespoons olive oil in a large saute pan over medium heat. Add 5 salmon cakes to pan and fry for 4 minutes per side, until browned. Transfer to paper towels to drain. Keep warm in a 250 degree F oven while remainder of salmon cakes are fried. Serve warm. Yield: 10 salmon cakes.

Cook's Notes - Crab boil is a spice mixture used to flavor the water in which crabs or other shellfish are boiled. If you are unable to purchase it, this homemade mixture can be substituted.

Old Bay-like Seasoning

Ingredients:
1 tablespoon ground dried bay leaves
2 teaspoons celery salt
1-1/2 teaspoons dry mustard
1-1/2 teaspoons ground black pepper
1 teaspoon sweet or smoked paprika
1 teaspoon ground celery seeds
1/2 teaspoon ground white pepper
1/2 teaspoon ground nutmeg
1/2 teaspoon ground ginger
1/4 teaspoon crushed red pepper flakes
1/8 teaspoon ground cloves
1/8 teaspoon ground mace
1/8 teaspoon ground cardamom
1/8 teaspoon ground allspice

Directions:

Combine all ingredients and mix thoroughly. Store in an airtight container and store in a cool place. Use with seafood or chicken. Makes about 1/4 cup.


One Year Ago Today: Strawberry Salsa


Two Years Ago Today: Cajun Corn Maque Choux


You might also enjoy these recipes:
Salmon Burgers - Steamy Kitchen
Salmon Cakes with Lemon Yogurt Sauce - Guvi's
Pan-Fried Salmon Cakes, Sauce Remoulade - Edible Aria
Salmon Cakes with Lemon Herb Mayonnaise - Inspired 2 Cook
Dill and Caper Salmon Cakes - Coconut and Lime

Wednesday, June 29, 2011

Crusty Farm-Style Fried Chicken


From the kitchen of One Perfect Bite...I was delighted when this recipe was reprinted by the editors of Farm Journal. I had originally seen it in one of their old cookbooks, and made it for the first time nearly fifty years ago. I was newly married and trying to capture the warmth and aura of country cooking in a very modest big city kitchen. Thoughts of that kitchen still make me smile. It had an ancient stove, a refrigerator and a sink with a drain board that was also used for assembly and chopping. I first made this chicken there. The recipe was great and I used it for years, but when our nest began to empty and calories had to be watched more carefully than the children ever were, the recipe was retired and fell out of sight and mind. I stumbled on it again last year and simply had to make it again. The biggest drawback was scaling ingredients to feed fewer people. I halved the ingredients and used two (2-1/2 pound) chickens to make this for our dinner. There were four of us at the table that evening and I still had leftovers for the following day. If you are unable to find packets of the powdered garlic dressing, an Italian mix can be substituted. I think those of you who try this chicken will love it. It is a perfect choice for holiday picnics or alfresco dining. Here's the recipe as it originally appeared in Farm Journal (AGWeb).


Crusty Farm-Style Fried Chicken
...from the kitchen of One Perfect Bite courtesy of Farm Journal

Ingredients:
3 (3 pounds) broiler-fryers..cut in pieces
2 envelopes garlic salad dressing mix (i.e. Good Seasons)
3 tablespoons flour
2 teaspoons salt salt
1/4 cup lemon juice
2 tablespoons soft butter
1 cup milk
1-1/2 cups pancake mix
Vegetable oil for frying

Directions:
1) Wipe chicken pieces with a damp paper towel. Combine salad dressing mix, flour and salt in a small bowl. Add lemon juice and butter, mix to a smooth paste. Brush chicken on all sides with spice paste. Store coated chicken in refrigerator over night.
2) About 1-1/2 hours before serving heat 1/2-inch of oil in large skillet. Dip chicken in milk, then coat with pancake mix. Lightly brown in hot oil. When browned place in a shallow baking pan, one layer deep. Spoon half of remaining dipping milk over chicken. Cover with foil. Bake at 375 degrees F for 30 minutes. Remove foil, baste with pan drippings and bake 20 to 30 minutes more. Remove from Oven and serve immediately. Yield: 6 to 8 servings.


One Year Ago Today: Lemon Coleslaw


Two Years Ago Today: Red Cooked Pork


You might also enjoy these recipes:
Perfect Fried Chicken - Chef at Large
Double Dipped Fried Chicken - The Red Spoon
Southern Fried Chicken - The Galley Gourmet
Crispy Oven Fried Chicken - Living the Gourmet
Batter Fried Chicken - What's Cookin' Chicago?

Sunday, October 31, 2010

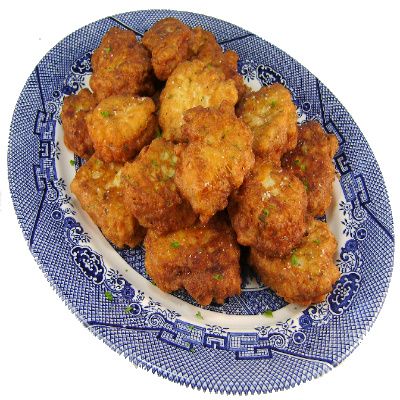
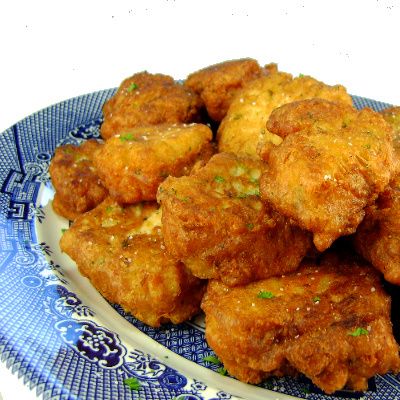
Clam Fritters


From the kitchen of One Perfect Bite...I found this recipe several weeks ago while searching for dishes that would allow me to use the large cans of chopped clams found in warehouse stores. It was originally developed by Craig Claiborne, a prolific food writer and editor at The New York Times. He called the recipe Bonacker-Style Clam Fritters and considered it to be a perfect example of authentic American cooking. Bonacker is the name given to natives of the East Hampton, Long Island. Fortunately, this dish had been featured at Saveur.com and I was able to retrieve the original recipe from their files. I wanted to make the dish as it was written, the only substitution being the use of canned for fresh clams. The most difficult part of this exercise was determining how much meat would actually be harvested from 4 dozen cherrystone clams. Available search engines failed me, so I splashed water on my face, put on some lipstick and went for a chat with my guys at the fish market. Based on the assumption that all the cherrystones were the same middling size, the guys were certain - certain mind you - that I'd need 2-1/2 cups of chopped canned meat to equal the amount that I'd get from freshly shucked clams. It, of course, took another 20 minutes to explain why I was going through the exercise in the first place and by the time I left the market I wasn't quite sure why myself. At any rate, I made it home and we had great fritters for dinner. These are less doughy than most I've had and I really enjoyed them. I think you might too. Here's the recipe.

Clam Fritters (Bonacker-Style Clam Fritters)...from the kitchen of One Perfect Bite, courtesy of Craig Claiborne and Saveur

Ingredients:
1 cup all-purpose flour
1 teaspoon baking soda
2 teaspoons baking powder
2 eggs
1 tablespoon lemon juice
1⁄3 cup clam juice
1⁄4 cup milk
1 tablespoon melted butter
Pinch cayenne
2 tablespoons finely chopped fresh parsley
2-1/2 cups coarsely chopped, drained clams
Salt and freshly ground black pepper
Vegetable oil

Directions:
1) Sift together flour, baking soda, and baking powder in a mixing bowl. Whisk in eggs, lemon juice, clam juice, milk, butter, and cayenne, whisking until batter is smooth. Add parsley and clams, then season with salt and pepper. Mix well.
2) Add vegetable oil to a heavy skillet, to a depth of 1⁄8-inch, and heat over medium heat. When oil is hot but not smoking, spoon about 2 tablespoons of clam batter for each fritter into hot oil. (Work in batches and avoid crowding pan.) Fry until golden on one side, then turn fritters and continue frying about 2 minutes more. Make sure fritters are cooked through. Drain on paper towels. Season to taste with salt and pepper. Yield: 16 fritters.

Print Friendly and PDF

You might also enjoy these recipes:
Linguine and Clams with Garlic White Wine Sauce - The Red Spoon
Cuban Clam Fritters with Cilantro Mayo - Lazaro Cooks
Spaghetti Frutti di Mare - Cooking-Gallery
Clams and Mussels in Tomato Broth - Mangiandobene
Clams with Green Peppers Tomatoes and Wine - My Mediterranean Diet
Karin's Curried Clam Pie - Pithy and Cleaver
Italian White or Red Seafood Chowder - What's Cookin' Italian Style Cuisine

Sunday, February 28, 2010

Yangzhou Fried Rice


From the kitchen of One Perfect Bite...Ten years ago we spent a brief period of time in a loft apartment. It was quite small, but with only three of us and a great deal of planning, it became a manageable, if not luxurious, space. Bob and I had sold our family home and were biding time, waiting for secondary pensions to vest before moving on to Oregon. Our youngest daughter, home following a year in Asia, made her first forays into cooking in that tiny kitchen. Fried rice was her specialty. She and I had discovered Ming Tsai, who was a Food Network star at the time and his style of cooking was perfect for that tiny space. We became wok and cleaver women and began to study, really study, Asian cooking and techniques. Years later in Yangzhou, a city near Shanghai, China I came across a fried rice that would replace the one that we crafted in that loft. No one knows for sure how fried rice became associated with the city Marco Polo once called home. The rice, in different guises, is served throughout China, and Western eyes are drawn to the color of its myriad ingredients. The version I serve is meatless and made with two cups of diced vegetables. If you prefer meat in your rice, substitute one cup of vegetables with a protein you really like. In China, we were served a version that was, most often, made with dried, reconstituted shrimp and fatback or pork belly. It's interesting to note that fried rice was served in the emperor's court, though it was wrapped in egg crepes or lotus leaves. For most of us, however, it will remain a great way to use leftover rice and bits and bobs of previous meals. There are hundreds of ways to make this rice. Here's the one I use for a great meatless meal.

Yangzhou Fried Rice - Yangzhou Chao Fan
...from the kitchen of One Perfect Bite

Ingredients:
4 tablespoons vegetable oil, divided use
2 large eggs, beaten
1/2 cup finely minced yellow onion
1 teaspoon minced garlic
1/2 cup frozen petite peas, thawed and drained
1/2 cup frozen petite corn, thawed and drained
1/2 cup frozen diced carrots, thawed and drained
1/2 cup frozen edamame, thawed and drained
1 tablespoon dark sesame oil
2 tablespoons soy sauce
1 teaspoon salt
1/2 teaspoon sugar
4 cups cooked rice

Directions:
1) Heat a wok over medium high heat. Add 2 tablespoons of oil. When hot, pour in eggs and cook without stirring until lightly set, about 30 seconds. Break up eggs and transfer to a plate.
2) Add remaining 2 tablespoons of oil to wok set over high heat. Add onion and stir fry until softened, about 3 minutes. Stir in garlic and cook until fragrant. Add vegetables and stir fry until crisp tender, about 3 minutes.
3) Add sesame oil, soy sauce, salt and sugar to vegetables. Stir in rice and toss to combine. Add eggs and cook until rice is heated through. Serve hot. Yield: 4 servings.

You might also enjoy these recipes:

Warm Asian-Style Rice Salad - One Perfect Bite
Wild Rice, Celery and Walnut Salad - One Perfect Bite
Sticky Rice and Alms Giving in Luang Prabang - One Perfect Bite

Tuesday, February 23, 2010

Thai-Style Catfish - Plah Toht Kamin


From the kitchen of One Perfect Bite...I'm told that plah toht kamin is a native Thai dish. I can't speak to the veracity of that because each time I've had the dish it was made by a French chef who was plying his trade in Southeast Asia. Thailand, Cambodia, Laos and, to a lesser degree, Vietnam seem to be magnets for French chefs. I suspect there are more of them in Southeast Asia than there are in France. The fusion of wonderful native cuisine with French technique and talent makes for some fascinating meals, and what native and French chefs are able to do with fish is really amazing. While most of the food we had in Asia was wonderful, our best meals in China were vegetarian and our best meals in Southeast Asia were fish or shellfish. I stopped by the fish market today to see what was available and found some gorgeous looking catfish fillets at bargain prices. I was determined to sidestep my usual blackened preparation and come up with something that, for us, would be new. I remembered the turmeric fried catfish we had in Thailand and Laos and set out to reproduce it. We had a lovely meal this evening. Fish prepared in this manner is really easy to make and can be on the table in about 30 minutes. The only remotely exotic ingredients are turmeric and fish sauce and they can be found in most large supermarkets. Bob really enjoyed this, so it will make an encore performance at the table in the next few weeks. I served the fillets with a Thai cucumber relish and sticky rice. I hope you'll try this. It is remarkably good. Here's the recipe.

Thai-Style Catfish - Plah Toht Kamin...from the kitchen of One Perfect Bite

Ingredients:
2 tablespoons chopped garlic
1 tablespoon chopped shallot or scallion
2 teaspoons ground turmeric
1 teaspoon sugar
1 teaspoon freshly ground black pepper
1/2 teaspoon salt
2 tablespoons fish sauce
3 tablespoons vegetable oil, divided use
1-1/4 pounds catfish fillets
Flour for dredging fish
Optional: Thai chili-lime sauce dipping sauce

Directions:
1) Place garlic, shallots, turmeric, sugar, pepper, salt, fish sauce and 1 tablespoon vegetable oil in the bowl of a small food processor. Process to a fairly smooth paste, using a small amount of water if necessary to bring ingredients together. Combine fish fillets and turmeric paste in medium bowl or baking dish, turning fillets to coat evenly with marinade. Let sit for 15 to 20 minutes at room temperature. The fillets can be marinated for up to 24 hours if covered and refrigerated.
2) Place about 1 cup of flour in a pie plate or cake pan. Dredge fillets in flour, shaking off excess. Heat reserved 2 tablespoons oil in a large frying pan set over medium-high heat. When a drop of water sizzles in pan, add fillets and cook, turning once, for 5 to 7 minutes depending on thickness of fillets. Be careful when turning. Transfer to a serving plate and serve with a Thai dipping sauce if desired. Yield: 4 servings.

Chili-Lime Sauce:

Ingredients:
1/4 cup fish sauce
3 tablespoons lime juice
2 tablespoons sugar
1 teaspoon finely chopped garlic
1 teaspoon finely chopped fresh hot green chilies
1 teaspoon finely chopped cilantro

Directions:
Combine fish sauce, lime juice, sugar and garlic in a small bowl, stirring until sugar dissolves. Sprinkle with chilies and cilantro. Set aside. Best served at room temperature.

You might also enjoy these recipes:

Thai Fish Cakes with Cucumber Relish from One Perfect Bite
Thai Cucumber Relish from One Perfect Bite
Thai Fresh Pea Soup with Green Curry from One Perfect Bite

Monday, July 20, 2009

Navajo Blue Corn Fried Chicken with Ancho Honey Sauce


From the kitchen of One Perfect Bite...If you love Southwestern cooking, I suspect you're about to become a happy camper. I been working with recipes that use blue corn meal for several weeks now. There's something about its flavor and the texture it imparts to food that agrees with my palate. I found today's recipe in a book called "Cook-Off America." The dish was created by Bobby Flay for the Aspen Food and Wine Classic. The few changes I've made to the recipe appear in red. I'm sure you will want to make changes of your own, but I've learned a few things, the hard way, that I'd like to share with you. Don't stint on the amount of time the chicken marinates in buttermilk. The tenderized chicken provides a marvelous counterpoint for the crispy fried batter. I've added hot sauce to the buttermilk to add just a hint of heat to the chicken and I salted it liberally at each of the preparation stages along the way. I substituted pancake mix for the flour used to dredge the chicken. I think the pancake mix makes for a crisper coating than flour. Do make sure you serve this warm and don't forget the sauce. It is an integral part of this dish. Leftovers are just so-so, so don't make more food than you'll consume at one sitting. The chicken is not as pretty as its southern counterpart, but it is "make your socks go up and down" good. I know the fried foods are something the food police have made a crime, but I'm a firm believer in moderation. Seldom or rarely, does not mean never. Good fried chicken a couple of times a year will not kill you. I hope you'll try this.

Navajo Blue Corn Fried Chicken with Ancho Honey Sauce
...from the kitchen of One Perfect Bite, courtesy of Bobby Flay

Ingredients:
1 whole chicken (3 to 4 pounds) cut up
3 cups buttermilk
1/4 cup hot sauce (i.e Tabasco or Texas Pete)
Peanut oil, for frying
Salt and freshly ground pepper
2 cups pancake mix seasoned with 1 teaspoon salt and 1/4 teaspoon pepper
4 large eggs, mixed with 2 tablespoons of water and 1/2 teaspoon salt and 1/8 teaspoon pepper
3 cups blue cornmeal, seasoned with 1 teaspoon salt and 1/2 teaspoon pepper
. Ancho-Honey Sauce
1 cup honey
2 tablespoons ancho chile powder

Directions:
1) For Chicken: Place chicken in a large baking dish, add buttermilk, turn to coat. Cover and place in refrigerator for at least 4 but up to 24 hours. Heat 1-inch of peanut oil in a cast iron skillet to 350 degrees F. An electric frying pan can also be used. Remove chicken from buttermilk, pat dry and season with 1 teaspoon salt and 1/4 teaspoon pepper. Dredge each piece of chicken in flour and pat off excess. Dip in the eggs then cornmeal. Slowly add the chicken pieces to hot pan skin-side down in batches. Cover the skillet and reduce the heat to medium high and cook for 7 minutes, remove cover, turn the chicken over and continue to cook for 6 to 7 minutes. Drain on paper towels.
2) For the Ancho Honey Sauce: Mix honey and ancho chile powder together until blended.
3) To serve: Transfer chicken to a platter. Serve warm drizzled with Ancho Honey Sauce. Yield: 4 servings.
Related Posts with Thumbnails

Printfriendly