Monday, October 11, 2010

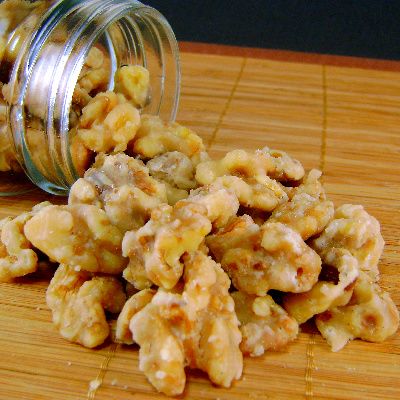
Candied Walnuts


From the kitchen of One Perfect Bite...I make it a point to keep a supply of candied walnuts and pecans in the pantry. I use them often enough to warrant making them in quantity and that, coincidentally, allows me to avoid the expense of the commercial variety that I favor. We don't eat these out of hand, but I do use them in salads and to top certain of the desserts we enjoy. Years ago, Bob and I fell in love with a French salad of watercress and endive that is lightly dressed with vinaigrette and tossed with candied walnuts. We have the salad at least once a week and I've convinced myself that it is not an extravagance as long as I make the nuts myself. My stash allows me to overlook the outrageous cost of Belgian endive and watercress. Foolish I know, but we all have grand deceptions we visit upon ourselves. This happens to be one of mine. I have several recipes for candied nuts and the one I'm sharing tonight is the one my family most enjoys. Regular readers know that I have a great deal of faith in the test kitchens of some commercial ventures. I've had exceptionally good luck with the recipes that come from the Diamond Walnut test kitchen. Let me immediately interject that mine is an unsolicited and unpaid observation. I am in no way affiliated with these people and am merely sharing personal observations and experience. If you have a need for candied nut meats and are comfortable using a candy thermometer, I think you'll love this recipe. The nuts can be stored in an airtight container for several weeks. Here's how they are made.


Candied Walnuts...from the kitchen of One Perfect Bite, courtesy of Diamond Walnut test kitchen

Ingredients:

1-1/2 cups granulated sugar
1/4 teaspoon salt
1/4 cup honey
1/2 cup water
1/2 teaspoon vanilla
3 cups walnut halves or large pieces

Directions:
Boil sugar, salt, honey and water together, stirring often to 242 degrees F on a candy thermometer (firm, soft ball stage). Remove from heat and add vanilla and walnuts. Stir until creamy. Turn out on waxed paper; separate walnuts, using two forks.

You might also enjoy these recipes:
Candied Walnuts - 400 Calories or Less
Roasted Walnuts with Rosemary - The Dog's Breakfast
Orange Glazed Walnuts - Meals 4 Moms
Candied Walnuts - Delicieux
Walnut Brittle with Orange Zest and Sea Salt - Eat Real
Maple-Rosemary Glazed Walnuts - Pinch My Salt
Maple Syrup Candied Walnuts - The Family Kitchen

Sunday, October 10, 2010

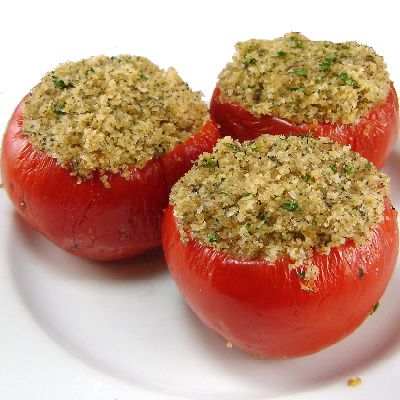
Baked Tomatoes


From the kitchen of One Perfect Bite...This is a side dish that I occasionally make when tomatoes are plentiful and inexpensive. Years ago, baked tomatoes were commonly served in the Southern United States and could be found in restaurants across the country where they were used as a garnish for steaks and chops. The dish is actually French in origin and anyone who has traveled through France in the late summer has probably been served Tomates a la Provencale - whether they wanted them or not. This is a very simple dish. It consists of tomatoes that are topped with seasoned bread crumbs and then baked until the crumbs are crisp and brown while the interior of the tomatoes remain soft and creamy. The dish is not to everyone's liking, but it is remarkably versatile and can be altered to please your family's taste. Here's the recipe I use.

Baked Tomatoes...from the kitchen of One Perfect Bite

Ingredients:

6 medium tomatoes, about 2 pounds
1/2 cup fine dry bread crumbs
3 tablespoons extra-virgin olive oil, divided use
1 teaspoon minced garlic
1 tablespoon Italian seasoning
1/4 teaspoon garlic powder
1/4 teaspoon onion powder
1/4 teaspoon fresh ground pepper
1 teaspoon kosher salt
2 tablespoons finely grated Parmesan cheese
2 tablespoons finely chopped parsley
1 teaspoon vegetable oil

Directions:
1) Preheat oven to 375 degrees F. Lightly grease a 9-inch round baking dish with 1 teaspoon vegetable oil. Set aside.
2) Cut top third from each tomato. Discard top. Gently squeeze each tomato to extract juice and seeds. Place tomatoes in prepared baking dish, cut side up.
3) Combine bread crumbs, 2 tablespoons olive oil, garlic, Italian seasoning, garlic powder, onion powder, pepper, salt, Parmesan cheese and parsley in a small bowl.
4) Top each tomato with two tablespoons of crumb mixture, gently packing them down with back of a spoon. Drizzle remaining 1 tablespoon olive oil evenly over tomatoes.
5) Bake, uncovered, until topping mixture is golden brown and the tomatoes are tender, about 30 minutes. Remove from oven and let sit for 10 minutes before serving. Yield: 6 servings.

You might also enjoy these recipes:
Pickled Green Tomatoes - Homesick Texan
Tomato Leek Soup - Living the Gourmet
Cherry Tomato Crisp - Let's Dish
Slow Roasted Tomatoes - Passionate About Baking
Stuffed Tomatoes with Bleu Cheese - Karen Cooks
Homemade Tomato Paste - My Man's Belly

Saturday, October 9, 2010

Not Your Mama's Lemonade - Pink Saturday

October is National Breast Cancer Awareness Month. I know you need no reminders to schedule your mammogram. Early detection is currently the greatest weapon we have in fighting this insidious disease. I think you'll enjoy any of the drinks that appear below. Pick one and join me in a toast to the cure. Recipes for the drinks can be found by linking to the source that's listed to the right of each photograph. Here's to the cure!


Taylor Takes A Taste


Mike's Hard Pink Lemonade


Southern Living


The Intoxicologist


Life's Ambrosia


Better Recipes


Coastal Living


Food


Gal's Stuff


Whole Living


Country Living


Kraft Recipes


Pink Lemonade


This post is being linked to:
Pink Saturday, sponsored by Beverly at How Sweet the Sound.

Friday, October 8, 2010

Pickled Pepper Relish


From the kitchen of One Perfect Bite...I must admit to a deception. A small one to be sure, but a deception nonetheless. This condiment should actually be called calico relish, but I can't get the yellow or green peppers to show in the photographs I've taken. Rather than fuss, I've decided to rename the dish and what was once called calico has become pickled pepper relish. This is a wonderful way to use end of season sweet peppers. The relish is great with sandwiches and lovely with cream cheese. The recipe makes enough to guarantee you always have some around when you want or need it. The downside to this process is that you'll need a water bath canner to put this one by. If you need additional information about canning you can find it here. I don't freeze relish because I find it loses all trace of crispness when it thaws. Over the years, this has become really simple to make. I no longer do the chopping of vegetables by hand. The food processor is perfect for this task. I pulse the peppers until they have the same consistency as the cranberries that are used in Thanksgiving relish. I let them drain for a few minutes and then proceed with the recipe. If you like relish or chutney, I suspect you love this condiment. Here's the recipe.

Pickled Pepper Relish...from the kitchen of One Perfect Bite

Ingredients:
2 sweet red peppers, chopped
2 sweet yellow peppers, chopped
2 sweet orange peppers, chopped
2 sweet green peppers, chopped
4 medium onions, finely chopped
1 cup white vinegar
1 cup granulated sugar
1 teaspoon pickling salt

Directions:
1) Combine peppers, onions and 1/4 cup water in a large non-reactive saucepan. Bring contents of pan to a boil. Remove from heat, cover pan, and let sit for 5 minutes.
2) Drain vegetables and return to saucepan. Stir in 1/3 cup each vinegar and water. Bring to a boil, cover and reduce heat; simmer for 5 minutes.
3) Drain vegetables and return to saucepan. Heat remaining 2/3 cup vinegar, sugar and salt in a separate saucepan, until sugar is dissolved. Add to vegetables and return mixture to a boil. Boil gently, uncovered, for 25 minutes or until liquid is reduced and vegetables are tender-crisp.
4) While vegetables cook, sterilize 4 half-pint jars and lids. Bring water in a water bath kettle to a boil.
5) Ladle hot relish into jars to within 1/2-inch of jar rims. Process in hot water bath for 10 minutes. Remove jars from kettle and let cool on a towel until jars are room temperature. Tighten lids and store in a cool dark place. Yield: 3-1/2 cups relish.

You might also enjoy these recipes:
Gooseberry Relish - Diner's Journal: New York Times
Ajvar - Red Pepper and Aubergine Relish - Maninas: Food Matters
Cranberry Relish - Simply Recipes
Homemade Hot Dog Relish - Sea Salt with Food
Green Mango Maple Relish - No Recipes
Plum Ginger Relish - The Mom Chef
Red Pepper Relish - One Perfect Bite

Thursday, October 7, 2010

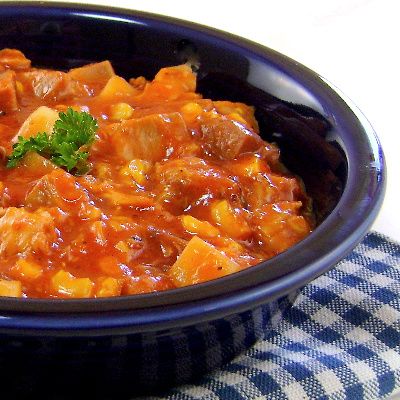
Georgia-Style Brunswick Stew


From the kitchen of One Perfect Bite...Except to say it's a traditional Southern dish, little is known about the origins of Brunswick stew. Both Virginia and Georgia claim it to be their own, but proof to support either claim is missing or contradicted. In Virginia, the stew is made with chicken and sundry vegetables. In Georgia, pork and squirrel reign supreme. I couldn't find a squirrel, but I had a sufficient quantity of slow-roasted pork to attempt my first Georgia-style version of the stew. Several months ago, the Daring Cook's challenged their members to give Brunswick stew a try. The recipe to be used for that challenge can be found at the Wolf's Den. I took a pass at the time, because the recipe made a huge quantity of food. I always feel guilty when I don't participate in these challenges, so I never quite put the idea of the stew to rest. A large quantity of left-over pork and the need for something to carry to a covered-dish supper led to the creation of my first ever Brunswick stew. Diana Rattray, whose recipe can be found here, developed an easy version of the stew that I decided to use as the base for my own. This is very basic food. It also happens to be delicious, especially if your sweet tooth encompasses main courses as well as desserts. If fairness, this is no sweeter than barbecued beef or pork but I was a bit surprised when I took my first bite. This was well received by my tasters this evening, so I think you might enjoy it as well. Here's the recipe.

Georgia-Style Brunswick Stew...from the kitchen of One Perfect Bite, inspired by Diana Rattay

Ingredients:
2 pounds pork, cooked and cut in 3/4-inch dice
1/2 teaspoon ground black pepper
1 teaspoon hot sauce, or to taste
2 tablespoons Worcestershire sauce
1 teaspoon liquid smoke
1/2 cup barbecue sauce, your favorite
1-1/2 cups ketchup
3 cups potatoes, cooked and cut in 3/4-inch dice
Optional: 1 cup cooked lima beans or edamame
2 to 3 (15.5-oz.) cans cream-style corn
Salt and pepper

Directions:
Place all ingredients in a stockpot or Dutch oven. Cover and simmer until hot and bubbly. Thin if desired with water or stock. Taste and adjust seasonings with more salt and hot sauce, as desired. Yield: 8 servings.

You might also enjoy these recipes:
Autumn Pork Stew - The Bake-Off Flunkie
Leek, Potato and Pork Roast Stew - Babe in the City
Chipotle Pork Stew with Rice and Lentils - Food Republik
Pork Vindaloo - E L R A
Pork Stew with Chipotle and Plantains - Edible Aria
Spicy Pork Stew - Chewing the Fat
Brunswick Stew - Art and Lemons

Wednesday, October 6, 2010

Chunky Plum and Tomato Chutney


From the kitchen of One Perfect Bite...It was a gorgeous day. It was crisp and sunny and early errands provided the perfect excuse to get out for a while. An hour became two and before I knew it the day was done. We picked up visas, had flu shots and filled the prescriptions the CDC insists we need for our adventure. With all of that done, our trip countdown officially began. We are at 12 days and counting. The next destination on the agenda should have been home, where chores aplenty were waiting. I must admit my resolve crumbled. The day was just too lovely to spend inside. We took to our favorite backroads and byways and spent the rest of the day in the country picking, plucking and picnicing. I came home with what will probably be my final stash of locally grown plums, tomatoes and sweet peppers. I also had some gorgeous, fresh from the farm, pork and lamb in my tote. The plums and tomatoes are starting to look dogeared, so I decided to use them in a chutney where their less than perfect appearance could be disguised. The chutney would be perfect with grilled chops and help make an ordinary meal special. Time constraints meant the chutney would have to be served warm, so that helped narrow down my choices. This simple version of the condiment looks best when it is made with firm, just ripe fruit. If you have good knife skills, the chutney is table ready in about 30 minutes. Leftovers can be refrigerated for several weeks or frozen for up to a year. Here's the recipe.

Chunky Plum and Tomato Chutney
...from the kitchen of One Perfect Bite, inspired by Nancy Baggett

Ingredients:
1 small yellow onion, coarsely chopped
1-1/2 tablespoons peeled and finely chopped ginger root
1 (3-inch) piece stick cinnamon
1 teaspoon allspice berries, crushed or 1/2 teaspoon ground allspice
1/2 teaspoon black peppercorns, crushed or a scant 1/2 teaspoon coarsely ground black pepper
1/4 teaspoon salt
1 to 3 pinches dried hot red pepper flakes, crushed, to taste
2 cloves, finely crushed or 1/8 teaspoon ground cloves
3/4 cup sugar
1/2 cup apple cider vinegar
2 tablespoons water
2-1/2 cups pitted and chopped (3/4 inch) unpeeled red or yellow plums
1-1/4 cups slightly underripe peeled tomatoes, chopped into 3/4-inch pieces

Instructions:
1) Have 2 or 3 (8-ounce) jars ready.
2) In a medium-size nonreactive pan over medium-high heat, combine onion, ginger root, cinnamon stick, allspice, black pepper, salt, red pepper flakes, cloves, sugar, vinegar and water. Adjust heat so that the mixture boils briskly and cook, uncovered, 5 minutes. Add plums and reduce heat to simmer gently for 3 minutes. Add tomatoes and cook 3 to 5 minutes longer, or until plum and tomato pieces are cooked through but still hold some shape. Liquid should seem almost syrupy. Remove from the heat.
3) To test for doneness, put about a tablespoon of the chutney in a small, nonreactive bowl and place in freezer about 3 minutes. If syrup is slightly thickened, chutney is done. If it is still runny, boil 2 minutes longer. (The chutney may still seem somewhat fluid but will thicken further when chilled.)
4) Remove from heat. Discard cinnamon stick. Ladle chutney into jars, allowing about 3/4-inch headroom for expansion during freezing. Wipe any drips from jar rims and threads; screw on lids securely. Let stand until barely warm. If lids seem loose after cooling and contracting, check and tighten further, but not so much that seal is broken. May refrigerate for 1 month or freeze up to 1 year. Yield: 3-1/2 cups.

You might also enjoy these recipes:
Mango Chutney - Chasing Delicious
Tomato Onion Garlic Chutney - Niya's World
Fiery Plum Conserve - KO Rasoi
Pear Ginger Chutney - Wives With Knives
Peach Chutney - Sugar Crafter
Cilantro Ginger Chutney with Coconut - One Life to Eat
Five Spices Plum Chutney - Vegalicious
Peach Chutney - Suburban Spoon

Tuesday, October 5, 2010

Chocolate Zucchini Cake


From the kitchen of One Perfect Bite...This is a wonderful cake, but it's one that falls into my "hate to love it" category. The cake is delicious and fairly easy to make, but I have a problem with its baking time. I've made it several times and on each occasion the baking time has varied. In all three instances, it has taken longer to bake than the recipe suggests. My oven has just been recalibrated, so I doubt there is a problem with the thermostat, and I'm using the specified pan-size, so I know there is no problem there. I can tell you that my cakes still shimmy at the end of the 30 minute time suggested by the recipe. Mine require a minimum of 50 minutes to assure a stable center. I suspect the difference is attributable to the amount of moisture in the zucchini, but I really don't know for sure. At any rate, the cake is good enough that I'm willing to keep an eye on it while it bakes. The cake is based on a recipe developed in the Ghiradelli kitchens and the original recipe can be found here. This version of the cake, created by Kate Westburg, was a winner in a Ghiradelli competition held at the DuPage County Fair this past summer. I've changed the recipe slightly and if you'd like to see the original it can be found here. The cake is delicious, even if it drives me crazy. I hope you will try it. It's worth the aggravation. Here's the recipe.

Chocolate Zucchini Cake ( 3-G Stealth Zucchini Cake)...from the kitchen of One Perfect Bite, inspired by Kate Westburg

Ingredients:

3 large eggs
1 cup + plus 1/2 teaspoon vegetable oil, divided use
2 teaspoons vanilla extract
2 cups sugar
1/2 cup unsweetened cocoa
2 cups all-purpose flour
2 teaspoons baking soda
1 teaspoon baking powder
1 teaspoon salt
1 tablespoon cinnamon
2 cups grated zucchini
1 cup semisweet chocolate chips
4 ounces baking milk chocolate

Directions:

1) Preheat oven to 350 degrees F. Lightly grease bottom and sides of (9-by-13-inch) pan or 2 (3-by-6-by-9-inch) loaf pans.
2) Combine eggs, 1 cup vegetable oil, vanilla, and sugar in a large bowl. Beat to combine, about 1 to 2 minutes.
3) Sift together cocoa, flour, baking soda, baking powder, salt and cinnamon; add 1/2 cup at a time to wet ingredients. Mix until well combined.
4) Stir in zucchini and chocolate chips. Pour into prepared pan; bake 30 minutes for (9-by-13-inch) cake pan (approximately 50 minutes for loaf pans), or until cake tester comes out clean. Using a 9 x 13 x 2-inch pan, I still needed a minimum of 50 minutes to bake the cake.
5) Melt baking milk chocolate in double boiler or in microwave over water (being careful not to scorch). Whisk in 1/2 teaspoon canola oil. Drizzle ribbon topping over cooled cake. Yield: 16 servings.

You might also enjoy these recipes:
Zucchini Cookies - The Local Cook
Hazelnut Zucchini Cake - My Kitchen in the Rockies
Chocolate Zucchini Cake - Eat At Allie's
Zucchini Cake with Lime Cream Cheese Frosting - Baking Bites
Chocolate Streusel Zucchini Cake - Let's Dish
Zucchini Cake with Crunchy Lemon Glaze - David Lebovitz
Apple Zucchini Cake with Walnuts - Anja's Food 4 Thought

Monday, October 4, 2010

Hot Clam Dip - Blue Monday


From the kitchen of One Perfect Bite...I live in a college community where many are conversant with the Hadron collider. They just won't discuss it with you until football season ends. They are victims of football fever and until the final game is played their prime directive is, "Go, Ducks!" It affects the degreed and the politic and there's no cure for the curse that has grown men wearing green and yellow beneath judicial robes. Food, too, falls victim to the curse. Dips and chips and spreads are "in" and only the foolish plan elaborate meals while the fever holds sway. The simplest of snacks is sure to please and I'm happy to say that I do simple better than anyone I know. While searching for recipes that use canned clams I came across one featured by Emeril Lagasse. The recipe was actually developed by Jamie Gwen, a chef and radio personality, and I gave it a test run this weekend. It's not bad and if you are in the market for a hot dip it's worth a try. Here's the very simple recipe for a very simple dip. I've scaled the recipe to feed four. You may double it if you wish.

Hot Clam Dip...from the kitchen of One Perfect Bite, adapted from a recipe developed by Jamie Gwen

Ingredients:

1 (8-ounce) package reduced fat cream cheese, room temperature
1 tablespoon, finely grated onion
1 teaspoon lemon juice
1 tablespoon clam juice
1 teaspoon Worcestershire sauce
1/2 teaspoon hot pepper sauce
2/3 cup canned minced clams, drained (2 6-oz. cans)
Bread, chips or crackers

Directions:
1) Preheat oven to 350 degrees F.
2) Combine cream cheese, onion, lemon juice, clam juice, Worcestershire sauce and hot pepper sauce in a mixing bowl. Mix well. Gently fold in clams. Scrape mixture into a shallow baking dish.
3) Bake for 20 minutes or until heated through.
4) Serve with sliced French bread, potato chips, corn chips or crackers. Yield: 1-1/2 cups.

You might also enjoy these recipes:
Blue Cheese and Bacon Dip - Easy Appetizers
Roasted Red Pepper Hummus - Eat Real
Chile con Queso - Drick's Ranbling Cafe
Peperonata - Sweet Bites
Bulghur and Walnut Kibbeh - Anja's Food 4 Thought
Easy Appetizer: White Bean Dip - Spoonful
Roasted Olive and Grape Crostini - The Daily Dish

This post is being linked to:
Smiling Sally - Blue Monday
Related Posts with Thumbnails

Printfriendly