Showing posts with label appetizer. Show all posts

Thursday, December 29, 2016

A Kitchen Keeper Original - Gougères


From the kitchen of One Perfect Bite...These light and tender morsels are in danger of extinction. Your mission, should you choose to accept it, is to help keep this recipe relevant and make sure that these silky, egg rich pastries remain on our tables for years to come. Please understand, I have nothing against salsa or chips and dips and pesto. I've been known to down a beer or two and confess that beer nuts are not safe in my presence. There are, however, times when I want something a bit more classic, something with culinary chops and a history that commends its presence on my table. The French gougères has much to recommend it. These savory cheese puffs are made with the same pate a choux dough that is used to prepare cream puffs and eclairs, but the addition of cheese or other savories make them a wonderful appetizer or hors d'oeuvres to serve with wine or champagne. They are very easy to make and I also  serve them with more pedestrian meals of soup or stew. I must warn you that they are additive and the puffs should come with a "once bitten" warning attached to them. I've just finished making a gazillion of these to share with friends tomorrow. I know they will love them and I suspect you will too. These are best served directly from the oven, but I understand that that is not always possible, so I have a few tips to share with you. The dough can be refrigerated for a day before it is formed and baked. Once baked, the puffs can be frozen until needed. Frozen puffs should be thawed and reheated in a 350 degree oven for about 10 minutes before serving. If you plan to bake them ahead of time, make a slit in the bottom of each puff and turn them upside down to let moisture escape.  I make it a point to reheat the gougères before serving them. Five minutes in a 350 degree oven does the trick. While I prefer to use Gruyere cheese, cheddar or blue cheese can be substituted and, if you wish, a filling can be piped into the puffs. I bake my trays of gougère on the lowest rack of the oven and I only bake one tray at a time. It may be my imagination, but I think the puffs get better lift that way. I really hope you will give this recipe a try. I like to share my addictions with others. Here's how these simple cheese puffs are made.

Tuesday, December 31, 2013

Deviled Eggs with Smoked Salmon and Chives


Wishing You Health and Happiness in the New Year


From the kitchen of One Perfect Bite...Regardless of the season, deviled eggs are always a crowd pleaser, and while it may be shameless to admit it, I make them whenever I have a gang to feed or need a filler for the buffet table. We had what is euphemistically called a block brunch this weekend. In reality, it was an early cocktail party and all the neighbors were asked to contribute something to the bar or table. This version of the eggs was my contribution to the get-together. The recipe is fairly standard for deviled eggs, but the addition of smoked salmon makes it a bit more upscale and true to the regional tastes of the Pacific Northwest. If you need a last minute appetizer or an extra dish for your buffet table, you might want to give this recipe a try. I know you will be pleased. Here is how deviled eggs, Pacific Northwest-style, are made.

Deviled Eggs with Smoked Salmon and Chives...from the kitchen of One Perfect Bite courtesy of Family Circle magazine

Ingredients:

12 eggs
1/3 cup mayonnaise
1/4 cup cream cheese, at room temperature
2 teaspoons Dijon mustard
1/3 cup chopped chives, plus extra for garnish
2 ounces smoked salmon, finely chopped

Directions:
1) Place eggs in a lidded pot and add enough water to cover eggs by 1 inch. Cover pan. Bring to a boil. Turn off heat and let stand 10 minutes. Remove to a bowl filled with ice water to cool completely.
2) Peel eggs. Halve eggs lengthwise. Remove yolks to a bowl. Place whites cut side up on a large platter.
3) Beat yolks, mayonnaise, cream cheese and Dijon mustard with a hand mixer until smooth. Stir in chives and salmon. Spoon some of the mixture into each egg white half. Garnish with chives. Yield: 12 servings.

Follow Me on Pinterest                    

                                                    Older Posts


                One Year Ago Today:                                                           Two Years Ago Today:
           Vasilopita - St. Basil's Bread                                                                 Muhummara


              Three Years Ago Today:                                                              Four Years Ago Today: 
          Bouillabaisse a la Marseillaise                                                 Mexican Beer Cheese Spread

Thursday, September 12, 2013

Clam Stuffing for Shells or Fish


From the kitchen of One Perfect Bite...Nearly everyone who visits Cape Cod has enjoyed the large stuffed clams called quahogs. My family is no exception, so I've tried to recreate them in my own kitchen. Unfortunately, quahogs are not abundant here, so while I've been able to come up with a recipe for stuffing them, I've had to work around the lack of large shells in which to serve them. The quahog is the largest of the hard-shelled clam. Little neck , cherry stone, and top neck clams are simply smaller versions of the quahog. The relationship is similar to that of the cremini and portobello mushroom. I first used the stuffing I'm featuring today to fill a large bass and I have since gone on to serve it in scallop shells alongside grilled or baked fish. I can buy fresh chopped clams and broth at the fishmarket and that convenience makes short work of this recipe. If you have access to quahogs, 8 pounds of them will yield enough meat and broth for the stuffing, though it will add an extra step to the recipe. The stuffing can be made several hours before needed and simply reheated for serving. If you enjoy clams, I think you'll enjoy this recipe. Here is how the stuffing is made.


Clam Stuffing...from the kitchen of One Perfect Bite 

Ingredients:
1-1/2 pounds chopped clams
3 cups clam broth
2 tablespoons olive oil
1 cup diced onion
4 teaspoons minced garlic
1/2 pound linguica, diced
1/2 teaspoon pepper
1 bag (14-oz.) preseasoned herb stuffing mix
Lemon wedges

Directions:

1) Preheat oven to 375Degrees F. If using, lightly spray shell halves with nonstick spray.
2) Saute onions, garlic, linguica and pepper in a large saucepan set over medium heat for 4 to 5 minutes, or until onions become translucent. Add stuffing mix and stir to combine. Stir in 2 cups of clam broth and chopped clams. If stuffing seems too dry, add additional clam broth.
3) Spoon stuffing into clam shells and bake on a cookie sheet for 10 to 12 minutes, or until tops are lightly browned. Serve with lemon wedges. Yield: About 24 stuffed clams.

If you have enjoyed your visit here, I hope you'll take a minute to...

Follow Me on Pinterest      


One Year Ago Today: Breakfast Skillet


Two Years Ago Today: Mexican Bizcochitos - Anise Butter Cookies


Three Years Ago Today: Spaghetti Frittata


Four Years Ago Today: Smoked Salmon Frittata

Sunday, February 24, 2013

Gougères - Cheese Puffs


From the kitchen of One Perfect Bite...These light and tender morsels are in danger of extinction. Your mission, should you choose to accept it, is to help keep this recipe relevant and make sure that these silky, egg rich pastries remain on our tables for years to come. Please understand, I have nothing against salsa or chips and dips and pesto. I've been known to down a beer or two and confess that beer nuts are not safe in my presence. There are, however, times when I want something a bit more classic, something with culinary chops and a history that commends its presence on my table. The French gougères has much to recommend it. These savory cheese puffs are made with the same pate a choux dough that is used to prepare cream puffs and eclairs, but the addition of cheese or other savories make them a wonderful appetizer or hors d'oeuvres to serve with wine or champagne. They are very easy to make and I also  serve them with more pedestrian meals of soup or stew. I must warn you that they are additive and the puffs should come with a "once bitten" warning attached to them. I've just finished making a gazillion of these to share with friends tomorrow. I know they will love them and I suspect you will too. These are best served directly from the oven, but I understand that that is not always possible, so I have a few tips to share with you. The dough can be refrigerated for a day before it is formed and baked. Once baked, the puffs can be frozen until needed. Frozen puffs should be thawed and reheated in a 350 degree oven for about 10 minutes before serving. If you plan to bake them ahead of time, make a slit in the bottom of each puff and turn them upside down to let moisture escape.  I make it a point to reheat the gougères before serving them. Five minutes in a 350 degree oven does the trick. While I prefer to use Gruyere cheese, cheddar or blue cheese can be substituted and, if you wish, a filling can be piped into the puffs. I bake my trays of gougère on the lowest rack of the oven and I only bake one tray at a time. It may be my imagination, but I think the puffs get better lift that way. I really hope you will give this recipe a try. I like to share my addictions with others. Here's how these simple cheese puffs are made.

Gougères - Cheese Puffs...from the kitchen of One Perfect Bite courtesy of Elizabeth Gunnison and Saveur magazine

Ingredients:
1/2 cup milk
8 tablespoons unsalted butter, cubed
1/2 teaspoon kosher salt
1 cup flour
4 eggs, at room temperature
6 oz. (1-1/2 cups) Gruyère cheese, grated

Directions:
1)  Heat oven to 425 degrees F.  Bring milk, butter, salt, and 1/2 cup water to a boil in a 4-qt. saucepan over high heat. Add flour, stirring until dough forms. Reduce heat to medium and cook, stirring dough constantly with a wooden spoon, until slightly dried, about 2 minutes. Transfer to a bowl and using a hand mixer, beat in 1 egg until smooth. Repeat with remaining eggs, beating each one at a time, until dough is smooth. Stir in cheese.
2)  Using a large tablespoon, drop balls of dough onto parchment paper-lined baking sheets. Place in oven and immediately reduce temperature to 375 degrees F.  Bake until golden brown, about 30 minutes. Serve warm. Yield: 2-1/2 dozen.


One Year Ago Today: Silken Turnip and Potato Soup


Two Years Ago Today: Rue Tatin Sweet Crescent Rolls


Three Years Ago Today: Wild Rice, Celery and Walnut Salad


Four Years Ago Today: Petite Apple Cakes

Friday, February 22, 2013

Frugal Foodie Friday - Glazed Sweet and Spicy Meatballs


From the kitchen of One Perfect Bite...These meatballs were originally featured as an appetizer in Better Homes and Gardens magazine. Over time, at least in my kitchen, they have morphed into a main course that works really well for a family dinner, especially when there are children at the table. The meatballs are glazed with a sauce that is both sweet and hot. The sweetness comes from a reduction of apple juice and brown sugar, while the heat, which you can regulate, comes from a sparing use of cayenne pepper. While this dish is inexpensive to prepare, the ingredients needed to make it were too costly for it to be included in our SNAP challenge menus. It is, nonetheless, a bargain meal, so I wanted to include it as a Frugal Friday feature. We are well past the stage where apple juice is stocked in our fridge, but because I use it in my cooking, I do keep juice concentrate in the freezer and measure out the quantity I need to reconstitute for the recipe at hand. It helps control costs and waste and assures I'll always have the juice when I need it. The meatballs are wonderful and should the sweet glaze not be to your liking, they lend themselves to a variety of other sauces. You can have this dish on the table in 30 minutes. I serve it with rice or noodles and a small green salad. I hope you'll give this recipe a try. Here is how the Sweet and Spicy Meatballs are made.

Glazed Sweet and Spicy Meatballs...from the kitchen of One Perfect Bite courtesy of Better Homes and Gardens

Ingredients:
Meatballs
1 egg
1/4 cup milk
2 slices white or whole-wheat bread, torn
1 pound 85% lean ground beef
4 cloves garlic, minced
1/2 teaspoon freshly ground black pepper
1/4 teaspoon salt
1/8 to 1/4 teaspoon cayenne pepper
1 tablespoon vegetable oil
Apple Glaze
1 cup apple juice or pear nectar
1/4 cup reduced-sodium soy sauce
2 to 3 tablespoons packed brown sugar
1-1/2 teaspoons cornstarch
1 teaspoon ground ginger
1/8 to 1/4 teaspoon cayenne pepper
6 green onions, chopped

Directions:
1) For Spicy Meatballs: Whisk egg and milk together in a large bowl. Add bread. Let stand 10 minutes, just until bread is softened. Add beef, garlic, black pepper, salt, and cayenne pepper. Mix thoroughly with hands or wooden spoon. Shape beef mixture into 24 meal-size or 48 appetizer-size meatballs.
2) Heat oil in a 12-inch skillet set over medium heat. Cook meatballs, half at a time, about 6 minutes per batch, turning occasionally until brown and crusty on outside and no longer pink inside. Transfer meatballs to a dish; cover to keep warm. Drain fat from skillet and wipe it out.
3) For Apple Glaze: Combine apple juice, soy sauce, brown sugar, cornstarch, ginger, and cayenne pepper in a small bowl. Pour into skillet in which meatballs were browned. Cook, stirring, until mixture thickens and bubbles. Cook at full boil for about 2 minutes, or until syrupy bubbles form on the surface. Return meatballs to skillet to heat through and coat with sauce. Transfer glazed meatballs a serving dish. Top with green onions. Serve with rice or noodles. Yield: 12 appetizer or 6 dinner servings.


One Year Ago Today: Curried Coconut and Avocado Soup


Two Years Ago Today: Fast and Easy Filipino_Style Adobo Chicken


Three Years Ago Today: Morning Glory Muffins

Saturday, February 2, 2013

Oh, Baby! It's Hot Hot Hot Jalapeno and Bacon Dip


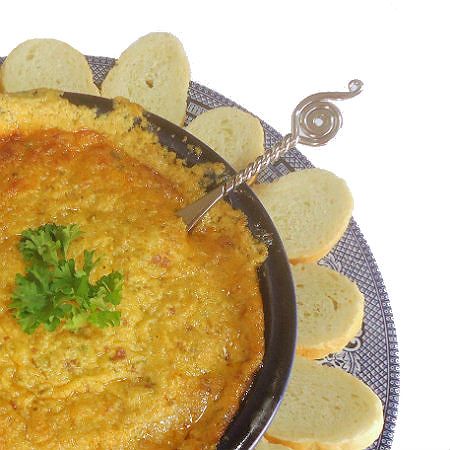
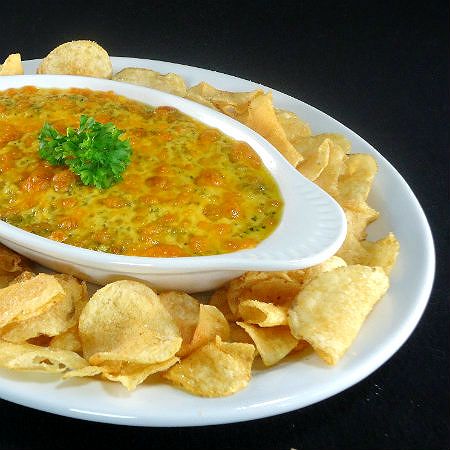
From the kitchen of One Perfect Bite...If your family likes heat, and you can count a teenager or two among those who will watching the game with you on Sunday, I hope you'll give this recipe a try. It defines simplicity and makes enough dip to feed a small country. It also doubles as a fabulous burger topping and it is reputed to cure bunions and cause the planets to align. Now, I'm personally not much into dips. I've made a ton of them over the years because others love them, but my game addictions are fresh hot pretzels or hot dogs on stale buns, even when the game is watched at home. I guess I'm a purist. That means I have to rely on the judgment of others when it comes to rating dips and spreads. Over the years, we've established a base line against which all the dips I make are judged. It pains me to admit this, but the old Knorr Spinach Dip is their hands down favorite and the one against which all others are judged. The dip, found here, is a 50's relic that I suspect most of you have never tasted, but if ever you do, I think you'll better understand how it captured the loyalty of several generations of Americans. At any rate, my crew thinks that tonight's dip is good enough to share the same table with their favorite. It is loaded with bacon and jalapenos and if you like either you'll enjoy the dip. Here is how it is made.

Hot Hot Hot Jalapeno and Bacon Cheese Dip...from the kitchen of One Perfect Bite

Ingredients:
2 (8-ounce) blocks of cream cheese, room temperature
1 cup shredded extra-sharp cheddar cheese
1/2 cup sour cream
1/2 cup mayonnaise
1 tablespoon minced garlic
1 teaspoon smoked paprika
8 strips of crisp cooked bacon, coarsely crumbled + 1 tablespoon bacon drippings
1/2 to 1 (4-ounce) can diced jalapenos

Directions:

Preheat oven to 350 degrees F. Combine cream cheese, cheddar cheese, sour cream, mayonnaise, garlic, paprika and bacon drippings in bowl of a food processor. Pulse until mixture is perfectly smooth. Fold in crumbled bacon. Depending on heat tolerance, fold in 2 to 4 ounces of diced jalapenos. Scrape into a shallow 1-quart baking dish and bake until bubbly and lightly browned, about 20 to 25 minutes. Serve warm with a baguette or pita or tortilla chips. Yield: About 3-1/2 cups.


One Year Ago Today:  Grilled Chicken with Tamarind and Coconut Glaze


Two Years Ago Today: Triple Chocolate Cheese Cake


Three Years Ago Today: Warm Asian Rice Salad

Saturday, January 26, 2013

Super Bowl Hot Vegetable Dip


From the kitchen of One Perfect Bite...I know it is a bit early, but the Super Bowl is next week-end and I wanted to share this recipe with you while there is still time for it to be considered as a new game go-with. I found the recipe on the Whole Foods website and gave it a test run this afternoon. The recipe was simple to begin with, but I made it simpler still, by using pre-packaged ingredients that did away with the need to peel or slice or dice anything at all. The Silver Fox, who is in charge of provisions for the next week or so, came home from the store with a 12-ounce bag of cauliflower florets, a 6-ounce bag of baby spinach and a 12-ounce bag of shredded cheese. That wasn't what I had on the list, but this is one of those occasions where I applaud his independence and take-charge mien. I cooked the cauliflower in the microwave and then threw everything into the bowl of a food processor. Save for wait-time, the whole process took about 5 minutes of my time. I know you all will enjoy this dip, but vegetable lovers will be in heaven. The dip has layered flavors and the only change I made to the original version was to add the juice of a small lemon to the mixture before it was warmed. You'll want to adjust salt and pepper to your own tastes. This is best served with sturdy chips or vegetable sticks. If there is any of the dip remaining after the game, it can be thinned with milk or cream and used to dress pasta. I hope you'll give this recipe a try. It's worth 5 minutes of your time. Here is how the dip is made.

Super Bowl Hot Vegetable Dip...from the kitchen of One Perfect Bite courtesy of Whole Foods

Ingredients:
Florets from 1/2 head cauliflower (about 2-1/2 cups), steamed until very soft and cooled
4 ounces 1/3 less fat cream cheese
1/4 cup mayonnaise
1 fresh jalapeño peppers, seeded and finely chopped
2 cloves garlic, chopped
3/4 teaspoon salt
12 ounces (about 3-1/2 cups) shredded Cheddar-Jack cheese
3 lightly packed cups (about 5 ounces) baby spinach leaves
Optional: Juice of 1 small lemon

Directions:
Heat oven to 375 degrees F. Pulse cauliflower in a food processor until very smooth. Add cream cheese, mayonnaise, jalapeño, garlic, salt and all but 1/2 cup of the cheese shreds and pulse until very smooth. Add spinach and pulse until chopped. Addlemon juice if using. Adjust salt to taste. Scrape into a lightly greased 1-quart ovenproof baking dish or casserole, sprinkle with remaining cheese and bake until hot and bubbling, about 35 minutes.


One Year Ago Today: Crock-Pot: Cuban Pork and Black Beans


Two Years Ago Today: Crock-Pot Pork Posolé


Three Years Ago Today: Mexican Skillet Corn Bread

Saturday, November 10, 2012

Peruvian Causa Rellena


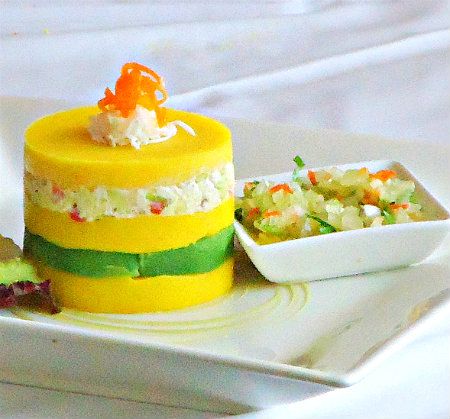
From the kitchen of One Perfect Bite...Peruvian food is amazingly good. It's delicious, fairly easy to make and nearly as colorful as the parrot-like hues worn by the children of the country. One of the first dishes I wanted to share with you is this riveting appetizer that is made from freshly mashed potatoes. It's been estimated that there are over 4000 varieties of potatoes found in Peru, so it should come as no surprise to find that they play a large role in the staple diet of the country. What is surprising is the number of ways in which they are prepared. Tonight's feature, called causa, is served as a starter in Peru. It is a potato terrine that is layered with a mayonnaise based salad and other complimentary ingredients that add color to the dish. Causa, in its most primitive form, was made with potatoes and aji, a yellow pepper that is indigenous to Peru. Oral tradition elevated this humble dish and created a backstory to explain its creation. It's believed that the modern causa was first made by a woman who had to feed a battalion of soldiers intent on celebrating Peruvian Independence day. She had little food on hand, so she created a potato terrine using bits and bobs of what she had in her kitchen.  The key element to a good causa is the quality of the potato that is used to prepare it. In Peru, a potato called papa amarilla is used. I suspect you won't find it in your local market, but the Yukon Gold variety can be used as a substitute and you'll be able to approximate the flavor, if not the color, of the Peruvian variety. The yellow aji chiles that are used in Peruvian kitchens will be even harder to find. Hungarian sweet paprika can be used in its place, though aji chili powder is available online and you can order it here. If you think Peruvian food will appeal to your family and you want to experiment, I urge you to order the real thing. It makes a difference. As strange as the combination of ingredients may sound, causa is delicious and really worth the small effort it takes to make it. I hope you'll give it a try.

Causa Rellena...from the kitchen of One Perfect Bite inspired by Chef Felix

Ingredients:
8 yellow potatoes (about 2 to 3 pounds), peeled
3 fresh yellow chile peppers or 2 tablespoons aji chili powder
2 tablespoons vegetable oil or butter
2 gloves garlic
1/3 cup fresh lime juice
2 boneless skinless chicken breasts
1/2 cup mayonnaise
1 teaspoon prepared mustard
2 ripe avocados
Salt and pepper to taste
Optional garnish:
Hard boiled egg slices
Red pepper strips
Black olive halves
Parsley leaves

Directions:

1) Cook potatoes in salted water until soft. Smoothly mash or rice and set aside.
2) If using fresh chile peppers, remove seeds and membranes and saute peppers and garlic in vegetable oil until softened. Add peppers and lime juice to a food processor or blender and process until smooth. If using chili powder, add it to lime juice and mix well. Stir lime/chile mixture into potatoes. Adjust seasoning, adding salt and pepper to taste.
3) Poach chicken in water seasoned with salt, pepper. Shred the cooked chicken, and mix with
mayonnaise and mustard. Season with salt and pepper to taste.
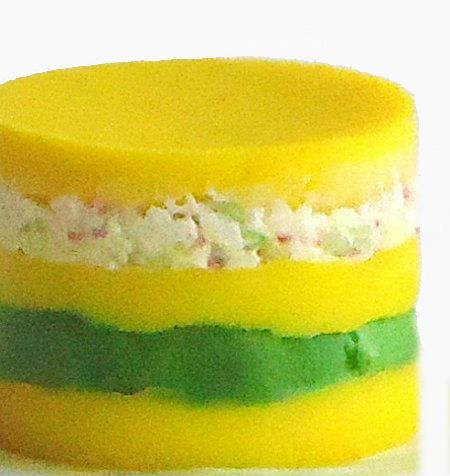
4) Oil 1 large or 6 small ring molds. Using 1/3 of potato mixture, spread a potato layer into bottom of each mold and top with a layer of sliced avocado. Cover with another layer of potato mixture and top with a layer of chicken salad. Finish molds with a final layer of potatoes. Smooth tops, unmold and chill. Garnish before serving. Yield: 6 servings.


One Year Ago Today: Oven Roasted Cauliflower


Two Years Ago Today: Sampling the Colors of India


Three Years Ago Today: Polpettone - Tuscan Stovetop Meatloaf

Thursday, August 2, 2012

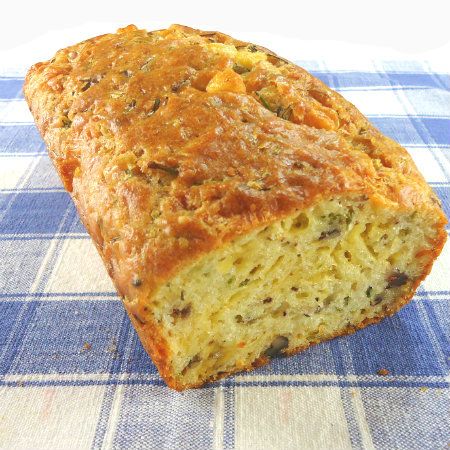
Savory Cheese and Chive Bread


From the kitchen of One Perfect Bite...I was given a copy of Dorie Greenspan's Around My French Table earlier this summer. As soon as it arrived, I curled up on the sofa, and like a child paging through a Christmas catalogue, marked my favorites and plotted the order in which my choices would be tried. The bread I am featuring tonight was on that list. The photo that accompanied the recipe was gorgeous and highlighted a deep gold pebbly crust that was unique and gave the bread an irresistible, come-hither air. I was finally able to make the bread today and I am generally pleased with the result. The bread, which is delicious, does, indeed, have gorgeous color and its aroma will make stomachs start to growl as it wafts through the kitchen and adjoining rooms. I couldn't wait for it to cool enough to slice. It's meant to be served as an appetizer and its cheesy goodness makes it perfect to serve with drinks at an informal gathering. I let the bread sit for 45 minutes before I had my first bite. It had wonderful flavor, but I was unhappy with the appearance of the sliced bread. The surface had holes and tunnels that are usually an indication that a dough has been over-mixed. I knew that was not the case, so I did a search to find other photos of the bread and see what others had come up with. As it turns out, my results were not unique. Most of the breads I found had the same holes and tunnels, so it is probably safe to say they are a characteristic of this bread, probably caused by slow melting cheese. I will, however, give the recipe another try in an attempt to produce a more finely grained loaf. I'll keep you posted if the results are significantly different. I think those of you who try the bread will really like it. It is easy to do and makes an unusual cocktail appetizer. Here's how it is made.

Savory Cheese and Chive Bread...from the kitchen of One Perfect Bite courtesy of Dorie Greenspan

Ingredients:
Unsalted butter, for greasing the pan
1-3/4 cups flour
1 tablespoon baking powder
1/2 to 1 teaspoon salt (depending on what cheese you're using)
1/4 teaspoon freshly ground white pepper (may substitute a pinch of cayenne pepper)
3 large eggs, at room temperature
1/3 cup whole milk, at room temperature
1/3 cup extra-virgin olive oil
1 generous cup (about 4 ounces) coarsely grated Gruyere, Comte Emmental or cheddar cheese
2 ounces Gruyere, Comte, Emmental or cheddar cut into very small cubes (1/2 to 3/4 cup)
1 bunch chives, minced (1/2 cup; may substitute thinly sliced scallions)
1/3 cup walnuts, toasted

Directions:
1) Position a rack in middle of oven; preheat to 350 degrees. Use butter to grease an 8 x 4-1/2 x 2-3/4-inch loaf pan, preferably Pyrex.
2) Whisk flour, baking powder, salt to taste and pepper together in a large bowl.
3) Whisk eggs in a medium bowl for 1 minute, until foamy, then whisk in milk and oil.
4) Pour egg mixture into flour mixture; use a sturdy flexible spatula or wooden spoon to gently mix together until moistened, then stir in grated and cubed cheese, chives and walnuts to form a thick dough. Transfer to loaf pan and spread to make dough even on top. Bake for 35 to 45 minutes or until bread is golden and a slender knife inserted into center comes out clean.
5) Transfer pan to a wire rack to cool for 3 minutes, then run a round-edged knife along edges of pan to loosen loaf. Turn it out and cool right side up before cutting and serving. Yield: 1 loaf.


One Year Ago Today: Stove-Top Barbecued Chicken "Ribs"


Two Years Ago Today: Schnecken

Wednesday, May 30, 2012

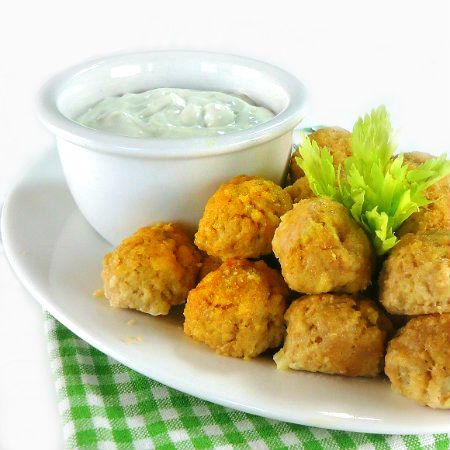
Buffalo Chicken Meat Balls with Blue Cheese Sauce


From the kitchen of One Perfect Bite...If your place is the spot folks gather to watch games or celebrate the holidays, I think you might want to have this recipe in your hopper. Those of you who enjoy Buffalo wings will quickly become fans of these easy to make meat balls that come from The Meatball Shop Cookbook. This is a really simple recipe and there is little that could be added to improve it. I do, however, have a caution to share with those of you who will plan to make these gems for the first time. The amount and type of hot sauce you use to make these is really important. If at all possible, use the Frank's Red Hot Sauce that is called for in this recipe. It adds flavor as well as heat. If you have to use a vinegar based hot sauce, watch the amount of it you use. I've made these meat balls using other sauces and found myself breathing fire. I don't mind heat, but I bristle when it kills my taste buds and the vinegar based sauces will do just that. I do hope you will try these. They are very very nice and I think you will enjoy them. Here's the recipe.

Buffalo Chicken Meat Balls with Blue Cheese Sauce...from the kitchen of One Perfect Bite from the book, THE MEATBALL SHOP COOKBOOK by Daniel Holzman and Michael Chernow

Ingredients:
Meat Balls
2 tablespoons vegetable oil
4 tablespoons (1/2 stick) unsalted butter
1/3 cup Frank's Red Hot Sauce or any other favorite hot sauce
1 pound ground chicken, preferably thigh meat
1 large egg
1/2 celery stalk, minced
3/4 cup bread crumbs
1 teaspoon salt
Sauce
3/4 cup sour cream
1/3 cup crumbled Blue Cheese
1/3 cup whole milk
1/3 cup mayonnaise
1 teaspoon salt or more to taste
1 tablespoon red wine vinegar

Directions:
1) Preheat oven to 450 degrees F. Drizzle vegetable oil into a 9 × 13-inch baking dish and use your hand to evenly coat bottom and sides of pan. Set aside.
2) Combine butter and hot sauce in a small saucepan, and cook over low heat, whisking until butter is melted and fully incorporated. Remove from heat and allow the mixture to cool for 10 minutes.
3) Combine hot sauce mixture, ground chicken, egg, celery, bread crumbs, and salt in a large mixing bowl and mix by hand until thoroughly incorporated.
4) Roll mixture into round, 3/4-inch balls, making sure to pack meat firmly. Place balls in prepared baking dish, being careful to line them up snugly and in even rows vertically and horizontally to form a grid. The meatballs should be touching one another.
5) Roast for 15 to 20 minutes, or until meatballs are firm and cooked through. A meat thermometer inserted into center of a meatball should read 165 degrees F.
6) Allow meatballs to cool for 5 minutes in baking dish before serving.
7) Place sour cream, blue cheese, milk, mayonnaise, salt, and vinegar in a medium bowl and whisk thoroughly until completely combined. Taste and adjust the seasoning, if desired. Yield: 40 3/4-inch meatballs.


One Year Ago Today:  Zucchini Caponata


Two Years Ago Today: Blue Cheese and Onion Burger Topping


Three Years Ago Today: Blueberry and Lemon Tea Biscuits
Related Posts with Thumbnails

Printfriendly