Showing posts with label pie. Show all posts

Sunday, November 24, 2013

Bourbon Pumpkin Tart with Walnut Streusel


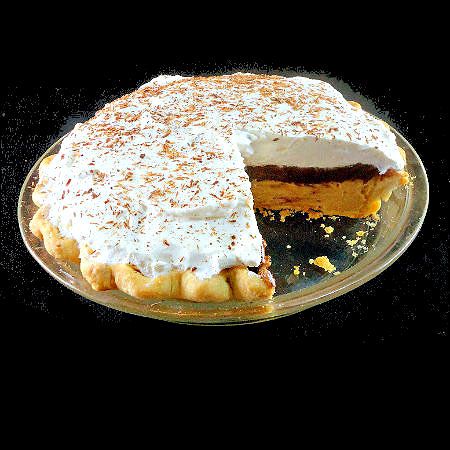
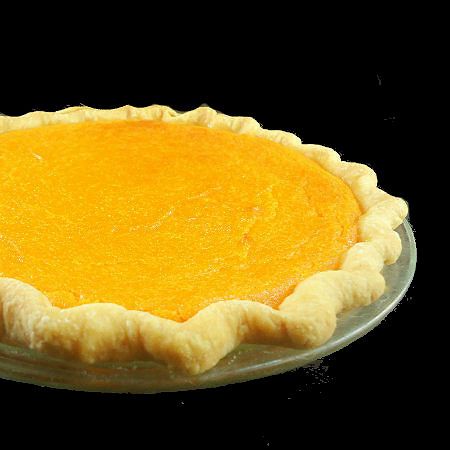
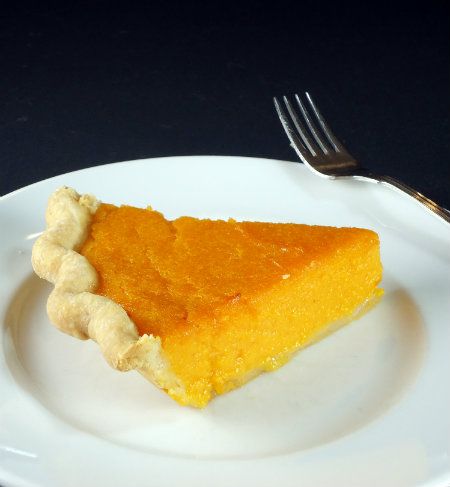
From the kitchen of One Perfect Bite...I've been known to make non-traditional meals for Thanksgiving dinner, but even when I prepare the traditional feast, chances are I'll experiment with variations on some of the classic dishes that usually accompany it. I found this unusual take on pumpkin pie in an old issue of Fine Cooking magazine and as soon as I saw it, I knew I'd have to give it a try. The tart, which has a shortbread-like crust, is filled with a bourbon laced pumpkin custard and topped with a to-die-for walnut streusel. It's easy to make, but the 3 stage preparation and length of the ingredient list can be off-putting to some. Please do not be dissuaded. This is a lovely, slightly more sophisticated version of good ol' pumpkin pie and it will make the socks of pumpkin lovers go up and down. Last year, I returned from Peru with an embarrassing quantity of jungle rum, so I decided to use it, rather than bourbon, to flavor my custard filling. It worked well, but I'm sure bourbon would also be splendid and the two can be used interchangeably. The tart needs time to ripen, so make and refrigerate it the night before you plan to serve it. It can be served warm, at room temperature or slightly chilled. It begs to be served with lightly whipped cream or a small scoop of really good vanilla ice cream. I do hope you'll try this tart. Those of you who do will not be disappointed. Here is how it is made.


Bourbon Pumpkin Tart with Walnut Streusel Topping...from the kitchen of One Perfect Bite courtesy of Fine Cooking magazine

Ingredients:
Crust
2 cups all-purpose flour
1/3 cup sugar
1 teaspoon grated orange peel
1/2 teaspoon salt
2/3 cup cold butter, cubed
1 large egg, lightly beaten
1/4 cup heavy whipping cream
Filling
1 can (15 ounces) solid-pack pumpkin
3 eggs
1/2 cup sugar
1/2 cup heavy whipping cream
1/4 cup packed brown sugar
1/4 cup bourbon
2 tablespoons all-purpose flour
1 teaspoon ground cinnamon
1 teaspoon ground ginger
1/4 teaspoon salt
1/4 teaspoon ground cloves
Streusel Topping
3/4 cup all-purpose flour
1/3 cup sugar
1/3 cup packed brown sugar
1/2 teaspoon salt
1/2 teaspoon ground cinnamon
1/2 cup cold butter, cubed
3/4 cup coarsely chopped walnuts, toasted
1/4 cup chopped crystallized ginger

Directions:
1) To make crust: Combine flour, sugar, orange peel and salt in a large bowl. Cut in butter until crumbly. Add egg. Gradually add cream, tossing with a fork until a ball forms. Cover and refrigerate for at least 30 minutes or until easy to handle. On a lightly floured surface, roll out pastry into a 13-in. circle. Press onto the bottom and up the sides of an ungreased 11-in. fluted tart pan with removable bottom. Set aside.
2) Preheat oven to 350 degrees F.
3) To make filling: Combine all filling ingredients in a large bowl. Mix well. Pour into crust.
4) To make streusel topping: Combine flour, sugar, brown sugar, salt and cinnamon in a medium bowl. Cut in butter until crumbly. Stir in walnuts and ginger. Sprinkle over filling.
5) Bake for 50-65 minutes or until a knife inserted near center comes out clean. Cool on a wire rack. Refrigerate leftovers.
Yield: 14 servings.


Follow Me on Pinterest      

                                                    Older Posts


                  One Year Ago Today:                                                           Two Years Ago Today:
             Sour Dough Bread Stuffing                                                               Pumpkin Latte                  


         Three Years Ago Today:                                                           Four Years Ago Today: 
    Salisbury Steak with Onion Gravy                                                  Coffee Twist - Three Ways

Tuesday, October 15, 2013

Family-Style Sweet and Salty Peanut Buttter Pie


From the kitchen of One Perfect Bite...I have a real weakness for desserts that are made with peanut butter, so, when this gem appeared in Food and Wine magazine I knew it was only a matter of time before it graced my table. I made the pie for my family today and it was so good that, despite having made it just this once, I'm comfortable sharing it with you tonight. If you like peanut butter and are occasionally willing to flirt with wretched excess, you are going to love this pie. I must admit that necessity forced me to use whipped topping rather than heavy cream as an ingredient, but the pie was delicious nonetheless. If you want clean slices, I suggest you freeze the pie for an hour or so before you cut it. Once it is cut, it can be refrigerated until you are ready to serve it. If appearances are not important to you, give everyone a spoon and let them dig in. This is a very informal dessert, so it is best kept for family and close friends who no longer need to be impressed. I do hope you'll try this. I suspect it will be a case of "once bitten". Here is how the pie is made.


Sweet and Salty Peanut Butter Pie...from the kitchen of One Perfect Bite courtesy of Food and Wine magazine

Ingredients:
8 ounces peanut butter sandwich cookies, such as Nutter Butters
Salt
4 tablespoons unsalted butter, melted
1/2 cup creamy peanut butter
4 ounces cream cheese, at room temperature
1/2 cup plus 2 tablespoons confectioners' sugar
1-3/4 cups heavy cream
1 teaspoon pure vanilla extract
1/4 cup salted roasted peanuts, coarsely chopped

Directions:

1) Preheat oven to 350 degrees F. In a food processor, pulse cookies with 1/4 teaspoon of salt until finely ground. Scrape cookies into a 9-inch pie plate. Stir in melted butter, 1/2 tablespoon at a time, until crumbs have texture of wet sand; you may not need to use all of the butter. Using your fingers, press crumbs evenly over bottom and up the side of pie plate. Freeze crust for 15 minutes.
2) Bake crust for about 10 minutes, until lightly golden. Let cool on a rack.
3) In a medium bowl, combine peanut butter with cream cheese, 1/2 cup of sugar and 1/4 teaspoon of salt and mix until thoroughly blended.
4) In another bowl, whip 3/4 cup of heavy cream until stiff. Whisk whipped cream into peanut butter mixture. Spread peanut butter filling in crust in an even layer. Refrigerate until chilled, about 30 minutes.
5) In same whipped-cream bowl, whip remaining 1 cup of heavy cream and 2 tablespoons of sugar with vanilla until stiff. Spread whipped cream over pie. Sprinkle pie with chopped peanuts, cut into slices and serve. Yield: 8 servings.

If you have enjoyed your visit here, I hope you'll take a minute to...

Follow Me on Pinterest      


One Year Ago Today: Sweet Potato Bread with Streusel


Two Years Ago Today: Banana and Carrot Muffins


Three Years Ago Today: Toasted Coconut Bread


Four Years Ago Today: Pumpkin Cake

Sunday, October 13, 2013

Apple and Apricot Pie with Streusel Topping


From the kitchen of One Perfect Bite...This is a dessert for apple lovers who want to spread their wings. The addition of dried apricots adds a hint of tartness that helps to balance the sweetness of the apples and the streusel topping that are used in the pie. This is not a sweet dessert. I suspect that those of you who are fond of barely sweet European pastries will enjoy this, but if you crave sweets you'll probably be happier with an old-fashioned apple pie. This is an easy pastry to make, but the streusel topping is not the type you fling over a filling. It is more cake-like and must be chilled before it is pinched into small pieces that are used to cover the apple and apricot mixture. I cut my apples into 12 segments and I've found that that is a perfect thickness for the slices used in this pie. At the end of an hours baking, they'll be fork tender and juicy but will still retain their shape. I do hope you'll give this recipe a try. If you are not so inclined, I hope you'll at least throw some dried apricots into your favorite apple pie and see what transpires. In the meantime, here are the instructions for this pie.

Apple and Apricot Pie with Streusel Topping...from the kitchen of One Perfect Bite

Ingredients:
Pastry for single crust pie
Crumb Topping 
6 tablespoons butter, room temperature
1/4 cup firmly packed golden brown sugar
1 egg white, lightly beaten
1/2 teaspoon almond extract
3/4 cup all-purpose flour
1/4 teaspoon kosher salt
1 tablespoon all-purpose flour, plus more for rolling
Filling
5 large apples (2-1/2 pounds), such as Granny Smith— peeled, cored, quartered and thickly sliced
1/2 cup sugar
1/2 cup diced dried apricots (2-1/2 ounces)
1 teaspoon finely grated orange zest
1 teaspoon ground cinnamon
1 tablespoon flour
1 tablespoon cold unsalted butter, cut into small dice

Directions:

1) Roll pastry to fit a 9-inch pie or quiche pan. Refrigerate until ready to fill. Preheat oven to 425 degrees F.
2) To make streusel: Combine butter and sugar in a small bowl. Blend with a fork until creamy. Mix in egg white and almond extract and stir until incorporated. Sift flour and salt into butter mixture and stir to combine. Refrigerate for at least 30 minutes.
3) To make filling: In a bowl, toss apples with sugar and apricots, zest, cinnamon and 1 tablespoon of flour. Scrape apples into pie shell and dot with butter. Crumble topping over apples leaving some fruit showing so steam can escape as pie bakes.
4) Bake pie in lower third of oven for 10 minutes, then reduce temperature to 400 degrees F. and bake until topping is nicely browned and filling is bubbling slightly, about 1 hour. If topping becomes too dark, cover with foil during last 20 minutes of baking. Let pie cool completely before serving. Yield: 8 servings.

If you have enjoyed your visit here, I hope you'll take a minute to...

Follow Me on Pinterest      


One Year Ago Today: Stir-Fried Broccoli with Ginger and Garlic


Two Years Ago Today: Rhubarb and Raspberry Swirl Brunch Cake


Three years Ago Today: Apple Cider Quatre Quarts Pound Cake


Four Years Ago Today: Cranberry Dressing

Sunday, April 7, 2013

Catskill's Chocolate Mousse Pie


From the kitchen of One Perfect Bite...The pie I'm featuring tonight served as a trial run for one that was sold at a pie auction yesterday. If you are curious to know what it sold for, stop by my Facebook page. The Silver Fox, who at his best, was never a candidate for the diplomatic corp, took one look at it and promptly dubbed my lovely creation, Borscht Belt Chocolate Pie. For those unfamiliar with that reference, the Borscht Belt was a resort area in the Catskill Mountains that was frequented by predominately Jewish guests who came from the NYC area to escape the heat and vacation in the crisp mountain air. In their hay day, the resorts were famous for entertainment and the copious quantities of food they provided for their guests. It is a virtual certainty that creamy pies, similar to this one, were found on dessert tables in the hotel dining rooms. While it is, admittedly, a study in wretched excess, this rich pie is delicious and I think that most of you will enjoy it, especially if you have the discipline to regulate your portion size. It consists of a pie crust that is covered with chocolate wafer crumbs and then filled with a truly delicious mousse that is topped with a mountain of whipped cream fraiche and chocolate curls. The whipped topping is unsweetened and it adds a lovely nutty tang that helps balance the richness of the mousse and cream. I found the recipe for this creation last summer in Bon Appetit magazine. The recipe that appears below is theirs and does not reflect the changes I made to the auctioned pie. To make the pie a bit more attractive, I baked the final version in a high-sided tart pan that was lined with a chocolate crumb crust rather than short pastry. I also added plain gelatin and a bit of white creme de cocoa to the topping to stabilize it and add a bit more flavor. This pie needs to sit for at least 24 hours before it is sliced. As a matter of fact, I recommend freezing it and slicing it while frozen if you want clean slices. This is not a hard dessert to make if you break it into segments, but do be forewarned, it is time consuming. If you like rich creamy desserts I think you'll love this pie. Here is how it is made.


Chocolate Mousse Pie...from the kitchen of One Perfect Bite courtesy of Bon Appetit magazine

Ingredients:
1 pie crust, homemade or store-bought
4 large egg whites
3/4 cup + 3 tablespoons sugar
10 ounces semisweet or bittersweet chocolate (do not exceed 71% cacao), chopped, plus more shaved with a vegetable peeler for garnish
3 tablespoons unsalted butter
4 cups heavy cream, divided
1 cup coarsely crushed chocolate wafer cookies (such as Nabisco Famous Chocolate Wafers), divided
1/2 cup crème fraîche
1/8 teaspoon kosher salt

Directions:
1) Preheat oven to 350 degrees F. Line pie dish with crust; crimp edges decoratively. Fully bake pie crust according to recipe or box instructions. Let cool completely.
2) Whisk egg whites and sugar in a medium heatproof bowl set over a medium saucepan of simmering water until sugar dissolves and egg whites are warm but not hot, 3–4 minutes. Remove from heat. Using an electric mixer, beat on medium-high speed until cool, tripled in volume, and stiff peaks form (the tips of the peaks won't fall over when beaters are lifted from bowl and turned upright), about 6 minutes.
3) Stir chopped chocolate and butter in a large bowl set over same saucepan of simmering water until melted and smooth, 4–5 minutes; set aside.
4) Beat 2 cups cream in another medium bowl until medium peaks form (cream should be soft and pillowy), 5–6 minutes.
5) Gently fold egg whites into warm chocolate mixture until fully incorporated (work quickly to prevent chocolate from turning gritty). Gently fold in whipped cream just until no white streaks remain; do not overmix or mixture will deflate. Spoon 1/2 cup chocolate mousse into bottom of prepared pie crust; spread evenly over bottom of crust. Sprinkle 3/4 cup plus 2 tablespoons crushed chocolate wafers over mousse. Top with remaining mousse, mounding in the center to create a dome. (The point is to add height, not to spread out evenly to edges.) Chill pie.
6) Beat remaining 2 cups cream, crème fraîche, and salt until medium-stiff peaks form (when the beaters are lifted from the cream, the peaks will hold their shape but the tips will fall over). Top chocolate mousse with whipped-cream mixture, following the same rounded dome shape. Chill pie for at least 4 hours or, covered, for up to 3 days. (It will slice best if chilled overnight, allowing mousse to set properly.)
7) Garnish pie with 2 tablespoons chocolate wafers and chocolate shavings. Slice pie using a clean, dry knife; wipe between slices to ensure clean, elegant pieces. Yield: 10 servings.


One Year Ago Today: Stir-Fried Tofu with Bok Choy


Two Years Ago Today: National Coffeecake Day - A Retrospective


Three Years Ago Today: Cheesy Orzo Pilaf


Four Years Ago Today: Maple Nut Chiffon Cake

Wednesday, March 20, 2013

Sweet Easter Pie


From the kitchen of One Perfect Bite...There are some foods and beverages that are acquired tastes. Martinis and haggis come to mind and I suspect the pie I'm featuring tonight might be on that list as well. Pastiera is a wheat and ricotta pie that is part of the Italian Easter tradition. It is made with grano cotto, a cooked wheat product that is sold in cans in older Italian markets. The goopy mass of cooked wheat is mixed with a bit of sugar, fresh ricotta cheese and orange water then poured into a pie shell for baking. Back in the day, the pie was an integral part of the Easter meal in Italian homes, though I'm sure there were some at the table who would have preferred a coconut lamb cake. I had a forkful of the pie when I was six years old, and despite my love of all things Italian, it never crossed my lips again. As I initially said, this is an acquired taste and I suspect some of you are wondering why I am even mentioning the pastiera tonight. As it happens, I have a friend who was passing through a bad stretch a few years ago. She had fond memories of the pastiera, so I took it upon myself to bake for her and lift her spirits with the Easter pie. I was unable to find grano cotto, so I used soaked barley instead. My first effort was an unmitigated failure, so I began to look for other ways to make the pie. I knew that wheat was used because it symbolizes resurrection, but symbolism aside, without the proper form of wheat, I had no chance of success. In the course of my search, I found recipes that used rice, rather than wheat to make the pie. Both Mary Ann Esposito and Giada De Laurentis used rice, but I decided to use Giada's recipe because it was easier and used phyllo sheets to make a leafy crust for a custard that was much like rice pudding. The finished pie was beautiful. If you'd like to see Giada make the pie, a video can be found here. I do have a caution to share with those of you who decide to make this pie. Taste the custard filling as you go along. Keep the vanilla bottle nearby and don't be afraid to use more sugar. I still make this pie for my friend who asks for it each year. Never doubt that memory trumps the palate. Now for those of you who are brave enough to try a real pastiera, I'd like to recommend the one that is made my friend Claudia, who has a recipe for the pie on her blog, Journey of An Italian Cook, which you can find here. The recipe below is the one I used to make my friend's Easter pie.

Sweet Easter Pie...from the kitchen of One Perfect Bite courtesy of Giada De Laurentis

Ingredients:
3/4 to 1 cup powdered sugar, plus extra for garnish
3 large eggs
2 teaspoons pure vanilla extract
1 tablespoon orange zest
1 (15-ounce) container whole milk ricotta cheese
1/2 cup cooked short-grained rice
1/3 cup toasted pine nuts
6 sheets fresh phyllo sheets or frozen, thawed
3/4 stick (3 ounces) unsalted butter, melted

Directions:
1) Blend 3/4 to 1 cup  powdered sugar, eggs, vanilla, orange zest and ricotta in a food processor until smooth. Stir in rice and pine nuts. Set ricotta mixture aside.
2) Preheat oven to 375 degrees F.
3) Lightly butter a 9-inch glass pie dish. Lay 1 phyllo sheet over  bottom and up  sides of the dish, allowing  phyllo to hang over  sides. Brush the phyllo, including the drooping sides  with  melted butter. Top with a second sheet of phyllo dough, laying it in  opposite direction as the first phyllo sheet. Continue layering remaining sheets of phyllo sheets, alternating after each layer and buttering each sheet. Spoon  ricotta mixture into the dish. Fold  overhanging phyllo dough over  top of filling to enclose it completely. Brush completely with melted butter.
4) Bake  pie until phyllo is golden brown and the filling is set, about 35 minutes. Transfer pan to a rack and cool completely. Sift powdered sugar over the pie and serve. Yield: 8 servings.


One year Ago Today: Tom  Yum Goong - Hot and Sour Lemongrass  Soup


Two Years Ago Today: Spicy Peanut Noodles for Blog Insert


Three Years Ago Today: Ciambellone - Italian Easter Bread


Four Years Ago Today: Key Lime Sherbet

Sunday, January 27, 2013

Chocolate and Peanut Butter Puddin' Pie


From the kitchen of One Perfect Bite...This is a wonderful family treat. We don't have it often because it is so rich and calorie laden, but my gang really enjoys it when I make it for them. I originally found the recipe for the pie in Saveur magazine. While I've made changes to it over time, the base recipe is still theirs. I no longer use the pie crust that was part of the original recipe because I found it to be tough. This sometimes happens   with an all-butter crust. Butter crusts tend to be crisper and less tender than ones made with a mixture of butter and shortening. Shortening is 100% fat, while butter consists of  20% water and 80% fat. The higher amount of fat in shortening results in a more tender crust because fat tenderizes by coating flour particles so that gluten can't form, and by trapping air between flour molecules to give the crust a layering or flakey effect. This really is not a difficult dessert to make, especially if you use  a commercially prepared crust as a starter. This dessert is so rich that you'll never miss the  butter crust.The filling is a peanut butter mousse that is topped with a chocolate pudding. It's probably best that we not speak of the whipped cream topping as it  could cost me my reputation for nutritional awareness. Obviously, the cream could be replaced with a whipped topping, but if you're going to make something so awfully wonderful it doesn't pay to stint. Have a small piece less often and enjoy it. If you love the chocolate and peanut butter you will really enjoy this pie. Here is how it is made. 

Chocolate and Peanut Butter Puddin' Pie
...from the kitchen of One Perfect Bite inspired by Saveur magazine

Ingredients:

Crust
1-1/4 cups all-purpose flour
1/2 teaspoon kosher salt
1 tablespoon granulated sugar
6 tablespoons chilled unsalted butter, cut into 1/4-inch pieces
4 tablespoons chilled vegetable shortening
3 to 4 tablespoons ice water
Topping
2 cups heavy cream
2 tablespoons sugar
1 teaspoon vanilla extract
Filling
3/4 cup smooth peanut butter
8 ounces semisweet chocolate, chopped
1/2 teaspoon kosher salt
1 cup light brown sugar
1/4 cup cornstarch
4 egg yolks
2 cups milk
2 tablespoons butter
1 tablespoon vanilla

Directions:

1) Mix flour, salt and sugar in bowl of food processor fitted with steel blade. Scatter butter pieces over flour. Cut butter into flour with five 1-second pulses. Add shortening and continue pulsing until flour is pale yellow and resembles coarse corn meal, with butter bits no larger than small peas, about 4 more 1-second pulses. Turn mixture into medium bowl. Sprinkle 3 tablespoons ice water over mixture. With blade of a rubber spatula, use folding motion to mix. Press down on dough with broad side of spatula until dough sticks together, adding up to 1 tablespoon more ice water if dough will not come together. Shape dough into ball with your hands, then flatten into a 4-inch-wide disk. Dust lightly with flour and wrap in plastic. Refrigerate 1 hour before rolling.
2) Preheat oven to 425 degrees F. Roll dough 1/8-inch thick on a floured surface. Transfer to a 9-inch pie plate, trim edges, prick with a fork. Cover with parchment; fill with dried beans. Bake for 20 minutes. Remove paper and beans and bake until golden brown, 10–12 minutes. Let cool.
3) To make topping: Whisk together cream, sugar, and 1 teaspoon vanilla to stiff peaks. Set aside.
4) Place peanut butter and chocolate in separate bowls. In a 4-quart saucepan, whisk together 1/2 teaspoon salt, brown sugar, cornstarch, yolks, and milk. Bring to a simmer over medium heat, cooking until custard thickens, about 2–3 minutes. Remove from heat and whisk in butter and vanilla. Mixture will be lumpy. Strain through a sieve, and divide custard evenly between peanut butter and chocolate, whisking each mixture until smooth. Fold half of whipped cream into peanut butter, then spread evenly in pie crust and chill for 20 minutes. Spread chocolate over top and chill until set, at least 45 minutes. Spread remaining whipped cream over pie. Yield: 8 to 10 servings.


One Year Ago Today: Roasted Cauliflower with Golden Raisins and Pine Nuts


Two Years Ago Today: Mexican Chocolate Brownies


Three Years Ago Today: Magyar Gulyas

Thursday, December 6, 2012

Treacle Tart


From the kitchen of One Perfect Bite...Many of my Christmas memories are associated with friends and the holiday foods they favored and shared with me. At this time of year, I make as many of those dishes as I can, and while I have never grown to like it, I continue to make Lily's treacle tart because it comes served with warm and lovely memories. For those who have never tried the tart, it's a traditional English pie, much loved by Harry Potter and the gang at Hogwarts, that's baked with a thick filling of bread crumbs, lemon juice and golden syrup. Golden syrup, which is also called light treacle, is the color of honey and tastes like sugar that's cooked to a medium caramel stage. While it pours like corn syrup, any similarity between the two syrups stops there.  Corn syrup, while sweet, has almost no flavor, so the two can't be used interchangeably.  I think treacle tart is an acquired taste for those born outside the United Kingdom. The filling is intensely sweet and while it is a favorite dessert across the pond, it does take some getting use to. Lily loved it and insisted it helped balance her tart tongue. I loved Lil and make this every Christmas in her memory. Who knows, one of these days I may even grow to like it. Here's how the tart is made.

Treacle Tart...from the kitchen of One Perfect Bite courtesy of Saveur magazine

Ingredients:
1-1/2 cups flour
8 tablespoons unsalted butter, cubed and chilled, divided use
1/2 teaspoon kosher salt, divided use
1 cup Lyle's golden syrup or molasses
6 tablespoons bread crumbs
3 tablespoons heavy cream
1 egg, lightly beaten
Zest of 1 lemon
Whipped cream, for serving

Directions:

1. To make pastry shell: Place flour, 6 tablespoons butter, and 1/4 teaspoon salt in a bowl. Rub flour and butter together until pea-size crumbles form. Add 1/4 cup ice-cold water and stir until dough forms. Transfer to a work surface and form into a flat disk. Wrap in plastic wrap and chill for 1 hour.
2) To make filling: Meanwhile, heat syrup in a 2-quart saucepan over medium heat until loose. Remove from heat and stir in reserved 2 tablespoons butter, 1/4 teaspoon salt, bread crumbs, cream, egg, and zest. Set filling aside.
3) Heat oven to 375 degrees F. Using a rolling pin, roll dough into an 11″ circle and transfer to a 9-inch fluted tart pan with a removable bottom. Trim excess dough and chill shell for 30 minutes. Prick bottom with a fork and cover with a sheet of parchment paper. Fill with dried beans and bake until crust is set, about 20 minutes. Remove paper and beans and bake until light brown, about 10 minutes. Pour filling into tart shell and bake until filling is just set, about 30 minutes. Yield: 8 servings.


One Year Ago Today: Peppermint Bark


Two Years Ago Today: Broccoli and Cheddar Cheese Soup


Three Years Ago Today: Meatball Sub with Homemade Sicilian Sausage


Friday, November 23, 2012

Maple-Walnut Tart


From the kitchen of One Perfect Bite......and then a miracle occurred. Everything got to the table on time and I didn't cuss even once in the process. I have pictures and recipes that I'll be sharing with you next week because this was a meal that would work as well for Christmas as it did for Thanksgiving. Today's tart is a riff on pecan pie that I found in Fine Cooking magazine. It is a rich and delicious creation and it was the first of the desserts to disappear from the table. The recipe seems long, but the tart is not actually difficult to make. While the tart crust described in the recipe is lovely, a commercial pie shell would make short work of this dessert without harming the finished tart. If you like maple flavored desserts, do give this one a try. It is delicious. Quite rich, but delicious nonetheless. Here's how it is made.

Maple-Walnut Tart...from the kitchen of One Perfect Bite courtesy of Fine Cooking magazine

Ingredients:
Pie Crust
1-3/4 cups unbleached all-purpose flour + more for rolling
1 tablespoon granulated sugar
1/2 teaspoon kosher salt
3/4 cup unsalted butter, cut into 24 small pieces and frozen
1 large egg yolk
1/4 teaspoon fresh lemon juice
3 to 4 tablespoons ice water
Cooking spray
Filling
2 large eggs
3 large egg yolks
1 teaspoon pure maple extract
1/2 teaspoon pure vanilla extract
1/4 teaspoon kosher salt
1 cup pure maple syrup
3/4 cup granulated sugar
5 tablespoons unsalted butter
2 cups chopped walnuts, toasted

Directions:
1) To make pie crust: Pulse flour, sugar, and salt in a food processor once or twice to combine. Add butter and pulse until mixture is pebbly, with some pea-size bits of butter.
    Whisk egg yolks, lemon juice and 3 tablespoons of ice water together in a small bowl. Pour mixture through feed tube of food processor, pulsing to combine. Dough mixture should be moist but should not come together into a ball. If a small handful of dough pressed together does not adhere, add remaining 1 tablespoon ice water and pulse to combine.
    Turn dough mixture onto a piece of plastic wrap. Gather plastic around dough and press dough into a disk. Wrap tightly in additional plastic wrap and refrigerate for at least 1 hour and up to 2 days.
2) To roll crust: Let dough stand at room temperature for about 15 minutes to become pliable before rolling. Lightly coat a rolling pin with flour and roll  dough on a lightly floured surface into a 15-inch circle. Lightly coat a round 9-1/2 x 1-inch fluted metal tart pan with a removable bottom with cooking spray. Roll dough around rolling pin and carefully unroll over tart pan. Gently press it into bottom and up  sides of  pan without stretching. Trim excess, leaving a 1-inch overhang. Fold overhang inside  tart and press against sides to make a double wall about 1/4 inch higher than  tart pan (this will offset any shrinkage during baking). Wrap tart shell in plastic wrap and refrigerate for at least 30 minutes and up to 24 hours.
    Position a rack in lower third of oven and heat the oven to 425 degrees F. Line tart shell with parchment and add enough beans or pie weights to fill shell. Bake on a heavy-duty rimmed baking sheet until  edges are firm and starting to brown, 15 to 20 minutes. Carefully lift parchment and weights from tart shell. Continue to bake until bottom of the shell is pale golden, 5 to 7 minutes more. Let cool on  baking sheet on a rack and reduce oven temperature to 350 degrees F.
3) To make filling: In a medium bowl, whisk together eggs, yolks, maple and vanilla extracts, and salt. Set aside.
     In a 2-quart saucepan, combine maple syrup and sugar and cook over medium-high heat, stirring constantly until sugar is dissolved and mixture just starts to boil, about 3 minutes. Reduce heat to medium and add butter, stirring until melted. Remove from heat and let cool for 1 minute.
    Slowly whisk warm syrup into egg mixture, drizzling it in about 1/4 cup at a time and whisking continuously to prevent hot syrup from cooking eggs.
4) To fill and bake tart: Fill tart shell with chopped walnuts. Carefully ladle filling over walnuts to within 1/4 inch of  rim (do not overfill; there may be a little filling left over). Bake tart until it is just set in the center, 30 to 40 minutes (if crust is golden-brown before filling is set, cover edges loosely with foil). Cool completely on the baking sheet on a rack.
    Carefully remove tart rim. Slide a long, flat spatula between  pastry and the pan bottom and transfer tart to a serving platter. Yield: 8 to 10 servings.


One Year Ago Today: Pumpkin Latte


Two Years Ago Today: Coconut Bubble Bread


Three Years Ago Today: Puff Pastry Pillows with Blue Cheese Filling

Tuesday, November 20, 2012

Sweet Potato Pie


From the kitchen of One Perfect Bite...I have a confession to make. I had never made or tasted a sweet potato pie until this evening. We are pumpkin people and the similarity between the two types of pie assured that the one made with sweet potatoes would be given short shrift. That changed when I paged through the October special collectors issue of Saveur magazine. It featured 101 of the 150 classic recipes that had been chosen to celebrate publication of the magazine's 150th issue. I love this magazine, and, as I read through the recipes they had chosen, I made a mental commitment to make every recipe in the special issue. My original plan was to start the effort in January, but when I saw the vibrant color of this sweet potato pie I knew I had to move up my time table and include it as part of our holiday dinner. The pie was created by Mrs.Bonner who owned a cafe in Crawfordville, Georgia. As I understand it, this was the only dessert she served and somehow in their travels, Jane and Michael Stern, authors of Roadfood.com, stumbled on the cafe and were attracted to the bright color of the pie. They sampled it and liked it so much that they begged for the recipe, and, proving yet again, that good things come to those who wait, they finally were given a copy. They attribute the color of the pie to the use of boiled, rather than baked, sweet potatoes. The fact that no spices are added to the custard probably helps as well. Those of you who love sweet desserts will be in heaven. It is delicious. This is very easy to prepare and it makes a perfect holiday dessert. I hope you will give it a try. Here's how this version of sweet potato pie is made.

Sweet Potato Pie...from the kitchen of One Perfect Bite courtesy of Jane and Michael Stern and Saveur magazine

Ingredients:

1-3/4 cups flour
8 tablespoons unsalted butter, cubed and chilled, plus 8 tablespoons melted and cooled
1 teaspoon kosher salt
2 cups boiled and mashed sweet potatoes
1 cup sugar
1/2 cup evaporated milk
1 teaspoon vanilla extract
2 eggs, lightly beaten

Directions:

1) Place flour, 8 tablespoons chilled butter, and 1/2 teaspoon salt in a food processor, and pulse until pea-size crumbles form. Add 1/4 cup ice-cold water; pulse until dough forms. Form dough into a ball and transfer to floured work surface; form into a disk. Wrap in plastic wrap and refrigerate for 1 hour.
2) Heat oven to 375 degrees F. In a bowl, whisk together 8 tablespoons melted butter and salt, sweet potatoes, sugar, milk, vanilla, and eggs until smooth; set filling aside.
3) Unwrap dough and transfer to a floured work surface. Using a rolling pin, roll until 1/8-inch thick. Transfer to a 9-inch pie pan and trim excess dough from edges. Crimp edges with a fork or your fingers. Pour filling over crust and smooth top with a rubber spatula. Bake until crust is lightly browned and filling is set, about 1 hour. Let cool completely before serving. Y
Yield: 8 servings.


One Year Ago Today: Cider Brined Pork Loin


Two Years Ago Today: Nankhatai for Diwali


Three Years Ago Today: Portuguese-Style Turkey Soup with Linguica, Potatoes and Kale
Related Posts with Thumbnails

Printfriendly