Wednesday, July 24, 2013

Sesame Noodles for a Crowd


From the kitchen of One Perfect Bite...Hail, hail the gang's all here - what the heck do we eat now? Something fast and simple with a final caveat that it must be delicious and worthy of a family feast. It took me years to learn to cook for two once the children had left home. Now that we are vacationing together, the coin is flipped and I have to pull recipes from mothballs or scramble to find new ones that can be scaled to feed the hungry horde. I had some help from Ree Drummond this year. I'd been eyeing her recipe for sesame noodles and decided to serve them as a side on the night I was responsible for dinner. I doubled her already large recipe and served the noodles with an Asian salad and Korean barbecued chicken. It was a great meal, thanks in part to her very simple recipe for those noodles. When I make this dish I use Chinese egg noodles rather than spaghetti. I packed the noodles in my luggage on the off chance that they would not be available on Cape Cod. It was a wise call. If you are unfamiliar with these noodles and decide to try them, be aware that they are not cooked in the same way as Italian pasta and it is imperative that you follow the manufacturer's directions for cooking them. While the noodles need a bit of time to cool, they can be made in 15 effortless minutes and I think you will love them. They are perfect for buffets, barbecues and picnics and should there be any leftovers, they will keep well for several days. The only caution I want to share with you, is the importance of saucing the noodles while they are hot and able to absorb all the lovely flavors swimming in the sauce. If you have never used Chinese hot chili oil, proceed with caution and add it in increments rather than in one fell swoop. It is hot, hot, hot and while you can always add more, you can't back out heat once it has been added.I hope you will try the noodles this summer. Here is how they are made.

Sesame Noodles for a Crowd...from the kitchen of One Perfect Bite inspired by Ree Drummond

Ingredients:
2 (16-oz. each) packages thin Chinese egg noodles or Italian capellini, cooked and drained per manufacturer's directions
1/2 cup soy sauce
1/4 cup sugar
2-1/2 tablespoons minced garlic
1/4 cup rice vinegar
1/3 cup dark sesame oil
1 teaspoon red hot chili oil or red pepper flakes
1/2 cup canola oil
1 bunch scallions, thinly sliced

Directions:
1) Combine soy sauce, sugar, garlic, rice vinegar, sesame oil, canola oil and chili oil in a large bowl and whisk until smooth. Adjust ingredients to taste.
2) Cook noodles per package directions, drain and add to sauce while still warm. Toss noodles with sauce to coat thoroughly. Sprinkle with scallions and toss again. Serve warm or at room temperature. Yield: 16 servings.

If you have enjoyed your visit here, I hope you'll take a minute to...

Follow Me on Pinterest      


One Year Ago Today: Lemon-Glazed Blueberry Bread


Two Years Ago Today: Milk Chocolate Bundt Cake


Three Years Ago Today: Watermelon Smoothie


Four Years Ago Today: Jewel-Toned Buttermilk Tarts

Tuesday, July 23, 2013

New England-Style Blueberry and Apple Pandowdy


From the kitchen of One Perfect Bite...We are home again, a bit jet-lagged, several pounds heavier and brimming with a trove of memories that rival the weight of Midas' gold. The two munchkins you see above managed to keep us all entertained with their curiosity, good natures, and general love of silliness. You can imagine the giggles that erupted when they learned there was a dessert called a pandowdy. They quickly put the word to their own use and their latest epithet is pandowdy do-do head. I suspect our Pilgrim forefather's are rolling in their graves with each utterance of the new curse.


A pandowdy is a fruit dessert that is sweetened with maple syrup and topped with a layer of pie crust, biscuit dough or a mildly sweet cake-like batter. The crust is obviously where variations come into play. After it is baked, most folks break up the crust and push parts of it into the fruit mixture to give the dessert a messy or dowdy appearance. Pandowdy is an old New England dish that was born of necessity. It uses extremely basic ingredients and the use of syrup harkens back to the days when white sugar was expensive or unavailable. I cheat a bit and use both sugar and syrup in my version of the recipe. Despite that, this is not an overly sweet dessert. I like to serve it warm with a good vanilla ice cream or a dollop of sweetened whipped cream. I hope those of you who have never prepared this simple dessert will give it a try. I know you will enjoy it. Here is how it is made.


Blueberry and Apple Pandowdy...from the kitchen of One Perfect Bite

Ingredients:
5 large apples, peeled, cored and sliced
1 cup blueberries
1/4 cup maple syrup
1/4 cup brown sugar
1 teaspoon cinnamon
1/4 teaspoon nutmeg
1 cup all-purpose flour
1/4 cup granulated sugar
2 teaspoons baking powder
1/2 teaspoon salt
1/2 cup milk
1 large egg
1/4 cup butter, melted
1 teaspoon vanilla

Directions:
1) Preheat oven to 350 degrees F. Generously butter or spray an 8 x 8-inch baking dish.
2) Combine apples, blueberries, maple syrup, brown sugar, cinnamon in a large bowl. Mix well. Transfer to prepared baking dish. Cover dish with a sheet of aluminum foil and bake for 30 minutes.
3) Meanwhile, combine flour, granulated sugar, baking powder and salt in another bowl. Whisk to combine.
4) Combine milk, egg, butter and vanilla in a large measuring cup. Pour into dry mixture and stir to combine.
5) Spoon batter over apples and bake for an additional 30 minutes. Serve warm with a scoop of ice cream or a dollop of whipped cream. Yield: 6 to 8 servings.

If you have enjoyed your visit here, I hope you'll take a minute to...

Follow Me on Pinterest      


One Year Ago Today: Pan Grilled Shrimp with Barbecue Spices


Two Years Ago Today: Thai-Style Green Beans


Three Years Ago Today: Flank Steak with Garlic and Parsley Sauce


Four Years Ago Today: Tomato Brunch Sandwiches

Monday, July 22, 2013

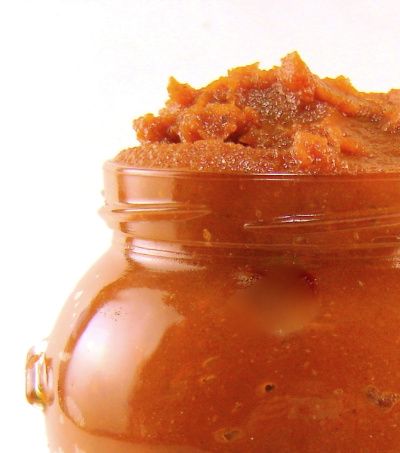
Gone Fishin' Series - Pumpkin Butter


For several years, this was the most popular recipe on my blog. It is holding on by its fingernails now, but it is still in the top ten list. This is clearly a seasonal recipe and I'm reprising it here because of its continued popularity on my blog. The recipe is nice, but I've always been more fascinated by the history and lore that came with this post. I hope you'll save the recipe for fall and be able to make use of it then. Here is how pumpkin butter is made.


From the kitchen of One Perfect Bite...We've had large, carving pumpkins in local farmer's markets for weeks now, but this weekend I saw the first of the sugar pumpkins I like to use for baking. Pumpkins are everywhere, and that started me thinking about how they got their name. I guessed it came from England but I was wrong. It originated with the Greeks whose word "pepon" which means large melon. The French played with the word, changed it to "pompon", and passed it on to the English who immediately changed it to "pumpion." As a matter of fact, you'll find references to "pumpion" in Shakespeare's Merry Wives of Windsor. By the time of our forefather's first Thanksgiving, the large orange squash was called a pumpkin. While pumpkin pie originated in the American colonies, the first pumpkin pie was not a pie as we know it today. The colonists sliced off the pumpkin top, removed the seeds, and filled the insides with milk, spices and honey and baked it in hot ashes. Chances are it was very stringy and bland, but the pumpkin was a major source of food for the colonists. Edward Johnson, who wrote the History of New England (1654), thought it important enough to share this admonition, "And let no man make a jest at Pumpkins, for with this fruit the Lord was pleased to feed his people to their good content, till Corne and Cattell were increased." Needless to say, the stern old Pilgrim didn't mention the jack-o-lanterns which people had been making for centuries.

The practice of carving pumpkins originated with an Irish myth about a man called Stingy Jack who invited the Devil to have a drink with him. Jack didn't want to pay for the drinks, so he convinced the Devil to turn himself into a coin that could be used to buy their drinks. The Devil agreed but Jack had a change of heart and decided to keep the coin in his pocket along with a silver cross that prevented the Devil from assuming his original form. Jack eventually freed the Devil, under the condition that he would cause Jack no harm for a year and that, should Jack die, he would not claim his soul. The next year, Jack again tricked the Devil into climbing into a tree to pick a piece of fruit. While he was up in the tree, Jack carved a sign of the cross into the tree's bark so that the Devil could not come down until he promised Jack he would not bother him for ten more years. Soon after, Jack died. As the legend goes, God would not allow such an unsavory figure into heaven. The Devil, upset by the tricks Jack had played on him and keeping his word not to claim his soul, would not allow Jack into hell. He sent Jack off into the dark night with only a burning coal to light his way. Jack put the coal into a carved out turnip and has been roaming the Earth with it ever since. The Irish began to refer to this ghostly figure as "Jack of the Lantern," and then, simply "Jack O'Lantern."

Now back to cooking. When selecting a pumpkin for cooking, your best choice is a "pie pumpkin" or "sweet pumpkin." These are smaller than carving pumpkins and the flesh is sweeter and less watery. It should have a stem that 1 to 2 inches long. Anything less than that will cause the pumpkin to decay quickly. Shape is not important but avoid those that have blemishes and soft spots. You'll need one pound of raw, untrimmed pumpkin for each cup of finished pumpkin puree. To make the puree, remove the stem, cut the pumpkin in half, remove the seeds and fibrous mass and cut the pumpkin into large chunks. I steam mine for about 12 minutes, or until it's fork tender. It could also be boiled, baked or microwaved if you prefer. When it's tender and cool enough to handle, remove the peel with a knife and your fingers. Puree the pumpkin using a food processor, blender or food mill. If you don't want to bother with this, buy a can of solid pack pumpkin and use that instead.

I made pumpkin butter this weekend. My favorite recipe is an old one developed by Martha Stewart and I suspect you've seen it before. I made one small change to her recipe. It calls for 1/2 teaspoon ground cloves. I thought the cloves made last year's batch too bitter, so I cut the measure to 1/4 teaspoon cloves and added 1/4 teaspoon mace to keep the recipe in balance. It's a lovely recipe and, yes, you can used canned pumpkin.

Pumpkin Butter
...from the kitchen of One Perfect Bite

Ingredients:

1 (28-oz.) can pumpkin puree
3/4 cup apple juice
2 teaspoons ginger
1/4 teaspoon cloves
1/4 teaspoon mace
2 teaspoons cinnamon
1 teaspoon nutmeg
1-1/2 cups granulated sugar

Directions:
1) Combine all ingredients in a large saucepan. Bring to a boil, then reduce to a simmer and cook, stirring often, for 30 minutes, or until mixture thickens. I cook mine until a spoon pulled through middle of mixture leaves a trail that does not close in upon itself. If you plan to use immediately, let cool to room temperature. Pack into storage containers and refrigerate for up to a month. Pumpkin butter can also be frozen for up to 6 months. Yield: 3 cups.

Sunday, July 21, 2013

Gone Fishin' Series - Salt and Pepper Pork Chops


I was surprised when this recipe moved into the top ten, but the recipe apparently has cross-cultural appeal. It has slowly elbowed the competition out of the way and moved into the charmed circle. This is a classic Chinese dish and I hope you won't let the title put you off. The salty flavor comes from soy sauce and you can use a low-sodium variety if you are watching your salt intake. This is a quick and easy dish that I hope soon makes it to your table. I think your family will love these chops. There is nothing here not to like.


From the kitchen of One Perfect Bite...Like many small families we eat a lot of chicken and pork. They make it possible for us to have meals that can be eaten in one sitting without having to deal with leftovers. For years after the children were on their own, I'd use pork tenderloin because it was fast to make and always tender. We love pork chops, but cooking them properly and serving them before they become shoe leather isn't always easy. More often than not, they need to be brined to keep them moist and tender as they cook. While doing some reading in preparation for our, now completed, trip to China, I came across a recipe from Taiwan that used thin cut pork chops. I thought the recipe was worth a try and we've been delighted with the results ever since. If you like, a reduced sodium soy sauce or tamari can be used to marinate the chops. The chops should be no thicker than 3/8 of an inch. If yours are more than that, beat them to submission. While the marinade can be made in less than 5 minutes, the chops should laze in it for at least an hour before they're are cooked. Total cooking time is less than 5 minutes and, be forewarned, the chops will toughen if they are overcooked. I serve these right from the pan with scallion rice and a bean sprout salad. I know you're going to love these. Here's the recipe.

Salt and Pepper Pork Chops
...from the kitchen of One Perfect Bite with a lot of help from Wei-Chuan Cooking School Taiwan

Ingredients:
3 tablespoons soy sauce
2 tablespoons cornstarch
1 teaspoon fresh cracked pepper
1 tablespoon granulated sugar
1/4 teaspoon salt
1-1/4 pounds boneless thin-cut pork loin chops
2 tablespoons vegetable oil

Directions:
1) Combine soy sauce, cornstarch, pepper, sugar and salt in bottom of 9 x 13 x 2-inch baking pan. Stir with a fork until all ingredients are combined and marinade is smooth. Add chops, turning to coat both sides. Cover dish with plastic wrap. Refrigerate, turning occasionally, for 1 to 24 hours.
2) Heat oil in a large frying pan set over medium high heat. Add pork, working in batches if necessary. Cook 1 to 2 minutes per side, until golden brown and cooked through. Transfer to serving plate or serve from pan. Yield: 4 servings.

Saturday, July 20, 2013

Gone Fishin' Series - Oven-Baked Baby Back Ribs


How many racks of ribs does it take to feed 12 people? Way too many! The trouble is we love backribs, so summer or winter I try to serve them when the gang gets together. Unfortunately, the ribs I've been able to find here on the Cape leave much to be desired, so we'll have to take a pass on them this year. That doesn't mean this recipe should be overlooked. This is an effortless meal that produces wonderful ribs with meat that falls off the bone. Once you've tried this oven baked variety, I suspect you'll never bother with the grilled ribs again. I hope we've tempted you to try this top ten recipe. Here is how these ribs are made.


From the kitchen of One Perfect Bite...Our plans last weekend were changed because of rain. Fortunately, everything on the menu could be made as easily in the kitchen as on the grill. At the time I talked briefly about the meal and have since received requests for the recipes I used, particularly the one for baby back ribs. There are basically three steps involved in making this summer favorite. The first is assembling a dry rub. The second is making a barbecue sauce and the third is the actual cooking of the ribs. The dry rub and sauce will take 10 minutes of your time to make, but the sauce will need to cook for 1 to 2 hours. The ribs will require about 4 hours of unattended cooking time. They will be most flavorful if you apply the dry rub to the ribs about 8 to 24 hours before you plan to cook them. The barbecue sauce, which by the way is fantastic, will be even better if it has 24 hours to age. I'm not a fan of sauces that need dozens of ingredients to be flavorful. This is a very simple sauce. While I prefer baby back ribs, this recipe also works well with spare ribs, though they will require an additional hour to cook. Whichever you choose, remove the silver skin from the back of the ribs before apply the rub. It's really hard to believe that something this good can be this easy to prepare. Here's the recipe.

Oven-Baked Baby Back Ribs
...from the kitchen of One Perfect Bite

Ingredients:

Dry Rub
1 tablespoon Kosher salt
1 tablespoon granulated onion
1 tablespoon granulated garlic
1 teaspoon sweet smoked paprika
1 teaspoon fresh ground black pepper
Barbecue Sauce
1 cup ketchup
2/3 cups Worcestershire sauce
2/3 cup golden brown sugar
1/2 teaspoon hot sauce (optional)
1/4 to 1 teaspoon cayenne pepper
1 teaspoon freshly ground black pepper
1 teaspoon salt
1 teaspoon sweet smoked paprika
1 teaspoon chili powder
2 tablespoons mustard
1 tablespoon liquid smoke
1 teaspoon minced garlic
1/4 cup flour
1 (12-oz.) bottle non-alcoholic amber ale
Baby Back Ribs
2 slabs baby back ribs, silver skin and under flap removed
1 teaspoon liquid smoke

Directions:
1) To make dry rub: Combine salt, granulated onion, granulated garlic, paprika and pepper in a small bowl. Set aside.
2) To make barbecue sauce: Combine all sauce ingredients, in the order listed, in a large pot with a heavy bottom. Whisk until smooth. Place pot over low heat and cook for 1 to 2 hours, stirring every 20 minutes, until thickened. Set aside. If not using immediately, cool to room temperature and refrigerate.
3) To make the ribs: Rub top surface of ribs with liquid smoke. Sprinkle top surface of each rack with 1 teaspoon dry rub. Turn and sprinkle bottom surface of each rack with 1 teaspoon dry rub. Wrap in plastic wrap and refrigerate for 8 to 24 hours. Preheat oven to 250 degrees F. Remove covering from racks. Place on an aluminum foil lined baking pan or cookie sheet. Cover pan with foil and bake in preheated oven for 3-1/2 hours. While ribs are cooking, remove sauce from refrigerator and warm. Remove ribs from oven. Let rest for 10 minutes, remove foil and drain accumulated liquid. Spread both sides of ribs with barbecue sauce, return to oven and bake, uncovered for an additional 30 minutes. Serve hot. Yield: 4 to 6 servings.

Friday, July 19, 2013

Gone Fishin' Series - Black Bean Dip


This terrific dip was a late comer to the top ten list. Pinterest moved it out of limbo and gave it the recognition it deserved. Whether we get together in the summer or the winter, you can count on this dish being served at least once. As you might guess, the kids love this one, one so much I think we should issue mittens to slow him down. He hasn't yet grasped the concept of sharing. Do try this.It is next to no work to make and they will sing praises to your name. Guaranteed.


From the kitchen of One Perfect Bite...I love to make this dip for Friday movie nights or watching weekend games. It's one of those dishes that everyone seems to love and you'll never have to worry about leftovers when you serve it. It is really easy to make and involves little more than opening cans and thawing vegetables. It can be made in advance and then baked just before you want to serve it. Serve it with warm tortilla chips and your guests will follow you anywhere. To warm chips, spread them in a single layer on a cookie sheet or baking pan and bake in a 350 degree F. oven for about 5 minutes. Dump them into a bowl and serve, repeating as often as is necessary. The recipe was developed by Tony Rosenfeld for Fine Cooking magazine. I have made only minor changes to his creation. Specifically, I use less vinegar than he calls for. Here's the recipe.

Warm Black Bean Dip...from the kitchen of One Perfect Bite courtesy of Tony Rosenfeld

Ingredients:
2 tablespoons extra-virgin olive oil + more for baking dish
2 medium tomatoes, cored and cut into medium dice
2 teaspoons kosher salt, divided use
1 large yellow onion, finely diced
3 large cloves garlic, minced
1 tablespoon chili powder
2 (15.5-oz.) cans black beans, rinsed and drained well
2 canned chipotles en adobo, minced (about 1 tablespoon), plus 3 tablespoons adobo sauce from can
1 to 3 tablespoons cider vinegar
1-1/2 cups fresh or frozen corn kernels (if frozen, thaw first)
1-1/2 cups (6 oz.) grated sharp cheddar cheese
1-1/2 cups (6 oz.) grated Monterey Jack cheese
3/4 cup chopped fresh cilantro
Freshly ground black pepper
Tortilla chips for serving

Directions:
1) Heat oven to 425 degrees F. Grease a 1-1/2 qt. baking dish with oil and line a baking sheet with foil. Set the tomatoes in a colander over the sink and sprinkle with 1 teaspoon salt.
2) Heat oil in a large (12-inch) skillet over medium-high heat until shimmering hot. Reduce heat to medium, add onion, sprinkle with reserved 1 teaspoon salt, and cook, stirring, until softened and translucent, about 4 to 6 minutes. Add garlic and chili powder and cook, stirring, for 1 minute. Add half of black beans, chipotles and adobo sauce, and 3/4 cup water and bring to a boil. Cook until liquid reduces by about half, 2 to 3 minutes.
3) Transfer bean mixture to a food processor, add vinegar (I used only 1 tablespoon), and process until smooth. Let cool for a couple of minutes and then transfer to a large bowl. Add rest of beans, tomatoes, corn, half of each of cheeses, and 1/2 cup of cilantro. Mix well and season to taste with salt and pepper.
4) Transfer to baking dish and sprinkle with remaining cheese. Bake on a foil-lined baking sheet (to catch drips) until cheese melts and browns around edges, about 15 minutes (longer if refrigerated). Sprinkle with remaining cilantro and serve with warm tortilla chips for dipping.
Yield: 10 to 12 servings.

Gone Fishin' Series - Lemon Garlic Chicken Kebabs


It really is not surprising that this recipe is so popular. The kebabs can, literally, be made anywhere. I have a reader who made them using a hibachi on a Brooklyn rooftop and I've been known to make them in a grill pan on top of my stove. The ingredients needed to assemble the kebabs can be found in any large market and the recipe comes together quickly. They are a universal favorite in my kitchen. That means the kids enjoy them as much as their parents, and those of you who are feeding young children know how rare an occurrence that is. I'm glad this recipe made it to the second time around club.You will like these.


From the kitchen of One Perfect Bite...Skewered meat is one of those foods that has crisscrossed borders and been assimilated into the cuisine of many countries. We think that kabobs were originally a Turkish dish that consisted of pieces of marinated and skewered lamb that were grilled over a charcoal fire. Food historians believe the kabob's origins can be traced to a shortage of fuel in the Near East that made cooking large pieces of meat difficult. We know the word is Persian in origin and Arabic oral tradition infers it was the creation of Persian soldiers who used their swords to grill meat over battlefield fires. Now, here comes the kind of trouble that delights revisionists. Excavations on the Greek island of Santorini, have uncovered the stone sets of barbecue for skewers that were used before the 17th century BCE. That's mighty early and makes some of those earlier claims suspect. So, to be on the safe side, and keep all my friends, I'm going to attribute the creation of kabobs to the region rather than a country.These days, not much escapes the skewer and kabobs can be found in places as disparate as Greece and Thailand. Wherever they appear, they are a favorite food of locals who can't seem to get enough of them. The kabob is usually made with chunks of meat but it can also be made with meatballs or appropriately trimmed vegetables. We have spent the last few days in an area not known for fine dining. So, to assure decent meals we brought the fixings for ours with us. That involved some planning because my idea of an escape does not involve hours in the kitchen. This holiday there would be nothing on the table that couldn't be thrown in the oven or tossed on the grill. The hamper, of course, included kabobs. These make for a wonderful quick meal and they are delicious if you remember to grill the vegetables separately from the meat. If you try to combine both on the same skewer you'll have a hot mess on your hands. The vegetables will start to burn long before the meat is table ready. This recipe is a variation of one that was developed for Williams Sonoma. It is really pleasant and can be served over couscous or rice. Tzatziki is a nice accompaniment. I think you like this. Here's the recipe.

Lemon Garlic Chicken Kabobs...from the kitchen of One Perfect Bite adapted from a Williams Sonoma recipe

Ingredients:
Chicken
1/3 cup extra-virgin olive oil
Zest of 1 lemon
2 tablespoons minced garlic
2 tablespoon minced fresh flat-leaf parsley
2 teaspoon kosher salt, plus more, to taste
1 teaspoon freshly ground pepper, plus more, to taste
2 pounds boneless, skinless chicken breasts, cut into 3/4-inch pieces
Optional Vegetables
Juice of 1 lemon lemon
1/2 cup extra-virgin olive oil
1 large red onion, cut into 1-inch chunks
2 red bell pepper, seeded and cut into 1-inch chunks

Directions:
1) To prepare chicken: In a bowl, whisk together olive oil, lemon zest, garlic, parsley, salt and pepper. Add chicken and stir to combine. Cover bowl with plastic wrap and refrigerate for at least 2 hours or up to 8 hours.
2) To prepare grill, plank and skewers: Soak a cedar plank in water according to package instructions. Prepare a medium fire in a grill and heat plank. If using wooden skewers, soak them in water to cover for at least 20 minutes.
3) To prepare vegetables: In a small bowl, whisk together 1/2 cup olive oil, the lemon juice, salt and pepper. Set aside. Thread onion and bell pepper onto skewers, alternating pieces and dividing them equally. Remove chicken from marinade; discard marinade. Thread chicken onto separate skewers, taking care not to pack pieces too tightly.
4) To grill: Lay skewers on warm plank. Brush vegetables with olive oil-lemon juice mixture. Close lid and cook until chicken is opaque throughout and the vegetables are soft and beginning to brown, 8 to 12 minutes. Transfer skewers to a warmed platter and serve immediately. Yield: 4 servings.

Thursday, July 18, 2013

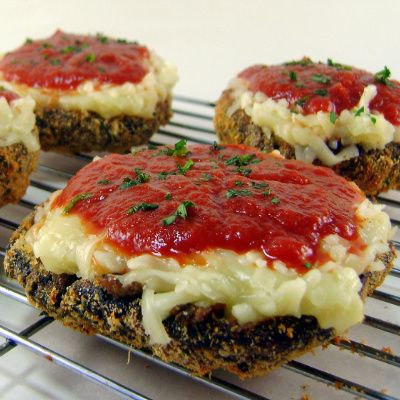
Gone Fishin' Series - Baked Portobello Parmesan


This recipe has been in 4th place for ages now. It has great appeal for those who have to watch their weight, so I'm glad I can reprise it here. It pares calories while preserving the flavors that we have come to associate with "parm" dihes. If you have not yet tried this it, do give this recipe a try. I think you'll be surprised by how flavorful it is. Here's the recipe for this leftover. Enjoy!


From the kitchen of One Perfect Bite...This is an old competition recipe. I give it new life each January as part of a regime to mend holiday excesses and restrict fat and caloric intake, at least until we're back in shape. I love the bold flavors of meat or vegetable Parmesan, but the amount of oil used in standard preparations meant we couldn't have it often, if at all. The whole purpose of this recipe was to come up with a variation that would require no frying and, if possible, use no meat or poultry. I had, for several years, grilled portobello mushrooms and was really happy with their meaty taste and texture. I settled on them for my recipe because eggplant simply didn't work when cooked this way. This version is really simple to make and if you are looking for a healthier alternative to standard "parm" recipes you might want to give this a try. You won't be sorry. Smaller families can halve the recipe and still enjoy its wonderful flavor. Here's the recipe.

Baked Portobello Parmesan...from the kitchen of One Perfect Bite

Ingredients:
1/2 cup Italian-style bread crumbs
1 cup (3-oz.) freshly grated Parmesan cheese, divided use
1 teaspoon sweet paprika
1/4 cup fresh minced parsley, divided use
2 teaspoons kosher salt, divided use
3/4 cup egg substitute
1/2 teaspoon fresh ground black pepper
1 teaspoon marjoram leaves
1 teaspoon garlic powder
1 teaspoon oregano leaves
4 large (5 to 6-inches wide) stemmed portobello mushrooms, brushed clean
1-1/2 cups (6-oz.) shredded part-skim mozzarella cheese
1 cup commercially prepared "light" tomato sauce
Cooking spray
Directions:
1) Position a baking rack in upper third of oven. Preheat oven to 400 degrees F. Line a 17-1/2 x 11-3/4 baking sheet with aluminum foil. Place a 16-1/2 x 11-1/2-inch wire cooling rack inside the baking sheet. Mist rack with cooking spray. Set aside.
2) Combine bread crumbs, 1/2 cup Parmesan cheese, 3 tablespoons parsley, paprika and 1 teaspoon salt in a shallow pan. Mix well. Set aside.
3) In a separate bowl, combine egg substitute, remaining 1 teaspoon salt. pepper, marjoram, garlic powder and oregano. Mix well.
4) Dip both sides of mushrooms into egg mixture. Dredge in crumb mixture until both sides are completely coated. Transfer, stem side down, to prepared wire rack. Spray tops with cooking spray and bake for 15 to 20 minutes, or until mushrooms are tender. Remove pan form oven.
5) Reset oven thermostat to 450 degrees F. Meanwhile, carefully turn mushrooms stem side up. Cover each mushroom with 2 tablespoons of remaining Parmesan cheese, 1/4 of mozzarella cheese and 1/4 cup tomato sauce. Spray tops lightly. Return to oven and bake until cheese melts and mushrooms are warmed through, about 10 minutes. Use a wide spatula to transfer mushrooms to a serving platter. Sprinkle with reserved 1 tablespoon parsley. Yield: 4 servings.
Related Posts with Thumbnails

Printfriendly