Wednesday, September 30, 2009

Kobe Kiwi Wings with Japanese Relish - Outdoor Wednesday


I know I should look at them and think, "All things bright and beautiful. All things great and small." I've really, really tried, but they look like buzzards and I'm simultaneously trying to figure out how they got here and how I can get rid of them. Did you know they can fly? Years ago a wall street broker, long since gone to his just reward, was sure that "...in a high wind even a turkey can fly." He was spot on, about bad stocks and the other turkeys. They can fly at 55 miles an hour for short distances. These new members of our wildlife menagerie, probably escapees from a nearby raptor center, started me thinking about birds and winged creatures that cannot, for one reason or another, fly. Some years ago I developed a crock-pot recipe for chicken wings and my over stimulated sense of the absurd decided to call them kiwi wings because the donor chickens could no longer fly. I'll tell you more about the wings below. The turkeys, by the way, are fine.


This very simple recipe was developed to provide an alternative to standard, albeit delicious, hot wings. These wings are cooked in a two step process that utilizes the broiler and a slow cooker. While they lack the extreme heat of the more familiar version, they are hot and decidedly Asian in their flavor. The broiler is used to give the wings color. If you don't mind beige wings this step can be bypassed. The finished wings are sprinkled with an Asian relish patterned after one that comes from Kobe, Japan. The wings will have more flavor if allowed to marinate before cooking. Your preparation time will be about 20 minutes and the wings can be on the table, start to finish, in three hours. While these were developed to be served as an appetizer, when served with rice, they make a wonderful light meal. Here's the recipe.
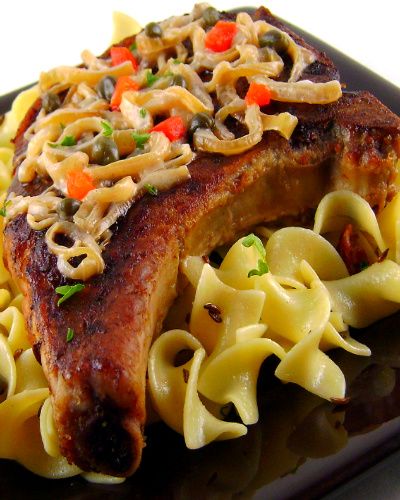
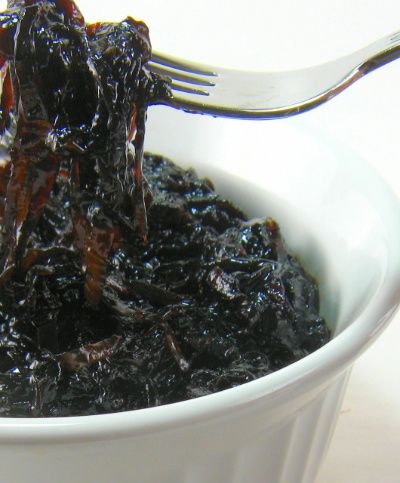

Kobe Kiwi Wings with Japanese Relish
...from the kitchen of One Perfect Bite

Ingredients:
4 pounds chicken wings
1/2 cup Japanese (shottsuru) or Thai (nam pla) fish sauce
1 cup Asian sweet chili sauce (i.e. Mae Ploy)
1/2 cup fresh lime juice
1 teaspoon chili garlic sauce
1 tablespoon brown sugar
1 tablespoon cornstarch
Relish
1/4 cup minced scallions (white and tender green)
1 tablespoon finely chopped fresh ginger
1 tablespoon finely minced parsley
1 teaspoon coarse sea salt (optional)

Directions:

1) Cut wings into pieces at joints; discard wing tips or reserve for stock.
2) To make marinade, place fish sauce, chili sauce, lime juice, chili garlic sauce, brown sugar and cornstarch in a small (1-quart) bowl. Whisk to combine.
3) Place wing pieces and marinade in a 1-gallon resealable storage bag. Seal and shake to coat all pieces with marinade. Refrigerate for 2 to 8 hours.
4) Preheat oven broiler. Coat insert of a large (6-quart) slow cooker with nonstick cooking spray.
5) Remove chicken from marinade and pat dry with paper towels. Reserve marinade. Transfer chicken to rack of a large broiler pan. Broil about 6 inches from heat for 5 minutes per side.
6) Meanwhile, pour marinade into a medium (2-quart) saucepan. Bring to a rolling boil over high heat. Reduce heat to medium and continue to cook for about 10 minutes to thicken mixture.
7) Dip chicken pieces into thickened marinade. When coated, transfer to slow cooker. Pour remaining marinade over chicken, cover, and cook on HIGH for 2 hours.
8) Just before serving, combine scallions, ginger and parsley in a small bowl. Toss to combine.
9) Transfer wings to a serving platter. Sprinkle with relish and sea salt (if using). Serve hot. Yield: 10 appetizer servings.

This recipe is being linked to:

Outdoor Wednesday, an event sponsored by Susan at A Southern Daydreamer.

Crock-Pot Wednesday an event sponsored by Deb at Dining with Debbie.

Tuesday, September 29, 2009

Bierstube Pork Chops


From the kitchen of One Perfect Bite...Years ago there was a hideaway about a block from the steel mills in South Chicago. I'm speaking now of a time before we knew of women's liberation or political correctness, so I hope no one will be offended when I recount the place was called Fat Helens. Ironically, Helen was a tall, thin woman of Eastern European extraction. She ran the place with an iron fist, an even stronger will and a bouncer kept at the door to prevent any on her hit list from getting to the bar. You'd probably call it a tavern, but Helen also served food - some of the best in the city. Portions were huge. This was the local watering hole for millworkers and their families. They were a tightly knit community and folks were married and mourned in the huge room behind the restaurant. On weekends the place became a social club. Beer was served in huge steins and boiler makers seemed, always, to be the drink of the day. Regulars put their drinks on a running tab, important in those days before we even dreamed of credit cards. I saw my first real fight here, but, more importantly, I had my first taste of Eastern European cooking at the communal tables behind the bar. Now, I suspect you're curious as to how I ended up in a beer hall behind the steel mills. My mother sure was until we took her to dinner one night. Bob and I were first taken to Helens by a friend who was a language instructor at the university. It was so different from anything in my experience that I was fascinated by the place. It would be fair to say our first visit was borne of curiosity. All others, however, were triggered by the food. We also had the good fortune to attend an Oktoberfest at Helens. It remains the standard by which we judge such celebrations. Bierstube pork is an original recipe based on flavors and memories from long ago. The chops are easy to do, but they are brined prior to cooking so you'll need 6 to 8 hours of lead time. I serve these with caraway noodles and Ina Garten's Sauteed Cabbage. If you like hearty well-flavored food I think you'll like these pork chops.

Bierstube Pork Chops
...from the kitchen of One Perfect Bite

Ingredients:
Brine
1 (12-oz.) bottle non-alcoholic amber ale (see Cooks Note Below)
1-1/2 cups water
2 tablespoons kosher salt
3 tablespoons brown sugar
2 tablespoons cider vinegar
1 tablespoon caraway seeds
1 teaspoon freshly cracked black pepper
Chops
4 bone-in pork chops, 1-1/4-inch thick
Kosher salt and freshly cracked pepper
1/3 cup all-purpose flour
1 tablespoon olive oil
2 slices thick cut bacon, diced
1 large sweet onion, thinly sliced
2 tablespoons capers, drained and rinsed
1/4 cup sour cream
2 tablespoons freshly chopped Italian parsley

Directions:
1) To make brine: Combine beer, water, salt, brown sugar, vinegar, caraway seeds and pepper in a large bowl. Stir until sugar dissolves. Pour brine into a 1-gallon plastic bag with a zip lock. Add chops and refrigerate for 6 to 24 hours.
2) Remove chops from brine, reserving brine. Pour brine into a 2-quart saucepan and boil 5 minutes to reduce by half. Set aside. Pat chops dry. Season lightly with salt and pepper. Dredge in flour, shake off excess. Heat oil in a large nonstick skillet. Add bacon and cook until crisp. Remove bacon and drain on paper toweling. Add chops and sear over medium-high heat, turning once, until both sides are brown, about 3 minutes perside. Transfer to a plate.
3) Add onions to skillet chops cooked in. Cook, stirring occasionally, until onion is tender and beginning to brown, about 5 minutes. Add 1/2 cup reserved brine and simmer, scraping bottom of pan, until liquid is reduced to 1/4 cup. Add 1/2 cup water and capers. Return chops and bacon to pan, setting them among onions. Reduce heat to a gentle simmer, cover pan and cook, at a simmer, for about 6 minutes. Turn chops, cook, covered for another 4 to 5 minutes, or until chops are firm to touch and barely pink inside (meat thermometer should read 145 to 155 degrees F.).
5) Transfer chops to a serving plate. Tent with foil. Add sour cream to pan liquid and simmer (do not boil) until sauce coats a spoon, about 2 minutes. Adjust salt and pepper to taste. Serve chops topped with sauce and sprinkled with parsley. Yield: 4 servings.

Cook' Note: Any beer can be used, but non-alcoholic beers impart flavor without bitterness. I use O'Doul's amber ale.

Monday, September 28, 2009

Apple Slice - Blue Monday


Mt. Rainier as seen from Orcas Island in the San Juan archipelago.


Apple Slice

From the kitchen of One Perfect Bite...
This is such a simple, old-fashioned pastry that I was hesitant to post it. I finally decided it was just too good not to share. Apple Slice was a feature in the bakeries and Mom and Pop groceries of my childhood. The folks who owned those shops often lived in the back of the stores with only a curtain separating their homes from their work places. You could buy a homemade Apple Slice in almost any store and there was very little difference in how it was prepared. It was usually smothered by a glaze of powdered sugar so sweet it hurt the teeth. Children, of course, loved it. Times and people changed and I had all but forgotten about Apple Slice until it was pulled from the recesses of memory when I had a piece on a ferry heading to Orcas Island a few years ago. The orchards of Oregon and Washington provide an abundance of apples and pears, so it's not surprising that some of the old desserts, still served in farm communities, are making their way back to the cities. I'm guessing Apple Slice came to this country with Scandinavian immigrants, but because it was easy and inexpensive to prepare it quickly spread from one home to the next. There are a couple of hints I want to share with those of you who are tempted to try this. The apples must be cut in paper thin slices for this to work. Most recipes that I've been able to find for this instruct you to roll the dough like a pie crust. Good luck with that. It doesn't work for me. I separate the dough into two portions and pat it into place. I've also tossed the glaze. The whole purpose of the slice is its wonderful apple flavor. I think the glaze overwhelms it, so I use a light sprinkle of confectioners' sugar instead. This is a dessert that is best served warm. One of its beauties is that it can be assembled in the morning and baked while you're having dinner. I must warn you that this addicting. I only make this when I have a houseful of people because I could eat the entire pan myself. Here's the recipe.

Apple Slice...from the kitchen of One Perfect Bite

Ingredients:
2 cups sifted all-purpose flour
2 teaspoons baking powder
1/4 teaspoon salt
1/2 cup butter, room temperatue
3/4 cup granulated sugar
2 large eggs
1 teaspoon vanilla extract
3 large apple, peeled, cored, thinly sliced
1/4 cup brown sugar
1/4 teaspoon nutmeg

Directions:
1) Preheat oven to 350 degrees F. Grease an 8-inch square pan. Line bottom with parchment paper. Grease the paper. Set aside.
2) Place flour, baking powder and salt in large bowl. Whisk to combine
3) In a separate bowl, cream butter and granulated sugar. Beat in eggs and vanilla extract. Add flour mixture and stir just until blended.
4) Pat half of dough into prepared pan. Spread dough with thinly sliced apples. Sprinkle with brown sugar and nutmeg. Cover apples with remaining dough, patting it into place.
5) Bake for about 40 minutes, or until a tester inserted into center of cake comes out dry. Cool. Turn out from pan onto a dessert plate. Remove paper. Sprinkle with confectioners' sugar. Yield: 6-8 servings.

This post is being linked to Smiling Sally - Blue Monday

Sunday, September 27, 2009

Guacamole


From the kitchen of One Perfect Bite...Everyone knows that guacamole is dip made of mashed avocado mixed with chopped onions and other seasonings. Not everyone know that Tyler Florence makes a guacamole that will make your socks go up and down. I can say that with authority because several people told me so today. I love most of his recipes, but I don't talk about them a lot because he has fans who regularly report on them. They are a great bunch of foodies and you can read about their kitchen exploits each Friday at Tyler Florence Fridays. I needed a quick dip this afternoon. I had glanced at this recipe several times before without trying it, but I remedied that today and I'm so glad I did. This is guacamole with attitude and I love attitude. I also love this dip. Here's the recipe.

Guacamole...from the kitchen of One Perfect Bite

Ingredients:
6 ripe avocados
3 limes, juiced
1 medium yellow onion, chopped
1 garlic clove, smashed then minced
2 serrano chiles, cut into rounds
1 big handful fresh cilantro with stems, about 1/2 cup, finely chopped
Extra-virgin olive oil
Kosher salt
Freshly ground black pepper

Directions:

1) Halve and pit avocados. With a tablespoon, scoop out flesh into a mixing bowl. Mash avocados using either a fork or potato masher, leaving them still a bit chunky. Add remaining ingredients, and fold everything together. Drizzle with a little olive oil, adjust seasoning with salt and pepper and give it 1 final mix with a fork.
2) Lay a piece of plastic wrap tight on surface of the guacamole so it doesn't brown and refrigerate for at least 1 hour before serving. Yield: about 4 cups.

Saturday, September 26, 2009

Salmon Chowder - San Juan Islands Sunset - Pink Saturday


Sunset on the San Juan Islands as seen from the shore of Puget Sound in Bellingham, Washington.


Ahoy, me hearties! Beware. This simple soup is a gift from Scandinavian immigrants who settled in the Pacific Northwest. This chowder, or a version of it, came with them. Fortunately, their recipes were passed on to us. This recipe utilizes a handful of ingredients to make an amazingly flavorful soup. It begins with a fish stock. I make mine from shrimp shells, the recipe for which can be found following the chowder recipe. It's simple to do, but if that seems too much work, dilute 1-1/2 cups bottled clam juice with 2 cups of water and proceed with the recipe. Once all the vegetables have been chopped, the soup will be table ready in 30 minutes. This is typical of the soups that are made on the San Juan islands. Easy, fast and flavorful. If you have an aversion to cream, replace it with half and half or whole milk. It will lack the richness of the real thing, but the chowder will still be delicious. I really hope you'll try this one. It's delicious and hearty enough to serve as a main course.

Salmon Chowder...from the kitchen of One Perfect Bite

Ingredients:
4 tablespoons butter
1-1/2 cups chopped onions
5 large boiling potatoes
4 cups fish stock
1 pound salmon, skinned and cut in 1/2-inch dice
2 cups heavy cream
1/4 cup dry white wine or dry vermouth
Salt and pepper to taste
1/2 cup chopped fresh dill or parsley (optional)

Directions:
1) Melt butter in a 5 to 6-quart stock pot. Add onions and saute until soft. Stir in flour and cook for 1 to 2 minutes. Add potatoes and fish stock. Bring to a boil. Reduce heat, cover pot and simmer for 20 minutes, or until potatoes are tender.
2) Add the salmon and cook for 2 minutes longer. Add cream, wine, and salt and pepper
to taste. Simmer until just heated through. If using, stir in dill or parsley. Yield: 4 to 6 servings.

To make fish stock from shrimp shells: Place fresh or frozen shells from 2 to 3 pounds shrimp in a large pot. Add 10 cups water and bring to a simmer over high heat. Reduce heat to low and simmer gently for 5 minutes, skimming off any foam that rises to surface. Strain through a fine sieve and set aside. Stock may be frozen.

They post is being linked to Pink Saturday, sponsored by Beverly at How Sweet the Sound.

Friday, September 25, 2009

Pumpkin Cupcakes with Maple Cream Frosting - Foodie Friday


From the kitchen of One Perfect Bite...Contrary to rumor, I don't travel with my KitchenAid mixer. When we're camping or visiting places where there are no restaurants, I arm myself with simple recipes that can be prepared in minutes with nothing more sophisticated than a wooden spoon. I've made these cupcakes for years. They're simple enough for a child to prepare and they're perfect for fall. The aroma of these cakes baking perfumes the kitchen with the scents of Island spices and the promise of a Thanksgiving yet to come. I think you like these. They're a cake type muffin that's made less pedestrian with a wonderful cream cheese frosting. Here's the recipe.

Pumpkin Cupcakes with Maple Cream Frosting
...from the kitchen of One Perfect Bite

Ingredients:
Cake
2-1/2 cups all-purpose flour
2 teaspoons baking soda
1/2 teaspoon salt
2 teaspoons ground cinnamon
3/4 teaspoon ground ginger
1/4 teaspoon ground nutmeg
1/8 teaspoon ground allspice
2 large eggs
1-1/2 cups sugar
1/2 cup milk
1/2 cup butter, melted
1 can (15-oz.) pumpkin puree
Frosting
1 (8-oz.) package cream cheese, room temperature
1/2 to 1 teaspoon maple extract
2 tablespoons milk or pure maple syrup
4 cups confectioners' sugar

Directions:
1) Preheat oven to 350 degrees. Line 18 muffin cups with paper liners. Set aside.
2) Combine flour, baking soda, salt, cinnamon, ginger, nutmeg and allspice in a medium bowl.
3) Combine eggs, and sugar in another medium bowl. Whisk to combine. Add milk, butter and pumpkin puree; mix with whisk or wooden spoon until smooth. Add flour mixture and beat until combined. Fill prepared muffin cups with batter.
4) Bake for 20 minutes, or until a toothpick inserted in center of cake comes out clean. Cool in pan for 1 minute. Remove from pan and allow to cool completely.
5) While cakes are baking, place cream cheese, milk or maple syrup and maple extract in a bowl. Beat till combined. Gradually add confectioners' sugar until smooth and creamy. Add more milk or syrup if frosting is too stiff to spread.
6) Frost cakes and garnish as desired.

This recipe is being linked to Designs By Gollum - Foodie Friday

Thursday, September 24, 2009

Summer Rolls for Sunday Supper - Tablescape Thursday


Last weekend we were asked to stand in for friends at a function that was scheduled to overlap the dinner hour and extend well into the evening. No mention was made of food. It seemed probable that food would be served, but experience has taught me that probable is not always the sure thing we assume it to be. Rather than chance a long evening without food, I decided to make a late lunch that would carry us through the evening, whatever happened. I love to prepare Asian food on these occasions. It's light and easy to prepare but filling enough to make evenings with uncertain meals easier to handle. We have a low table in our living room that's used for a lot for meals. It has a view of the fireplace and with candles and flowers it's a great place for dinner for two. Fortunately, we both can still manage the ups and downs that are necessary to sit at a table 18 inches off the floor. We are, however, no longer taking bets as too how long that will continue. My primary china service is white, but I augment it with special pieces, usually from special places, that make our ethnic meals seem more authentic. The red-lined cups I've used here are part of a tea service given to me by a client who became a friend. The lids are used to hold dipping sauce while the cups usually hold the clear soup that begins our meals. The chargers are from an old employer's kitchen. That gorgeous geranium is from one of the window boxes we use to tart up the decks that surround our home. I know it's old-fashioned but I really want the food to be the focus of a meal with family and friends. I deliberately try to keep things understated and use small pops of color try to keep the table interesting. I'm really pleased with the simplicity of my Asian table. I was also pleased with the simplicity of the meal I prepared for us. My choices? Pho Bo, a Vietnamese soup, and summer rolls. My recipe for Pho Bo can be found here and the recipe for summer rolls and a simple dipping sauce appears below. In Vietnam these rolls are called goi cuon, or salad rolls. They are bundles of shrimp or chicken that are combined with rice noodles and fresh mint before being wrapped and rolled in a paper thin rice wrapper. I hope you'll try the homemade version of both. They are really fresh and lovely. They are also easy to make.


Summer Rolls...from the kitchen of One Perfect Bite

Ingredients: 1/2 pound thin dried rice noodles
12 (8-inch) round rice paper sheets
2 cups tender lettuce leaves cut crosswise into 1-inch strips
1/2 cup fresh mint leaves
1/2 cup frsh cilantro leaves
5 green onions, cut into 3-inch lengths, then cut lengthwise into thin strips
12 medium shrimp cooked, peeled and halved lengthwise or 1/3 pound shredded chicken
Dipping sauce

Directions:
1) Bring a medium saucepan of water to a rolling boil over high heat. Drop in rice noodles and remove from heat. Let stand 8 to 10 minutes, gently lifting and stirring noodles occasionally as they stand to separate the strands and cook them evenly. Drain, rinse with cold water, drain again. Set aside.
2) Fill a large shallow bowl with hot water.
3) To make each roll: Place 1 sheet of rice paper into water and submerge it for about 15 seconds. Remove it carefully, draining off water. Place it on a work surface. On bottom third of sheet, place following ingredients in a horizontal row;
1/4 cup noodles, some lettuce strips, some mint leaves and some cilantro leaves. Sprinkle green onion slivers on top. Lift wrapper edge nearest to you and roll it up and over filling, tucking it in under them about halfway along wrapper and compressing everything gently in a cylindrical shape. Fold in sides as though making an envelope. Place a portion of chicken or 2 shrimp halves, pink side down, on rice sheet just above cylinder. Continue rolling wrapper and press seam to close it. If it is too dry to close, moisten it with a bit of water to seal. Set the roll on a platter, seam side down and continue to fill and roll wrappers until you have 8 to 10 rolls.
4) To serve, leave rolls whole or cut in half diagonally. Serve with a dipping sauce. Yield: 8 to 10 rolls.

Dipping Sauce

Ingredients:

1 tablespoon chopped garlic
2 tablespoons sugar
1/2 teaspoon chili-garlic sauce ot 1 teaspoon dried red chili flakes
3 tablespoons fish sauce
3 tablespoons water
2 tablespoons fresh lime juice

Directions:
1) Combine garlic, sugar and chili-garlic sauce in a small bowl or on a cutting board; mash to a paste.
2) Scrape into another small bowl. Add fish sauce, water and lime juice. Stir well to dissolve sugar. Transfer to small bowl/bowls for dipping. Unused sauce will keep for 1 week in refrigerator. Yield: 1/2 cup.

Recipe adapted from Quick and Easy Vietnamese by Nancy McDermott

This recipe is being linked to Tablescape Thursday hosted by Susan at Between Naps on the Porch.

Wednesday, September 23, 2009

Okanagan Apple Bread and the San Juan Islands - Outdoor Wednesday


Tucked between Puget Sound and the Straits of Georgia is an archipelago known as the San Juan Islands. The islands are accessible only by ferry and they've become the quiet place to which I retreat when the world is too much with me. There are 172 islands in the chain, but only a few are inhabited and some are not visible at high tide. In the spring and summer these islands are coves of stunning beauty, particularly at sunrise and sunset when the view rivals the majesty of a cathedral and the silence, broken only by the gentle lapping of waves, becomes an evensong. Life here moves slowly and you can, indeed, lose yourself in solitary splendor if that is what you seek. Food is simple and what you don't grow or raise must be ferried in at some expense. One of our favorite treats on the islands is an apple bread that comes from the Okanagan Valley in British Columbia. It's farm bread at its best. It can be made without special equipment and it falls into that easy but delicious category of old-fashioned quick breads. I love its simplicity. I use Golden Delicious Apples and coarsely chopped walnuts to make the bread, but feel free to improvise and use choices of your own. Here's the recipe.

Okanagan Apple Bread...from the kitchen of One Perfect Bite

Ingredients:

2 cups all-purpose flour
1 teaspoon baking soda
1 teaspoon salt
1/2 teaspoon nutmeg
1 teaspoon cinnamon
1/4 teaspoon cloves
1/4 cup whole wheat flour
1/2 cup butter, room temperature
3/4 cup light or golden brown sugar
2 large eggs
1 teaspoon vanilla
1 cup peeled, grated apple
1/2 cup buttermilk
3/4 cup toasted walnuts or pecans, coarsely chopped

Directions:
1) Preheat oven to 350 degrees F. Grease a 1-pound loaf pan. Set aside.
2) Sift all-purpose flour, baking soda, salt, nutmeg, cinnamon, cloves and whole wheat flour together. In a separate bowl, cream butter and sugar until light and fluffy. Beat in the eggs. Add vanilla. Add dry ingredients, alternating with grated apples and buttermilk, to egg mixture. Fold in toasted nuts. Scrape into loaf pan.
3) Bake in lower third of oven for 1 hour. or until a cake taster inserted in center of loaf comes out clean. Let sit for 10 minutes. Turn on a wire rack to cool. Yield: 1 loaf.

This recipe is being linked to Outdoor Wednesday, an event sponsored by Susan at A Southern Daydreamer.

Tuesday, September 22, 2009

Moroccan Shepherd's Pie


From the kitchen of One Perfect Bite...I can't let the first day of fall pass without posting something appropriately autumnal. Nor can I lie to you. The thermostat here reads 90 degrees and the temperature is forecast to rise, so I won't be making this today. I did, however, make it last Saturday when the weather here was really nasty. That led me to an old contest recipe and a dinner featuring this Moroccan shepherd's pie. When you see the spicing, you'll see how this old classic got its new name. The recipe calls for a topping of sweet potatoes or squash and we have a lot of that in the house right now. I thought this would be a great way to make a dent in the supply. Now, you may like the recipe or you may hate the recipe, but whatever your verdict, I think you'll agree it's not ho-hum. Here's my Moroccan shepherd's pie.

Moroccan Shepherd's Pie...from the kitchen of One Perfect Bite

Ingredients:
Sweet Potato Topping:
2 pounds peeled sweet potatoes, cut in 1-inch cubes
1/3 cup low-fat sour cream
1/3 cup chopped scallions
Salt and pepper to taste
Lamb Filling:
2 pounds ground lamb
1 teaspoon ground cumin
1 teaspoon ground coriander
1 teaspoon ground cinnamon
2 teaspoons salt
1/4 teaspoon cracked black pepper
2 teaspoons olive oil
1 cup finely minced yellow onion
1 tablespoon minced garlic
1 cup chopped parsley
1 cup petite peas, thawed if frozen
1 cup diced carrots, thawed if frozen
1/2 cup dried raisins or cranberries
2 tablespoons red wine vinegar
1 large egg, beaten
2 tablespoons chopped scallions (green tops only)

Directions:
1) To make the sweet potato: Place sweet potatoes in a medium (2 to 3-quart) saucepan; cover with water. Bring to a boil over high heat; cook for 20 minutes, or until tender. Drain. Return potatoes to saucepan; mash with a potato masher. Add sour cream; beat with a wooden spoon to blend. Fold in scallions. Season to taste with salt and pepper. Cover pan. Set aside.
2) To make the lamb filling: Preheat oven to 350 degrees F. Mist an 8 x 8 x 2-inch casserole dish with nonstick cooking spray. Place lamb in a large mixing bowl; add cumin, coriander, cinnamon , salt and pepper and mix with a wooden spoon until well blended. Place lamb in a large (12-inch) nonstick skillet; cook over medium-high heat, stirring occasionally with a wooden spoon to break meat apart, until meat is brown, about 10 minutes. Scrape meat into a large bowl. Add oil to skillet in which meat cooked. Stir in onions; cook until softened, about 5 minutes. Add garlic; saute until fragrant, about 30 seconds. Fold in parsley, peas and carrots and cook 5 minutes longer. Remove from heat. Stir in cranberries and vinegar. Add onion mixture to lamb. Season to taste with salt and pepper. Add egg; stir with a wooden spoon to incorporate.
3) To assemble: Scrape lamb into prepared casserole dish. Spoon potatoes over filling; spray top with nonstick cooking spray. Bake for 45 minutes, or until heated through and potatoes begin to brown. Let rest 10 minutes before serving. Garnish with green onion tops. Yield: 8 servings.

Pilgrim Hat Cookies for Kids by Kids


From the kitchen of One Perfect Bite...
With Halloween and Thanksgiving just around the corner, I wanted to give these "cookies" a test run for the holidays. They were created by two very young chefs, Megan and Mitchell Vogel, from Jefferson, Wisconsin. The not so young editors and chefs at Taste of Home magazine also deserve a round of applause for bringing them to our attention. I clipped this recipe from their Kids in the Kitchen feature last year. I had a young assistant today and thought this would be a great way to spend part of the day. The cookies are really easy to do and with a little planning kids over eight can make these by themselves. Younger children will need some help. If you have perfectionist tendencies you can't hold in check, have someone else supervise. These are messy to assemble and when they're done by kids chances are there going to look like it. This is supposed to be fun, not an audition for the Martha Stewart show. Make sure you have an extra bag of candy on hand. It mysteriously seems to disappear when the cookies are being assembled. My four year old assistant was responsible for turning the cookies upside down, removing wrappers from the peanut butter cups and centering them once the icing was in place. I had to make one ingredient substitution. I was unable to find mini Chicklets, so I used orange breath mints instead. We were a quite a team and I think we did ourselves proud. Here's how we did it.

Pilgrim Hat Cookies
...from Megan and Mitchell Vogel and Taste of Home Magazine

Ingredients:
1 cup vanilla frosting
7 drops yellow food coloring
32 miniature peanut butter cups
1 package (11-1/2-oz.) fudge-striped cookies
32 pieces orange mini Chicklets gum

Directions:
1) Combine frosting and food coloring in a small shallow bowl. Remove paper liners from peanut butter cups.
2) for each cookie, dip the wide part of the peanut butter cup in frosting. Position over center hole of cookie to form a hatband and crown. Add a buckle of Chicklets gum. Yield: 32 cookies.

Cook's Note: Rather than dip the peanut butter cups in frosting, I created a circle of frosting in the center of the cookies. My young assistant then pressed the peanut butter cups in place.

Monday, September 21, 2009

Half Moon Pies, Harvest Moon Pudding and Blue Moons for Blue Monday


We're talking about moons today - real, imagined or edible. Be sure to see the blue moon following the recipes. The first recipe is for a half moon fruit pie and it's wonderful for picnics, tailgating or events that require you to tote your food. I use apples to make these, but peaches, pears or berries could also be used. This is an easy, straight forward recipe. No special skills or equipment is required. I opt to use Golden Delicious apples in nearly all recipes that call for apples. Feel free to substitute your favorite, but make sure to use one that keeps it shape as it cooks. I dice the apples because I find them easier to work with than slices. If you prefer slices, go for it. This recipe will make sixteen 4-inch or eight 6-inch hand pies. You can make your own pastry or use ready made pie crust or puff pastry. You will, however, need enough pastry for a two crust pie. If you don't want to bake off all the pies, they can be frozen and used as your fancy strikes. Let's get to it.


Half Moon Apple Pies

Ingredients:
Pastry for a two crust pie
1/3 cup granulated sugar
1/3 cup light or golden brown sugar
2 tablespoons cornstarch
1 teaspoon ground cinnamon
1/8 teaspoon nutmeg
1/8 teaspoon salt
4 large apples, peeled, cored and diced
2 teaspoons lemon juice
Glaze: 3 egg yolks + 3 teaspoons milk

Directions:
1) Preheat oven to 425 degrees F. Grease and flour a large baking sheet. Set aside.
2) Combine both sugars, cornstarch, cinnamon, nutmeg and salt in a small saucepan. Add apples and lemon juice; toss to coat. Bring to a boil over medium heat, stirring constantly. Reduce heat; simmer, uncovered, for 4 to 5 or until apples are tender, stirring often. Remove from the heat.
3) Divide pastry into two sections. Roll each as for a 9-inch pie. Using a 4 or 6-inch round cutter, cut dough into 4 or 6-inch circles. Using a tablespoon if for 4-inch pies or a 1/4 cup measure for 6-inch pies, spoon filling into center of circle. Moisten edges with water, fold in half and crimp with tines of a fork. Place on prepared baking sheet. In a small bowl, beat egg yolks with milk. Generously brush half moons with glaze.
4) Bake on center rack of oven for 20 to 25 minutes, or until deep golden brown. These are best if served warm. Yield: 8 to 16 servings.


Bread pudding really lends itself to improvisation. This recipe is simple family fare. We have fancier versions to share with you as the holidays approach, but this is perfect everyday fare. I use Golden Delicious apples and any stale bread I happen to have in the house. This pudding was made with Texas toast. We, of course, serve it with a drizzle of caramel syrup and a dollop of cream or scoop of ice cream.


Harvest Moon Apple Pudding


Ingredients:
8 slices bread, crusts removed
4 Golden Delicious apples
1/2 cup golden raisins
1-1/3 cup milk
5 large eggs
3/4 cup brown sugar
1/4 cup (1/2 stick) butter, melted
1 teaspoon cinnamon
1/2 teaspoon nutmeg
1/4 teaspoon salt

Directions:
1) Heat oven to 350 degrees F. Lightly grease an 11-3/4 x 7-1/2-inch baking dish. Toast bread slices lightly and cut diagonally into quarters. Arrange a single layer of bread pieces in bottom of dish.
2) Core and slice 1 apple; reserve. Core and dice remaining apples. Spread diced apples evenly over bread in dish; sprinkle raisins on top. Arrange remaining bread in two lengthwise rows over diced apples and raisins. Place reserved apple sliced between rows of bread.
3) In large bowl, combine milk, eggs, 1/2 cup brown sugar, butter, cinnamon, nutmeg, and salt; beat until well combined. Pour over bread and fruit; sprinkle top with remaining brown sugar and bake 40 to 45 minutes or until firm. Serve warm or cold.
Yield: 10 servings.


Photo by Kostian Iftica, courtesy of NASA, taken on July 2, 2004.

In popular parlance, attributing something to a blue moon moon means that it seldom or rarely occurs. The moon shown in the photo above is blue because the photographer shot the image through a blue filter. Nonetheless, it was a blue moon and it is rare.

What is a blue moon? There are two definitions. The most recent says that a blue moon is the second full moon in a calendar month. This can occur every 2-1/2 years on average. The other, older, definition says a blue moon is the third moon in a season that has 4 full moons. This last definition is important to the ecclesiastical calendar, which needs to know when the 13th moon is going to occur in order to stay on track and determine such things as the date of Easter and Passover.

Are blue moons ever really blue? Probably not. The date of a full moon, all by itself, doesn't affect the moon's color, but volcanic activity can. Back in 1883 when the volcano Krakatoa exploded, the moon appeared to turn blue and stayed that way for years after the eruption. The particles in the ash cloud scattered particles in the visible light spectrum and allowed others to pass through, causing some objects to appear blue or green. More recently the eruptions of Mt. St. Helens and Mount Pinatubo have turned the moon blue as well. The key to having a blue moon is having lots of particles in the air that are slightly wider than the wavelength of red light. Volcanoes and forest fires can cause clouds that do that, so they can appear to be blue even if they're not. I don't want to get involved in the green cheese thing, so I'm going to move on. Hungry?


This post is being linked to Smiling Sally - Blue Monday

Sunday, September 20, 2009

Zucchini Cornbread


From the kitchen of One Perfect Bite...Have you ever tried a dessert that purported to be better than sex and found it not to be? Today's bread falls into that category. It's nice, but I it won't make your world stand still - at least it didn't mine. It was so popular at a zucchini festival that event cookbooks sold out and had to be reprinted because everyone wanted the recipe. For better or worse, I have the recipe. Before I go any further, you probably should know I'm a harsh critic. Over the past year, I tested a couple of dozen recipes that never made it to the blog. They weren't popular recipes that were bad, they were risky recipes that didn't work out. There was no reason to needlessly hurt feelings so they hit the circular file rather than the computer. I cussed a little and moved on. Having said that, I must add that this is not a bad recipe, it's simply not a great one. It is, however, enough outside the mainstream to merit some attention, especially if you are looking for ways to use an over abundant crop of zucchini. It is high and moist and the zucchini makes the use of shortening unnecessary. It's strongly flavored. If you love basil that will not be a problem, but I thought the basil overwhelmed the corn flavor of the bread. If I make this again, and I might, I would lose the basil and use red and green peppers to provide heat and color instead. Here's the recipe for inquiring minds to do with as they please.

Zucchini Cornbread...from the kitchen of One Perfect Bite

Ingredients:
6 cups grated zucchini
2 cups coarse yellow cornmeal
1 cup all-purpose flour
3 large eggs, beaten
1-1/2 cups milk
2 teaspoons salt, divided use
3 tablespoons sugar
1 tablespoon baking powder
2 tablespoons minced fresh basil (or 2 teaspoons dried basil)

Directions:

1) Place zucchini in a a colander. Toss with 1 teaspoon salt. Place a plate and a heavy can on top of zucchini to weigh it down. Let it sit for 30 minutes. Rinse and squeeze dry. Set aside.
2) Preheat oven to 350 degrees F. Lightly grease an 8 x 8 x 2-inch pan. Line bottom with parchment or waxed paper; grease. Set aside.
3) In a large bowl, whisk or sift together cornmeal, flour, sugar, baking powder and reserved 1 teaspoon salt. In a small bowl, beat eggs, milk and basil together. Add to flour mixture and stir just until combined. Stir in drained zucchini. Spoon batter into prepared pan.
4) Bake on lower shelf of oven until golden brown, about 40 minutes. Cool for 10 minutes in pan. Invert onto a serving platter. Remove paper, slice and serve. This is best served warm. Yield: 16 servings.

Saturday, September 19, 2009

Red Pepper Hummus - Pink Saturday


Sunrise on the Mediterranean Sea


From the kitchen of One Perfect Bite...This is football season. I live in a sports crazed town where season passes are so difficult to come by that we've seen them passed from one generation to the next in wills. Needless to say, there's lots of tailgating here. As it happens, I'm not a rabid sports fan so I like to keep things as simple as I can. This red pepper hummus is about as simple as it gets. When served with pita chips and raw vegetables, it's great for a party that has a Mediterranean theme. I had hoped my hummus would have a lovely glow for Pink Saturday. Unfortunately, a darker than usual tahini produced a hummus colored more orange than pink. Panic, of course, set in. Fortunately, I was able to find a photo of a Mediterranean sunrise that worked with both the pink and the Mediterranean theme. I hope you'll try the hummus. The recipe defines simplicity and can be made in minutes. The roasted peppers give the hummus a unique flavor that sets it apart from most others. This recipe appeared more than a decade ago in Bon Appetit magazine. Enjoy!

Red Pepper Hummus...from the kitchen of One Perfect Bite

Ingredients:

2 large garlic cloves, chopped
1 15-ounce can garbanzo beans (chick-peas), drained
1/3 cup tahini (sesame seed paste)
1/3 cup fresh lemon juice
1/2 to 3/4 cup chopped drained roasted red peppers from jar

Directions:
With processor running, drop garlic through feed tube and mince. Scrape down sides of work bowl. Add chick-peas, tahini and lemon juice; process until mixture is smooth. Add roasted peppers; process until peppers are finely chopped. Season with salt and pepper. I used 1-1/2 teaspoons salt and 1/2 teaspoon pepper. Transfer hummus to small bowl. (Can be made 1 day ahead. Cover and chill. Bring to room temperature before serving.)Yield: 2 cups.


Beverly, who hosts Pink Saturday, has asked us to recommend one other contributor whose blog we think others might enjoy. I've selected Sam at My Carolina Kitchen.

They post is being linked to Pink Saturday, sponsored by Beverly at How Sweet the Sound.

Friday, September 18, 2009

Chocolate and Hazelnut Pie with Vanilla Cream


I hope you're ready for a treat. This pie is chocolate, rich and decadent. It's also easy to make. As with all things chocolate, the better the poison the better pie. Spring for the best chocolate you can get your hands on. If you can't get hazelnuts use toasted almonds or pecans instead. Toasting the nuts, whatever type you use, is important because it really does improve their flavor. When the pie is taken from the oven it has the crackle crust of a brownie, but it's texture is more like a cross between a chocolate mousse and a brownie. It's almost a confection. Delicious doesn't begin to describe how good this really is. The recipe was developed by Giada De Laurentis who is an admitted chocolate addict and she has taken no shortcuts here. While the pie is simple to make there is a fairly significant wait time before it can be served. By my estimate, it takes 20 minutes to make but needs 3 hours to cool and chill. I suspect you'll like this one - a lot.

Hazelnut and Chocolate Pie...from the kitchen of One Perfect Bite

Ingredients:
Pie:
8 ounces semi-sweet chocolate chips
1 cup hazelnuts, skinned and toasted
1/4 cup all-purpose flour, plus more to dust the pie dish
3/4 cup sugar
1/4 cup hot water
4 eggs
1 stick butter, cut into 3/4-inch pieces, at room temperature, plus more to grease the pie dish
2 teaspoons vanilla extract
1/2 teaspoon ground cinnamon
Vanilla Cream:
1 cup heavy whipping cream
2 tablespoons powdered sugar
2 teaspoons vanilla extract
1/4 teaspoon ground cinnamon

Directions:

1) Position an oven rack in lower 1/3 of the oven and preheat to 350 degrees F.
2) Put 1/2 of chocolate chips, hazelnuts, and flour in bowl of a food processor. Pulse until hazelnuts are coarsely chopped. Pour hazelnut mixture into a small bowl and set aside. Combine remaining chocolate chips and sugar in food processor. Blend until mixture is finely ground. With machine running, gradually add hot water until chocolate is melted and mixture is smooth. Add eggs, butter, vanilla and cinnamon. Pulse until mixture is blended. Return hazelnut mixture to food processor and pulse to incorporate. Pour mixture into a buttered and floured 9-inch pie dish.
3) Bake for 35 minutes. Place pie on a cooling rack and cool for 1 hour. (Top may crack during cooling.) Refrigerate for 2 hours. (Pie can be made 1 day in advance and stored in the refrigerator). Allow pie to return to room temperature for 30 minutes before serving.
4) In a large mixing bowl, beat cream until it forms soft peaks. Add powdered sugar, vanilla, and cinnamon. Continue to beat until cream holds stiff peaks.
5) To serve, cut pie into slices and dollop with the vanilla cream. Yield: 8 servings.

This recipe is being linked to:
Designs By Gollum - Foodie Friday
My Toes are Claustrophobic

Thursday, September 17, 2009

Pom Koec - Belgian Coffee Cake


From the kitchen of One Perfect Bite...Pom Koec is a Belgian coffee cake that is similar to, but a bit drier than the honey cake that is traditionally served for Rosh Hashanah. The recipe I use comes from the Belgian Recipe Page and should be credited to Margaret Buytaert who brought it with her from Kieldrecht, Belgium. There are no tricks here. A child can make this cake. I changed the spicing a bit, replacing the cloves with ginger and adding a 1/4 teaspoon nutmeg and the zest of an orange to the batter. I also found the cake required more time to cook than is stated in the recipe. That may be a vagary of my oven, but I'd suggest you use 40 to 45 minutes as the estimated baking time. My changes to the recipe appear in red. The cake improves with aging, so it's best to bake it a day before you plan to serve it. I'd like to wish all who will be observing Rosh Hashanah this weekend "L'shana tova tikatevu." May your new year be sweet and spent in the company of family and friends.

Pom Koec - Belgian Coffee Cake...from the kitchen of One Perfect Bite

Ingredients:

3 cups flour
1/2 cup sugar
1 teaspoon baking soda
1 teaspoon cinnamon
1/2 teaspoon ground ginger
1/4 teaspoon ground nutmeg
1 teaspoon freshly grated orange zest
1 teaspoon salt
1 cup honey
1 cup hot coffee
1 large egg
1/3 cup corn oil

Directions:
1) Pre-heat oven to 350 degrees.
2) Grease a 9 x 4 -inch loaf pan. Cut a piece of wax paper or parchment to fit bottom of pan. Lightly grease paper. Set aside.
3) Mix dry ingredients (flour, sugar, baking soda, cinnamon, ginger, nutmeg, orange zest and salt) in a bowl to combine.
4) In a separate bowl, quickly mix honey, coffee, egg and oil.
5) Quickly fold in dry ingredients - mixing just enough to combine without toughening cake batter.
6) Fold into pan and bake for 30 minutes (my cake took 45 minutes to bake). Use a tooth pick to see if center is done.
7) Cool on wire rack for 10 minutes. Invert pan and turn cake onto a serving plate. Remove paper. Serve warm with butter, thinly sliced. Yield: 10 to 12 servings.

Wednesday, September 16, 2009

Kartoffel Suppe (Bavarian Potato Soup) - Oktoberfest - Outdoor Wednesday


Today is Outdoor Wednesday, and this week we're taking a cyber trip to Munich for Oktoberfest. Oktoberfest is the type of celebration that demands a little food be eaten before toasts are made and steins lifted. This recipe is one I learned to make in Hannie's kitchen years ago. Those who have followed One Perfect Bite from its beginnings know that Hannie is one of the special women who help to raise me and taught me how to cook. Follow the link above if you like to know more about her. Hannie made this soup for her husband, Max, on New Year's Day. He rarely drank but he was a New Year's Eve reveler. She was very disapproving and called this Max's hangover soup. Her displeasure led to much clattering and banging and a muttering that was definitely not soto voce. I could hear her across the hall. The soup is decidedly Germanic; it's an unusual potato soup that is redolent with bacon and onions. It's delicious and very easy to make. It ages well and is even tastier the following day.

Kartoffel Suppe (Bavarian Potato Soup)...from the kitchen of One Perfect Bite

Ingredients:
1/2 pound smoked bacon, diced
1 large carrot, peeled and diced
1 large stalk celery, diced
1 large onion, dice
1/2 bunch parsley, chopped
1/4 teaspoon marjoram
1-1/2 pounds waxy potatoes, peeled and diced
1/4 cup all-purpose flour
6 cups reduced-sodium beef broth
Salt and pepper

Directions:
Render bacon in a stockpot. Add carrots, celery, onions, parsley and marjoram. Saute until transparent. Stir in potatoes and toss to coat. Stir in flour. Add beef broth and simmer for 30 to 40 minutes. Season to taste with salt and pepper. Yield: 10 to 12 servings.

Oktoberfest


These young gals standing along the parade route are tourists visiting Munich for Oktoberfest - the hobo bag gives them away. I hope they've eaten and done some research. There are more tourists than chairs in the festival beer halls and some planning is necessary. Munich hosts nearly 6 million visitors during Oktoberfest and the fair grounds currently have 14 large beer tents. I think you get the picture - reservations are advised. Oktoberfest is a 15 day festival that is held in Munich every year. It begins in September and ends on the first Sunday of October. Why September? The Bavarian winds are quite strong and can bring early snow down the mountains with them. Rather than chance the weather, organizers have opted to have the festival span the months of September and October. We're going to follow the parade to the fair grounds.


This view of the fairgrounds is taken from a gondola on a ferris wheel. Beer tents line either side of the fairway. .


One of the most interesting things about Oktoberfest, other than listening to folks who do not share a common language and whose bellies are full of beer still trying to sing in unison, is watching the waitresses carry the beer steins. Those steins are 1 liter each and made of heavy glass. The waitresses regularly carry 10 or 12 at a time!


Germany is a beautiful country brimming with gorgeous scenery, history, castles, monuments and wonderful people. Some of you may remember the words of the Drinking Song from the Student Prince. “Eine, Swie, Drie, Fier, lift your steins and drink your beer...drink drink drink....” No doubt about it, while all those other things are true, Oktoberfest is all about the beer.


This recipe is being linked to Outdoor Wednesday, an event sponsored by Susan at A Southern Daydreamer.

Tuesday, September 15, 2009

Balsamic Onion Marmalade


From the kitchen of One Perfect Bite...If you are searching for a condiment to perk up the flavor of plain grilled meat, onion marmalade may be just what you're looking for. It's the homeliest of condiments, but it's awfully hard to look good when you've been caramelized and doused with balsamic vinegar. The shortcomings it's appearance present are overcome by the flavor it imparts to plain grilled pork, lamb or beef. I personally think it is too strong for poultry, but I have a friend who insists it's great with duck. At the risk of straining our relationship, I must tell you she's wrong a lot. While the marmalade is easy to make, it requires better than an hour to cook, so you'll have to plan your time accordingly. Once made, it will keep for three weeks if refrigerated. This recipe was develop by Tom Colicchio, the chef and restaurateur who heads the team of judges on Top Chef. You'll like his recipe.

Balsamic Onion Marmalade...from the kitchen of One Perfect Bite

Ingredients:
1 tablespoon vegetable oil
4 large onions, thinly sliced (about 8 cups)
Kosher salt and freshly ground black pepper
1/3 cup sugar
2/3 cup balsamic vinegar

Directions:

1) Heat the oil in a large skillet over medium heat until it slides easily across pan. Add onions, salt, and pepper and cook, stirring occasionally, for about 20 minutes, until onions are soft.
2) Add sugar and reduce the heat to medium-low. Cook, stirring frequently, for about 10 minutes, until onions appear dry.
3) Add vinegar and reduce heat to low. Continue cooking, stirring occasionally, for about 1 hour, until onions are soft and dry. Serve warm or at room temperature. Store marmalade in refrigerator. It will keep for several weeks. Yield: 2 cups.

Monday, September 14, 2009

Cougnou (Bread of Jesus) - Brussels, Belgium - Blue Monday

Belgium is renowned for its bakeries and among their specialties is the cougnou, a rich brioche-type bread shaped to resemble a swaddled infant. It is locally known as the Bread of Jesus and it's especially popular in the winter months and during the Christmas season. I stumbled onto a very old recipe for it while doing research for another bread I wanted to make. I've made a few changes to the recipe because the original instructions were difficult to follow and some of the ingredients were hard to find. The basic recipe, however, remains the same. This is a delicious loaf of bread. 
Cougnou... the kitchen of One Perfect Bite 

 Ingredients:

8 cups all-purpose flour + flour for kneading

5 teaspoons active dry yeast

8 ounces (2 sticks) softened butter

 1-1/4 cups warm milk 

2 teaspoons salt

6 large eggs, room temperature

1/2 cup granulated sugar 

1 teaspoon cinnamon 

3/4 cup raisins

1 cup + 2 tablespoons coarse sugar crystals (the original recipe called for 2 cups)

Glaze: 

3 egg yolks

3 teaspoons milk

Directions: 

1) Combine flour and salt in a large bowl. Make a well in flour. Pour warm milk into well. Add yeast. Let sit for 10 minutes. Mix. Add eggs, granulated sugar and cinnamon. Beat the mixture with a spoon (you can use your electric mixer if you wish). Gradually add butter. Turn dough onto a floured board and knead until dough no longer sticks to work surface. Place in a greased bowl. Cover with plastic wrap or a damp towel. Allow to rise 1 hour, or until doubled in size. Turn onto work surface. Knead in raisins and 1 cup coarse sugar crystals. Divide dough into six balls. Lightly grease or spray 2 cookie sheets. Connect three balls, representing head, body and legs, on each sheet. Allow to rise until doubled in size. 

2) Preheat oven to 430 degrees F. Combine egg yolks with 3 teaspoons milk. Brush loaves with mixture. Sprinkle with reserved 2 tablespoons sugar crystals. Bake for 25 minutes, or until a deep golden brown. Yield: 2 loaves. 

 Cook's Note: If you are unable to find sugar crystals, coarsely chop sugar cubes to desired size.

Indian Dosas


This month's Daring Cook hostess is Debyi of The Healthy Vegan Kitchen! She decided on Indian Dosas from the Refresh cookbook by Ruth Tal.

We enjoyed the recipe and heartily recommend it. It is a lot of work and the recipe as written makes a huge amount of food. If you enjoy Indian food or are just looking for something different for a change, I think you'll like this.


Indian Dosas Recipe
This recipe comes in 3 parts, the dosas, the filling and the sauce. It does take awhile to make, but the filling and sauce can be made ahead and frozen if need be. You can serve them as a main course with rice and veggies, or as an appetizer. This does take a little planning ahead, so make sure you read the recipe through before starting (I forgot & didn't start making the rice until everything was ready, oops).

Serves 4

Equipment needed:
large bowl
whisk
griddle or skillet
ladle (or large spoon)
spatula
vegetable peeler &/or knife
large saucepan
food processor or bean masher

Dosa Pancakes
1 cup (120gm/8oz) spelt flour (or all-purpose, gluten free flour)
½ tsp (2½ gm) salt
½ tsp (2½ gm) baking powder
½ tsp (2½ gm) curry powder
½ cup (125ml/4oz) almond milk (or soy, or rice, etc.)
¾ cup (175ml/6oz) water
cooking spray, if needed

Dosa Filling
1 batch Curried Garbanzo Filling (see below), heated

Dosa Toppings
1 batch Coconut Curry Sauce (see below), heated
¼ cup (125gm) grated coconut
¼ cucumber, sliced

Dosa Pancakes
1.Combine the dry ingredients in a bowl, slowly adding the almond milk and water, whisking until smooth.
2.Heat a nonstick skillet over medium heat. Spray your pan with a thin layer of cooking spray, if needed.
3.Ladle 2 tablespoons of batter into the center of your pan in a circular motion until it is a thin, round pancake. When bubbles appear on the surface and it no longer looks wet, flip it over and cook for a few seconds. Remove from heat and repeat with remaining batter. Makes 8 pancakes.

Curried Garbanzo (Chickpea) Filling
This filling works great as a rice bowl topping or as a wrap too, so don't be afraid to make a full batch.

5 cloves garlic
1 onion, peeled and finely diced
1 carrot, peeled and finely diced
1 green pepper, finely diced (red, yellow or orange are fine too)
2 medium hot banana chilies, minced
2 TBSP (16gm) cumin, ground
1 TBSP (8gm) oregano
1 TBSP (8gm) sea salt (coarse)
1 TBSP (8gm) turmeric
4 cups (850gm/30oz) cooked or canned chick peas (about 2 cans)
½ cup (125gm/4oz) tomato paste

1.Heat a large saucepan over medium to low heat. Add the garlic, veggies, and spices, cooking until soft, stirring occasionally.
2.Mash the chickpeas by hand, or in a food processor. Add the chickpeas and tomato paste to the saucepan, stirring until heated through.

Coconut Curry Sauce
This makes a great sauce to just pour over rice as well. This does freeze well, but the texture will be a little different. The flavor is still the same though. My picture of this sauce is one that I had made, had to freeze, then thaw to use. It tastes great, but the texture is a little runnier, not quite as thick as it was before freezing.

1 onion, peeled and chopped
2 cloves garlic
½ (2½ gm) tsp cumin, ground
¾ (3¾ gm) tsp sea salt (coarse)
3 TBSP (30gm) curry powder
3 TBSP (30gm) spelt flour (or all-purpose GF flour)
3 cups (750ml/24oz) vegetable broth
2 cups (500ml/24oz) coconut milk
3 large tomatoes, diced

1.Heat a saucepan over medium heat, add the onion and garlic, cooking for 5 minutes, or until soft.
2.Add the spices, cooking for 1 minutes more. Add the flour and cook for 1 additional minute.
3.Gradually stir in the vegetable broth to prevent lumps. Once the flour has been incorporated, add the coconut milk and tomatoes, stirring occasionally.
4.Let it simmer for half an hour.
Happy eating!

Sunday, September 13, 2009

Chipotle-Marinated Pork Tenderloin


From the kitchen of One Perfect Bite...We've just finished a wonderful meal that Bob thinks should be shared with you. I've made this pork tenderloin before, but tonight, rather than grill it outdoors, I seared it, stovetop, in a cast iron grill pan. It was terrific and , better still, almost effortless to prepare. I made a marinade this morning, placed it in a bag with the tenderloin and let it sit in the refrigerator until I was ready to cook the meat. The marinade is more than sufficient for two 1-pound tenderloins. This is a lovely stand-alone entree to serve with southwestern sides, but it also works well as a base for fajitas if you want something more informal. There are no tricks to be shared here, but because the marinade uses chipotles in adobo sauce, I wanted to pass on a tip I use for storing the unused portion of the can. I mash the chipotles with any remaining adobo sauce, transfer the puree to a small air tight container and refrigerate it until needed. This lasts for several months. When a recipe calls for a chipotle in adobo, I use two teaspoons of the puree. This recipe comes from Eating Well magazine, so you can rest assured that while the pork is delicious, it's also good for you.

Chipotle-Marinated Pork Tenderloin...from the kitchen of One Perfect Bite

Ingredients:
1 canned chipotle chile in adobo plus 1 teaspoon adobo sauce, or 2 teaspoons chipotle puree
1 clove garlic, minced
1/4 cup orange juice concentrate, undiluted
1/4 cup water
3 tablespoons lime juice
1 tablespoon red-wine vinegar
1 teaspoon dried oregano
1/2 teaspoon ground cumin
1/4 teaspoon salt
1/4 teaspoon freshly ground pepper
1 (1-pound) pork tenderloin, trimmed of fat and silver skin

Preparation:
1) Combine chipotle and adobo sauce (or chipotle puree), garlic, orange juice, water, lime juice, vinegar, oregano, cumin, salt and pepper in a blender or mini food processor; blend or process until the chipotle is chopped and mixture is relatively smooth. Pour into a sealable plastic bag, add pork and seal, squeezing out any excess air from bag. Turn to coat with marinade. Refrigerate at least 1 hour and up to 8 hours.
2) Preheat grill to high or heat a large indoor grill pan over high heat. Remove pork from the marinade (discard marinade). Grill pork, turning occasionally, until an instant-read thermometer inserted diagonally into center of the meat registers 145° F, 12 to 15 minutes. Transfer pork to a cutting board and let rest for 5 minutes before slicing. Yield: 4 servings.

Saturday, September 12, 2009

Smoked Salmon Frittata - Pink Saturday


Sides of Atlantic salmon hanging in a smoke shack.


Fillets of Pacific salmon in a backyard smoker.


This lovely frittata is wonderful for brunch or a light supper. While smoked salmon is expensive, I've learned that small amounts of it can raise fairly ordinary fare, such as this frittata, to new heights. We have a modern smoking facility here in town and it's fascinating to watch the salmon being cured and smoked. It can be done in one of two ways. Hot-smoked salmon is smoked from 6 to 12 hours at temperatures that can range from 120 to 180 degrees F. The size of the fish will determine the time and temperature at which it is smoked. Proximity to the source of the smoke can also affect the flavor of the fish. Cold-smoked salmon is smoked for 1 day to 3 weeks at temperatures that range from 70 to 90 degrees F. Within those two categories there are many types of salmon. Indian-cured salmon, which is like a jerky, is brined and cold-smoked for up to 2 weeks. In the United States, kippered salmon usually comes from chunks, steaks or fillets of Chinook salmon that have been brined and hot-smoked. In Europe, a kippered salmon is a whole salmon that has been split before being brined and cold-smoked. Lox is brine-cured, cold-smoked salmon that tends to be saltier than other types. Nova or Nova Scotia salmon is a designation used in the eastern United States to describe cold-smoked salmon. Scotch-smoked, Danish-smoked and Irish-smoked salmon are all cold-smoked Atlantic salmon that are named for the region in which they are caught. I used thinly sliced lox for this very simple recipe. My frittata bakes in the oven rather than cooking on the stovetop, so it's super simple and nearly foolproof. Here's how we do it.


Smoked Salmon Frittata ...from the kitchen of One Perfect Bite

Ingredients:
6 large eggs
1 cup sour cream
1/2 teaspoon salt
1/2 teaspoon hot sauce
1/4 cup all-purpose flour
1/4 pound smoked salmon, torn into pieces
1 cup shredded Gruyere cheese
5 green onion, chopped
2 tablespoons fresh dill or 2 teaspoons dried
1 tablespoon butter
Optional garnish: dill sprigs, sour cream

Directions:

1) Preheat oven to 375 degrees F.
2) Combine eggs, sour cream salt and hot sauce in a medium bowl. Add flour and whisk to blend. Stir in salmon, cheese, green onions and dill.
3) Using a 10-inch ovenproof skillet, set pan over medium heat, add butter and heat until butter sizzles. Pour in egg mixture. Transfer to oven and bake for 20 minutes, or until eggs are set and the top is brown. Cut into wedges and garnish with sour cream and dill if using. Yield: 6 to 8 servings.

They post is being linked to Pink Saturday, sponsored by Beverly at How Sweet the Sound.
Related Posts with Thumbnails

Printfriendly