Saturday, April 30, 2011

A Summary of Entrees for Cinco De Mayo

I know that some of you will be preparing special meals for Cinco de Mayo. I thought this would be a good time to do a review some of the recipes we've featured for Mexican entrees. These are all great recipes and I hope you'll give one or two of them a try. Here are some of my favorites.


Orange Glazed Fiesta Chicken


Chicken Mole Poblano


Camarones a la Mexicana


Black Bean Burritos


Mexicali Pizza


Chicken Enchiladas Verde


Tortilla Soup


Pork Meatballs in Chipotle Sauce - Albondigas


Gratineed Chicken in Poblano Cream Sauce


Crock-Pot Pork Posole


Shrimp Enchiladas Verde

Friday, April 29, 2011

Smooshed Potatoes


From the kitchen of One Perfect Bite...If you are looking for a slightly different take on roasted potatoes, you might want to give this version a try. It differs from its more classic cousins in that the cooked potatoes are lightly smashed before being roasted. Younger members of our family refer to these as smooshed potatoes and that is a pretty apt name for them. It certainly is the only thing that sets them apart from other roast potatoes. The potatoes are smooshed to create a greater surface area for browning while they're in the oven. Having said that, I'm pretty much at a loss for words, other than to tell you that kids love to make these and they actually eat them. Because there is so little to the potatoes, I use my best olive oil for their roasting and finish them with fleur de sel - French sea salt. The one tip I want to share with you concerns the precooking of the potatoes. In order to avoid over cooking or water logged potatoes, I use my microwave to cook them. I place them in a single layer in a large microwave container to which 3 or 4 tablespoons of water has been added. I cover the dish and microwave the potatoes for 10 minutes at which point they are fork tender and ready to be smooshed for roasting. Recipes rarely get easier than this. Here's how the potatoes are made.

Smooshed Potatoes...from the kitchen of One Perfect Bite

Ingredients:
1-1/2 to 2 pounds unpeeled small Yukon Gold potatoes
olive oil
coarse salt
4 large unpeeled garlic cloves

Directions:
1) Preheat oven to 350 degrees F.
2) Pour 4 cups of water into a large pot and bring it to a boil. Add potatoes and 2 teaspoons salt and cook at a medium boil for 10 to 12 minutes, or until potatoes are cooked. Do not over cook. Alternatively, potatoes may be placed in a large microwave container to which 3 tablespoons of water have been added, and, cooked, covered, for 9 to 10 minutes on HIGH power until potatoes can be pierced with a fork.
3) When the potatoes are cooked, rinse them under cold running water to stop cooking. Place the potatoes on a work surface and, using your fist, punch them so that they flatten a bit. I protect my hand with a thin pot holder.
4) Place potatoes and the garlic cloves on a baking pan large enough to hold them in a single layer. Sprinkle with salt and drizzle each potato with olive oil. Transfer pan to oven and roast for 15 minutes. Turn potatoes to opposite side, drizzle with more olive oil and bake for 15 minutes longer. Transfer potatoes to a large serving dish. Peel and mash garlic cloves and add to potatoes. Mix well. Serve immediately. Yield: 4 to 6 servings.


One Year Ago Today: Fry Bread


Two Years Ago Today: Thai Cucumber Relish - Ah Jaht


You might also enjoy these recipes:
Cheesy Scalloped Potatoes - Girli Chef
Hasselback Potatoes - Home Cooking Rocks
Potatoes Au Gratin - Daily Chef
Buttery New Potatoes with Parsley - Drick's Rambling Cafe
Recipe: Potato Latkes - Christie's Cornor
Best Ever Potato Salad - Brown Eyed Baker
Chive and Onion Mashed Potatoes - Real Mom Kitchen
Roasted Radish and Potato Salad - Noble Pig
Cajun Fried Potato Cake - The Flourishing Foodie
Fried Smashed Potatoes with Lemon and Garlic - La Bella Vita

Thursday, April 28, 2011

Rhubarb-Strawberry Jam

From the kitchen of One Perfect Bite...This is a spread that will not be to everyone's liking. It has a drab color and the predominant flavor of this sweet and tart jam is rhubarb. While I don't particularly like it on bagels or for breakfast toast, I think it makes a terrific quick appetizer when spread with cream cheese on freshly sliced baguettes. It also makes a wonderful sweet-tart glaze for sauteed or grilled chicken or pork. The recipe below requires canning equipment. While I sometimes make this spread for pantry storage, I usually bypass the water bath and simply refrigerate the jam in clean storage containers. I think those of you who like sweet-tart flavors will really enjoy this jam. If you like heat, I suggest you add a half teaspoon of red pepper flakes to the jam before storing it. If you fully process the jam, it will keep for a year on your pantry shelves. If you choose not to process it, the jam will keep for about a month in the refrigerator. I think those of you who appreciate spreads that are not to sweet will really enjoy this. Here's the recipe.

Rhubarb-Strawberry Jam...from the kitchen of One Perfect Bite courtesy of Sasha Chapman and Saveur magazine

Ingredients:
5 cups rhubarb (about 1-1⁄4 pounds), cut into 3⁄4 x 1⁄2-inch cubes
2 cups hulled and quartered strawberries (about 1⁄2 pound)
2 1⁄4 cups sugar
1 tablespoon fresh lemon juice

Directions:
1) Combine rhubarb, strawberries, sugar and lemon juice in a 4-quart saucepan set over medium heat. Bring to a boil and reduce heat to medium-low. Cook, stirring occasionally, until rhubarb breaks down and jam has thickened, about 1 hour. To determine whether jam has set, place a small spoonful on a chilled plate; if the dollop of jam holds firm and doesn't get runny around edges, it is ready for canning. If it runs, continue to cook for another 10 minutes.
2) Meanwhile, submerge three 1-cup canning jars, along with their lids and ring bands, in a large pot of boiling water and sterilize over high heat for 10 minutes. Transfer sterilized jars, lids, and bands to a clean dish towel. Fill each jar with hot jam, leaving at least 1⁄4" of space at the top. Wipe jar rims with a clean dish towel, place lids on jars, and secure ring bands.
3) Transfer filled jars to a canning rack; place rack in a pot of gently boiling water so that jars are submerged by at least 1"; let boil for 10 minutes. Transfer jars, set at least 1" apart, to a dish towel and let cool, undisturbed, for 24 hours. To test that jars have properly sealed, unscrew bands and lift each jar by the edge of the lid; if the lid holds, the jar is sealed. If it loosens, jar is not fully sealed, and jam should be refrigerated and used within 2 weeks. Sealed jars will keep, in a cool, dark place, for up to a year. Yield: 3 cups.


One Year Ago Today: Turnip Griddle Cakes


Two Years Ago Today: Asian-Style Beef Short Ribs for the Crock-Pot


You might also enjoy these recipes:
Rhubarb Upside-Down Cake - Kitchen Parade
Rhubarb and Plum Compote - Jaana's Kitchen
Strawberry and Rhubarb Crisp - One Perfect Bite
Rhubarb Streusel Cake - Angie's Recipes
Rhubarb Cornmeal Cake - The Red Spoon
Rhubarb Tarts - Almond Corner
Rhubarb and Yogurt Belgian Waffles - Sugar Crafters
Spiced Rhubarb Pancakes - 5 Star Foodie Culinary Adventures
Rhubarb Smoothie with Floral Notes - Dinners and Dreams
Rhubarb Fool - Alessandra Zecchini

Wednesday, April 27, 2011

Lamb Sausage - Shepherds and Flocks for Hire


From the kitchen of One Perfect Bite...Bob and I were at the King winery this past weekend. We had gone to watch a marathon and sample a flight or two of some highly recommended wines. We weren't the only visitors. Sheep, an uncommon occurrence on the estate, were grazing in the orchards and the vineyards. The flocks had been rented to assist in "vegetation control". Goats, as in herds for hire, are not uncommon here. The state uses them to clear vegetation on slopes that are too steep for highway crews to safely work on. This was, however, the first time I'd seen sheep used to clear the land of others. It seems they are more discriminating in what they eat than goats, and there is less chance they will eat vines or damage trees. While watching the race, I struck up a conversation with the man standing next to me. I asked him what he did. He said he was a shepherd. Choking back a laugh, I was about to introduce myself as Mother Goose, but my better angels and long dead mother stopped me. Turns out, he was one of three people responsible for the flocks. He was the "lead shepherd". His words, not mine. A lot of lamb is raised in the areas surrounding the estate, so the same farms that supplied sheep for vineyard maintenance also provided a fresh supply of lamb for my freezer. I have several recipes that I've wanted to try and I though this would be a great time to test those for lamb sausage. I'll be featuring them over the course of the next two weeks. This recipe is based on one developed by Michael Symon. His recipe makes a delicious Middle Eastern-style sausage but it is very spicy and I'm not sure it would appeal to all of you. So, I've cut way back on the amount and source of the chilies used to season the lamb. I've also taken a few shortcuts that make the sausage easier to prepare. I hope you'll give the recipe a try. If you like lamb, I know you'll like this sausage. Here's the recipe.

Lamb Sausage... from the kitchen of One Perfect Bite adapted from Michael Symon, Live to Eat

Ingredients:
1/2 tablespoon extra virgin olive oil
1/4 cup finely minced shallot
2 large cloves garlic, finely minced
2 pounds ground lamb
2 teaspoons smoked sweet paprika (Pimenton)
1/2 to 1 teaspoon red pepper flakes
1 teaspoon ground cumin
1 teaspoon ancho chili powder
1 tablespoon kosher salt
1/2 teaspoon sugar

Directions:
1) Warm oil in a medium frying pan. When oil shimmers, saute shallots over medium heat until translucent , about 4 minutes. Add garlic and saute until fragrant. Remove from heat. Cool completely.
2) Combine onions, garlic, lamb, paprika, pepper flakes, cumin, chili powder, salt and sugar in a large bowl. Cover and chill from 2 to 24 hours. Form into patties or logs. Sausage may be refrigerated for up to a week. It may also be frozen. Fry over medium heat until patties reach an internal temperature of 150 degrees F. Yield: 12 patties.

As an afterthought, I thought some of you might enjoy reading about the sheep at the King Estate Winery. Here's a bit more information for you.

The Sheep Are Back

Sheep in the Vineyard


One Year Ago Today: Southwestern-Style Potatoes Roasted with Peppers and Herbs


Two Years Ago Today: Raspberry Yogurt Parfait


You might also enjoy these recipes:
Homemade Country Sausage - Look Whose Cookin'
Homemade Hot Italian Sausage - Grilling 24 x 7
Homemade Italian Sausage - Cooking with Michele
Homemade Breakfast Sausage - One Perfect Bite
How to Make Homemade Sausage - Simply Recipes
Making Andouille Sausage - New Orleans Cuisine
How to Make Sausage - Michael Ruhlman
How to Make Italian Sausage - Farmgirl Fare
How to Make Polish Kielbasa - About Eastern European Food
Smoked Beef Sausages - Menu in Progress

This is being linked to:
Outdoor Wednesday - A Southern Daydreamer

Tuesday, April 26, 2011

Shaved Asparagus Salad with Aged Gouda and Hazelnuts


From the kitchen of One Perfect Bite...How green is my valley? At this time of year, it looks like waves of velvet have washed it in shades of green that shimmer as it captures light. In another week, apple trees, now in flower, will drop their petals in a flurry that resembles falling snow and if you venture outside the city there are hectares of aching beauty just begging to be seen. Another green, asparagus, has begun its long climb toward the sun and in a week or two the season will be in full swing. While it is one of my favorite vegetables, I rarely prepare it when it's out of season. At this time of year, however, I make it several times a week. When the season ends, asparagus disappears from my kitchen. I do, however, collect recipes for it throughout the year. I suspect my one real talent in the kitchen is the ability to taste a recipe as it is read. Very few duds make it to my table. There are mistakes to be sure, but not a lot of them. I came across a recipe for a spring salad that was developed by John Ash for Fine Cooking magazine. I knew it would be a standout as I read through the recipe and, sure enough, it was. The salad consists of strips of shaved asparagus and cheese that are tossed with arugula and hazelnuts in a special vinaigrette. It was a perfect way to begin our Easter dinner. I hope you will try this. I know those of you who do will be delighted. Here's the recipe.

Shaved Asparagus Salad with Aged Gouda and Hazelnuts...from the kitchen of One Perfect Bite courtesy of John Ash and Fine Cooking magazine

Ingredients:
Vinaigrette
3 tablespoons seasoned rice vinegar
2 tablespoons fresh lemon juice
2 tablespoons extra-virgin olive oil
1 tablespoon fragrant honey, such as wild flower or orange blossom
1 tablespoon finely chopped shallots
Kosher salt and freshly ground black pepper to taste
Asparagus
3/4 lb. thick asparagus, trimmed
3 cups baby arugula
1/2 cup toasted, peeled, and chopped hazelnuts
2-1/2 oz. thinly shaved aged Gouda (use a vegetable peeler)

Directions:
1) To make vinaigrette: Whisk vinegar, lemon juice, olive oil, honey, shallots and salt and pepper together in a small bowl. Cover and refrigerate.
2) To make salad: Remove tips of asparagus and put them in a large bowl. Using a vegetable peeler, shave a stalk discarding first shaving. When shaving first side becomes awkward, turn stalk over and repeat. Add shavings to tips. Repeat with remaining stalks. Toss asparagus with 1/3 cup of vinaigrette and let sit for 10 to 15 minutes so that flavors meld and asparagus softens just a bit. Marinate for no more than 15 minutes because strips will lose their crispness as they sit. Add arugula and hazelnuts and toss, adding more dressing as necessary to lightly coat arugula. Arrange on plates and top with shaved cheese. Serve immediately. Yield: 4 to 6 servings.


One Year Ago Today: Goat Herder's Mac N' Cheese


Two Years Ago Today: Coffee Walnut Snack Cake


You might also enjoy these recipes:
Asian Noodle and Cabbage Salad - Karista's Kitchen
Jazzy Carrot Salad - Bless Us O Lord
Chickpea Salad with Tamarind Dressing - Lisa's Kitchen
Creamy Cucumber Salad with Fresh Dill - La Bella Vita
Un-Cobb Salad - Simply Recipes
Greek Salad - Pioneer Woman Cooks
Lemon Coleslaw - One Perfect Bite
Endive, Pear and Watecress Salad - One Perfect Bite
Scallion and Asparagus Salad - One Perfect Bite
Israeli Salad - One Perfect Bite

Monday, April 25, 2011

Strawberry and Rhubarb Crisp


From the kitchen of One Perfect Bite...Every year at this time, rhubarb and strawberries flood the produce aisles of our local markets. Having been around the block a time or two, I know its way too early for local crops and yet I waffle and finally succumb. Thoughts of pies and crisps weaken my resolve and these imported villains find their way to my basket, despite my better angels and personal commitment to local produce. I blame the Silver Fox, who loves the combination and begins to lobby for a pie or crisp as soon as he sees the two paired in the stores. I have several recipes for pies and crisps and the crisp I'm featuring today is one of my favorites. It's really simple to make and differs from others in its class because it uses a copious amount of orange zest. The finished crisp has a bright sweet and tart flavor that's hard to resist. The fruit and vegetable base comes from a pie recipe developed for Cook's Illustrated, while the streusel, which originally came from bits and pieces of other recipes, has finally become my own. This is very straight forward recipe that I think you'll enjoy. Here's how the crisp is made.

Strawberry and Rhubarb Crisp
...from the kitchen of One Perfect Bite adapted from Cook's Illustrated

Ingredients:
Filling
3 cups fresh strawberries, hulled and quartered
3 cups fresh rhubarb, trimmed and cut into 1/2-inch pieces
3/4 cup granulated sugar
1 tablespoon grated orange zest
2 teaspoons lemon juice
1/4 teaspoon vanilla extract
1/4 teaspoon salt
3–4 tablespoons quick-cooking tapioca
2 tablespoons unsalted butter, cut into small pieces
Streusel Topping
3/4 cup all-purpose flour
1/2 cup toasted walnuts or pecans, coarsely chopped
1/4 cup old-fashioned oatmeal
1/2 cup granulated sugar
1/4 cup brown sugar, packed
Pinch of salt
1 stick (4-oz.) cold unsalted butter, diced

Directions:

1) Heat oven to 350 degrees F.
2) To make filling: Toss fruit with sugar, orange zest, lemon juice, vanilla extract, salt and tapioca. Let stand for 15 minutes.
3) To make topping: Combine flour, granulated sugar, brown sugar, salt, nuts, oatmeal and butter in bowl of an electric mixer fitted with a paddle attachment. Mix on low speed until the mixture is crumbly.
4) Transfer filling to a 2 quart casserole or deep-dish pie pan. Dot with small pieces of butter. Sprinkle streusel topping over mixture and place on a baking sheet. Bake for 1 hour, or until top is brown and crisp. Serve warm with ice cream or whipped cream Yield: 6 servings.


One Year Ago Today: Pink Lemonade Granita


Two Years Ago Today: Soy Glazed Hasselback Potatoes


You might also enjoy these recipes:
Rhubarb Streusel Cake - Angie's Recipes
Rhubarb Oatmeal Cake - The Red Spoon
Rhubarb Tarts - Almond Corner
Rhubarb Pineapple and Ginger Crumble - Farmersgirl Kitchen
Strawberry Rhubarb Fool - Sugar Crafter
Rhubarb Polenta Cake - Eggs, Cream and Honey
Strawberry Rhubarb Pie - Hummingbird Appetite
Rhubarb and Vanilla Crumble - Technicolor Kitchen
Rhubarb Spice Cake - Sugar High
Rhubarb Crumble Ice Cream - Deb Cooks

Sunday, April 24, 2011

Venetian Risi e Bisi - Rice and Peas - Easter 2011


From the kitchen of One Perfect Bite...I had gone to market in search of English peas and while there I happened on a display of large canned hams that I hadn't seen in years. They were a feature of holiday meals and throughout the 50's and 60's you'd be hard pressed to attend a party where they weren't served. The hams were usually topped with rings of pineapple and studded with maraschino cherries before being glazed and warmed for service. They weren't bad and they fit the lifestyles of woman trying to cast off years of rationing and cooking that kept them in the kitchen for hours at a time. The women who emerged from the war loved the simplicity of Danish modern furniture and the ease of frozen food. A company ready ham that need only to be warmed was perfect for their needs. That ubiquitous ham was part of Easter dinner in many homes across the country. Strange as it seems, while the food was simple, the holiday itself seemed more important then it does today. The Easter bunny was on a par with Santa and egg hunts replaced the magic of empty stockings miraculously filled by elves or angels. In those simpler times, Easter really did mean bonnets and parades, and to the delight of little girls, the holiday came with new outfits that included shinny Mary Janes.

It was also a more overtly religious holiday than it appears to be today. We spent a lot of time in church during Holy Week, but it wasn't as oppressive as you might think. I will forever be moved when I hear the "Exultet" and the "Alleluia" from the Easter vigil services and I'm so grateful they were part of my childhood. While Easter may have no meaning for many, it's my hope that we all believe in new beginnings and the triumph of good over evil. So, whatever your beliefs, I hope you all bask in the sun of this new day.

After that introduction, I was sorely tempted to make a canned ham and share it with you, but then I realized you'd probably stone me and I wanted no part of that. So, I'm heading back to the peas with which I began this post. “Risi e bisi” (rice and peas) is a classic Venetian dish. While many think it is a risotto, it is actually a very light soup. There should always be just enough liquid in the bowl to require a spoon for eating. It is very easy to make and you'll love it as long as you don't overcook the rice. The soup can be table ready in half an hour and it is a perfect light meal to break a fast or settle an uneasy stomach. The soup will absorb liquid as it sits, so it's best to serve it as soon as the rice is ready. If you have leftovers you will have to add stock when you reheat the soup. I think you'll really like this one. Here's the recipe.


Risi e Bisi...from the kitchen of One Perfect Bite courtesy of Saveur

Ingredients:
3 tablespoons butter
1 yellow onion, peeled and finely chopped
3 pounds fresh peas, shelled to yield 3 cups
Pinch of salt
1 cup Chicken Stock
1 cup arborio rice
2 tablespoons chopped fresh flat-leaf parsley
Grated parmigiano-reggiano

Directions:
1) Melt butter in a medium saucepan over medium heat. Add onions and cook for 5 minutes. Add peas and salt, and cook, stirring constantly, for 2 minutes.
2) Add chicken stock and 2 cups water, and bring to a boil. Stir in rice and parsley, reduce heat to medium-low, cover, and cook, stirring occasionally, until rice is al dente and peas are very soft, about 20 minutes.
3) Adjust seasonings and serve immediately before rice absorbs liquid. Top with grated parmigiano-reggiano, if you like. Yield: 4 to 6 servings.

Cook's Note: While this dish is best made with fresh peas, 3 cups of frozen peas can be substituted.


Easter Sunday One year Ago: Roasted Yellow Pepper Soup


Two Years Ago Today: Garlic Herb Rolls


You might also enjoy these recipes:
Creamy Chicken Wild Rice Soup - Very Culinary
Chicken and Rice Soup - Foodie Journey
Broccoli Wild Rice Soup - Meals 4 Moms
Shrimp and Rice Soup - 400 Calories or Less
Lemon Chicken and Rice Soup - Barbara Bakes
Basil Tomato Rice Soup - Creatively Domestic
Italian Chicken and Rice Soup - Pots and Plots
Spring English Pea Potato and Rice Soup - Cannelle and Vanille
Ginger Chicken Rice Soup - He Cooks She Cooks
Vegetable and Rice Soup - Our Island Kitchen

Saturday, April 23, 2011

Homemade Honey Dijon Mustard


From the kitchen of One Perfect Bite...Our mustard fields have just come into bloom, and for a week or so the roadsides here will be lapped by waves of molten gold and yellow. The flowers will be followed by a crop of seeds that will assure both greens and condiments for the coming year. These plants have a rage to live. They are by nature squatters and will grow anywhere they can find room. In a good year, two pounds of seeds, growing on a cultivated acre, will produce a half-billion seeds, and guarantee full larders for the season. As it happens, I use a lot of mustard when I'm cooking for the Easter holiday. There is a ham to glaze and lamb that needs the protection of a coat of crusty persillade. There are also roast potatoes that will be made savory with a sauce whose base is mustard. It sounds like a lot I know, but I use a nuanced hand with the mustard and do not allow its flavor to dominate. Even so, my small jar of Dijon wouldn't be enough for all three dishes While calculating how much I would need for cooking, I realized that I had never made my own. A quick search for a recipe and a pantry raid assured I had everything I need to proceed. So I did. I really enjoy this type of kitchen project. I'm not a glutton for punishment and I don't take "from scratch" as seriously as some, but I like to know that in a pinch I could keep my kitchen running smoothly. Mustard has now been moved from my to-do to can-do list. Here's the recipe I used to make my own Dijon-style mustard. I think you'll like it.

Honey Dijon Mustard...from the kitchen of One Perfect Bite courtesy of The Cook’s Book of Uncommon Recipes

Ingredients:

1 large onion
3 cloves garlic
2 cups dry white wine
4 ounces dry mustard
4 tablespoons honey
1 tablespoon vegetable oil
2 teaspoons salt

Directions:
1) Peel and finely chop onion. Peel and mince garlic. Combine onion and garlic with wine in a saucepan. Bring to a boil and then reduce heat and simmer for 10 minutes. Remove from heat and cool slightly. Pour through a strainer and discard onion and garlic.
2) Add dry mustard to flavored wine to make a paste. Add honey, oil, and salt and mix well. Return mixture to saucepan and cook over low heat until it thickens while you stir constantly. (Since there are no thickening agents used, you will be thickening it by evaporating the liquid away.)
3) Cool to room temperature and then stir well and store in a covered jar in refrigerator. Yield: 1-1/2 cups.


One Year Ago Today: Lime and Coconut Chicken


Two Years Ago Today: Thai Fresh Pea Soup with Green Curry


You might also enjoy these recipes:
Sweet Chili Sauce Recipe- Island Vittles
Tomato Jam - Never Enough Thyme
How to Make Ketchup - Wasabi Mom
West Indian Pepper Sauce - The Inner Gourmet
Red Pepper Relish - One Perfect Bite
Pickled Pepper Relish - One Perfect Bite
Sweet Pickles - One Perfect Bite
Refrigerator Dill Pickles - One Perfect Bite
Catsup, Carla and Me - One Perfect Bite
Homemade Mayonnaise - Tasty Kitchen


This post is being linked to:
Pink Saturday, sponsored by Beverly at How Sweet the Sound.

Friday, April 22, 2011

Sumarterta - Icelandic Summer Skyr Tart


From the kitchen of One Perfect Bite...Its name lured me as surely as the siren's song lured mariners of myth to death on rocky shoals. How can you resist something called a Summer Skyr Tart? I had visions of blond nymphs dancing in the pale glow of midnight sun, sipping champagne as they nibbled on elegant and Lucullean tarts. The romance of it all caused me to commit to its creation before I did my research and learned that skyr does not reference the midnight sun. It's a popular dairy product that is similar to strained yogurt, or soft cheese, and it's used extensively in Icelandic cooking. So much for romance. I also learned that skyr is thicker than yogurt and a bit sweeter. The product is not available here, so I decided to go with a Greek yogurt cheese that I've used for other purposes. As I browsed through the recipe it became clear that this dessert was not going to fall into the "sweet thing" category. It consists of cookie base that is covered with a barely sweet mixture of egg whites, cream cheese and yogurt. It is finished with a sprinkling of toasted almonds and strawberries. The recipe was developed by Beatrice Ojakangas, but I found it on a great blog called The Bohemian Kitchen. This is a large, thin tart. It will not set if you use a smaller pan and go for height rather than diameter. I used a 12-inch spring form pan to make my tart. I also made some adjustments to the recipe which I've highlighted in red. I added a small amount of almond extract and a pinch of salt to the cookie base. I also covered it with a 1/2 cup of warm strawberry jam before adding the yogurt layer. Please note that the recipe uses raw egg whites. Some of you might be more comfortable using pasteurized eggs or powdered egg whites. I like to use reconstituted egg whites because it alleviates the problem of having to store unused yolks. The tart will not set in the hour suggested in the recipe, so plan on at least 6 to 8 hours chill before serving. Now comes the hard part. I won't be making this again. It is a nice dessert, but it is very understated and almost boring. I suspect the results might be different if the tart were made with skyr, but until I can find a source for it, I'll stick with strawberry short cake. I hope some of you will try the Sumarterta and let me know what you think. Here's the recipe.

Sumarterta - Icelandic Summer Skyr Tart...from the kitchen of One Perfect Bite inspired by Beatrice Ojakangas and the Bohemian Kitchen

Ingredients:
Tart Base
1-1/2 cups all-purpose flour
1/4 cup sugar
1/4 teaspoon salt
3/4 cup softened butter
1 whole egg, beaten
1/4 teaspoon almond extract
1/2 cup warmed strawberry jam
Filling
2 egg whites
2 tablespoons sugar
1 cup yogurt cheese
1 (3-oz.) package cream cheese
Garnish
12 strawberries, cleaned & halved
3/4 cup sliced almonds, toasted

Directions
1) Preheat oven to 350 degrees F. Grease an 11 or 12-inch spring form pan and dust it with flour.
2) Combine flour, sugar, salt and butter. Mix with finger tips until coarse crumbs form. Add almond extract to egg and stir into crumb mixture, mixing well. Press mixture into bottom of prepared pan and bake for 20 minutes, or until crust is golden. Set aside to cool. When cool brush surface with strawberry jam.
3) With a mixer, combine yogurt cheese or skyr with cream cheese and beat until combined and smooth.
4) In a clean bowl, whip egg whites with a small dash of salt until frothy. Add sugar and continue beating until the whites become stiff.
5) Fold cheese mixture into egg whites. Spread over cooled crust.
6) Sprinkle with toasted almonds and decorate with strawberry halves.
7) Chill tart for at least 6 hours. Yield: 8 to 10 servings.


One Year Ago Today: Old-Fashioned Applesauce Cake


Two Years Ago Today: Braised Rabbit in Tomato-Wine Sauce


You might also enjoy these recipes:
Strawberry Shortcake - The Flourishing Foodie
Cheesecake Stuffed Strawberries - Daily Deliciousness
Strawberry Cupcakes - Sugar Plum
Fresh Strawberry Pie - Hands On Gourmet
Warm Strawberry Crumb Cake - The Pastry Studio
Strawberry-Sour Cream Ice Cream - Confections of a Foodie Bride
Strawberry Buttermilk Cake - Fork Spoon Knife
Strawberry Jam - Sea Salt with Food
Strawberry Mousse - Half Baked
Strawberry Parfait Pudding - Big Black Dog
Sumarterta - Cake and Vikings

Thursday, April 21, 2011

Brioche du Carême - Hot Cross Buns


From the kitchen of One Perfect Bite...If I may, I'd like to have a word or two with those wonderful souls who have been following One Perfect Bite from its very hesitant beginnings. Initially, there were just four of you, two of whom were family. That is painfully true. Those four kept each other company for the longest time, but when that first Easter rolled around the ranks had swollen to a hundred or so, and I was comfortable posting recipes for seasonal foods that I thought my readers might enjoy. That April I featured a recipe for hot cross buns that I had been asked to post. Unfortunately, it was not the recipe my readers wanted to see. It was too involved for those who didn't have the leisure the retirement kitchen afforded, and, while it's taken a while, I've finally found one that will better suit those with less time on their hands. We've been featuring French recipes this week and while searching for foods that might be part of the French Easter celebration, I came across a recipe for hot cross buns, or brioche du carême. I'm told the buns are not standard fare in France, but that they can be found in the boulangeries of Alsace-Lorraine, probably because of the German influence in the region. The word carême means Lent and the Lenten buns made in France are nearly identical to their English counterpart, the hot cross buns which are eaten on Good Friday by the British. While I prefer the original recipe I posted for hot cross buns, I must admit this one is delicious as well. I hope you will like this easier version. Here's the recipe.

Brioche du Carême - Hot Cross Buns ...from the kitchen of One Perfect Bite courtesy of the Kitchen Garden in France and Bella Online

Ingredients:
Dough
1/4 cup water - at room temperature or slightly above
1/2 cup lukewarm milk
1/4 cup melted butter
1 egg, lightly beaten
3-1/2 cups all purpose flour
1/4 cup sugar
1-1/2 teaspoons active dry yeast
1 teaspoon cinnamon
1/2 teaspoon nutmeg
pinch of ground cloves
pinch of allspice
1/2 teaspoon salt
1/2 cup golden raisins
1/4 cup finely chopped, mixed candied fruit
Glaze
2 tablespoons granulated sugar
2 tablespoons water
Icing
1/2 cup Confectioners' sugar
2 teaspoons water water

Directions:

1) Mix yeast, 1 cup flour, sugar, salt, and other spices in a bowl. In a separate bowl, mix milk and water together. Combine dry ingredients mixture, liquid ingredients, and butter in a large bowl. Beat for 2 to 3 minutes at medium speed. Add egg and beat 1 more minute. Stir in raisins, fruit, and enough of remaining flour to make a firm dough. Knead dough on a floured surface for about 5 to 7 minutes or until smooth and elastic. Use additional flour if necessary. Place in a lightly greased bowl; turn over to grease other side of the dough. Cover and let rise in a warm place. After about 15 minutes, test dough to see if it has risen sufficiently and is ready to be shaped. To test, gently stick two fingers into risen dough up to your second knuckle. Remove fingers. If indentations remain, dough is ready.
2) Divide dough into 12 pieces. Shape pieces into balls and place them 3 inches apart on a lightly greased baking sheet. Cover and let rise in warm place until almost doubled, about 45 minutes to an hour. Bake in a preheated oven at 375 degrees F for 15 to 18 minutes, or until light brown on top. Remove from oven. Place baking sheet full of buns on a wire rack to cool. Prepare glaze, then spread it over the warm buns. Let buns continue to cool on baking sheet. When completely cool, fill a cake decorating bag, fitted with a round tip, with icing. Pipe an icing cross on each bun. Yield: 1 dozen buns.


One Year Ago Today: Frittata with Spring Herbs and Leeks


Two Years Ago Today: White Chocolate Truffles


You might also enjoy these recipes:
Easter Bread with Colored Eggs - Italian Food Forever
Kulich, A Russian Easter Bread - The Winter Guest
Tsoureki Sweet Easter Bread - Culinary Flavors
Braided Easter Bread - Moogie and Pap
Easter Bread - Bobbini's Kitchen
Ciambellone Italian Easter Bread - One Perfect Bite
Kozunak Bulgarian Sweet Easter Bread - Annie's Art Book
Hot Cross Buns - The Cottage Kitchen
Orange Hot Cross Buns - Karen Cooks
Gluten-Free Hot Cross Buns - The Baking Beauties

Wednesday, April 20, 2011

Gnocchi Parisienne


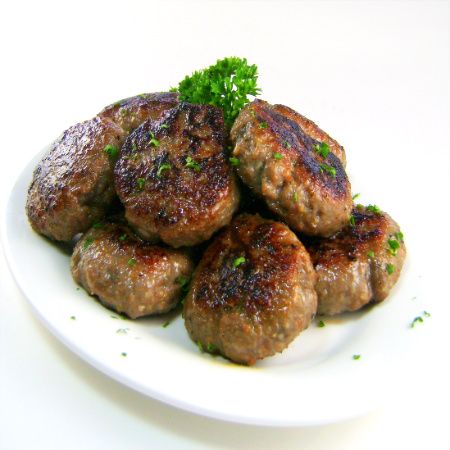
From the kitchen of One Perfect Bite...The adventurous swim uncharted waters and gasp thin air in search of something most can't see or understand. Why? There is, of course, the joy of discovery, but as important, is completion of the challenge, an effort so intense it holds a promise that just might free these wandering souls and allow them to rest and age with grace. We who love to cook and eat are explorers of a different sort, but we, too, seek out the new and different and love the challenge that demanding palates present to us. I recently made a dish that could be served with rice or pasta. The problem was I wanted neither and had a taste for something new. I happened on Jacques Pepin's recipe for gnocchi Parisienne and decided to give it a try. Italian gnocchi are small dumplings usually made with potato or ricotta cheese. In Italy the word gnocchi means lump and that pretty well describes their appearance. The French version of gnocchi is less grainy and is made from pâte à choux, the same dough that is used to make eclairs and cream puffs. While this is at best a judgment call, I've found French version of gnocchi to be lighter than its Italian counterpart. It is also easier to make. Once made, the choux paste is shaped using a pastry bag or two spoons. The pieces are dropped into gently simmering water and cooked until they rise to the surface of the water. If they are to be baked, the gnocchi are immediately plunged ice water. If they are to be sauced or warmed in brown butter, they should be cooked for two minutes longer, then tested to make sure the center is no longer doughy before dropping them in ice water to stop the cooking. I am using the simplest of the French techniques to make my gnocchi. Most recipes bake them in a Mornay sauce. While I pull out all stops when we have guests, that is too caloric for a family meal, so I simply sprinkle them with cheese and bake them off. These are delicious when served right from the oven. While I make sauce available, I serve them plain. Once you've tasted them, you'll see why. I really hope you'll give them a try. I promise you won't be sorry. The gnocchi in the photograph above have been magnified and appear much larger than they actually are. Here's the recipe.

Gnocchi Parisienne...from the kitchen of One Perfect Bite courtesy of Jacques Pepin and Food and Wine Magazine

Ingredients:

1 cup water
1 teaspoon salt
1/4 teaspoon freshly grated nutmeg
3 tablespoons unsalted butter, cut into tablespoons
1 cup all-purpose flour
3 large eggs
1/4 cup plus 2 tablespoons freshly grated Parmigiano-Reggiano, Gruyère or Asiago cheese

Directions:

1) Combine water, salt and nutmeg with 2 tablespoons of the butter in a small saucepan and bring to a boil over high heat. As soon as water boils, add flour all at once and beat dough with a wooden spoon until it is thick and comes away from sides of pan. Cook, stirring to dry out dough, about 30 seconds. Transfer dough to a medium bowl and let cool slightly, about 5 minutes.
2) Beat 1 egg into dough until incorporated. Beat in 1/4 cup of cheese and another egg until blended, then beat in last egg until dough is very smooth.
3) Preheat oven to 350 degrees F. Bring a large pot of salted water to a boil. Set a bowl of ice water near stove. With a large spatula, transfer the dough to a resealable plastic bag, pressing it into one corner. Cut off the tip of the bag; the opening should be about 1/2 inch long.
4) Reduce heat to maintain a gentle simmer. Carefully hold bag over the water and press out dough, using a small sharp knife or scissors to cut it into 1-1/2-inch lengths before it drops into pot (see Note). Simmer the gnocchi until it rises to top of water, about 3 minutes. With a slotted spoon, transfer gnocchi to ice water bath to stop cooking. Transfer the gnocchi to paper towels and pat dry.
5) Grease a 8 x 11-inch baking dish with the remaining 1 tablespoon of butter. Arrange gnocchi in dish and sprinkle with remaining 2 tablespoons of cheese. Bake until puffed, about 25 minutes. Preheat broiler. Broil gnocchi 6 inches from the heat for 1 to 2 minutes, or until browned. Serve immediately. Yield: 4 servings.

Cook's Notes: The gnocchi dough can also be shaped with 2 teaspoons and wet hands. The dough can be prepared through Step 4 and refrigerated overnight before baking and broiling. It can also be frozen for 4 to 6 weeks.


One Year Ago Today: Salmon Soup with Tomato and Dill


Two Years Ago Today: Cold Lime Souffle


You might also enjoy these recipes:
Gnocchi Poutine with Short Rib Ragu - Closet Cooking
Restaurant Dish: Ricotta Gnocchi - Simply Life
Sauteed Potato Gnocchi with Three Sauces - Big Black Dog
Homemade Gnocchi - La Dolce Duchessa
Butternut Squash Ricotta Gnocchi - Beyond the Peel
Gluten Free Potato Gnocchi - The Leftover Queen
Sweet Potato Spinach Gnocchi - AmyBites
How to Make Gnocchi - Parisienne, French Style - Becks and Posh
Gnocchi Parisienne - Mike Beresky
Bouchon's Parisienne Gnocchi - Oui,Chef


Tuesday, April 19, 2011

Boulettes - Meatballs with Tomato Sauce


From the kitchen of One Perfect Bite...I should never let my imagination loose in the French peasant kitchen. I find it terribly hard to leave and tend to overstay my welcome. I do, however, hope you'll indulge me if I linger there another day or two. I have some recipes I want to share with you. The frugality of French housewives is legend and their ability to transform the simplest of table scraps into delicious meals only serves to magnify the legend. It does sometimes seem they have the ability to make something out of nothing. Many of you will be serving roast beef for Passover or the Easter holiday. You're bound to have leftovers and boulettes - meatballs - are a great way to use leftover cooked beef. These are very easy to make and they are wonderfully flavorful. Credit for the recipe should go to Jacques Pepin who, while a celebrity chef, is also a wonderful teacher and author. If you have a food processor, preparation of the meatballs and their sauce will go quickly and you can have dinner on the table in less than an hour. The texture of these meatballs is quite soft. If you find they refuse to hold their shape, add small amounts of breadcrumbs until they can be formed, but don't overdo it. The sauce in which the meatballs simmer has diabolical color, but no heat. It is quite thick and you may want to thin it with stock or white wine. The boulettes can be served with pasta or rice, but I love to serve them with French gnocchi, a dish we'll explore tomorrow. Here's how the boulettes are made.

Boulettes - Meatballs with Tomato Sauce...from the kitchen of One Perfect Bite, courtesy of Jacques Pepin and Food and Wine Magazine

Ingredients:
Meatballs
12 ounces leftover roast beef, veal or pork, coarsely chopped
3 tablespoons all-purpose flour
1 teaspoon baking powder
1 teaspoon salt
1/2 cup minced onion
1/4 cup minced celery
1 garlic clove, minced
1/4 teaspoon dried thyme
1/4 teaspoon freshly ground black pepper
3 large eggs, beaten
Vegetable oil, for frying
Sauce
1/4 cup vegetable oil
3 garlic cloves, minced
1/2 cup minced onion
1/2 teaspoon dried thyme
1/2 teaspoon dried oregano
One 28-ounce can diced tomatoes with their liquid
1/3 cup pitted green olives, coarsely chopped
Salt and freshly ground pepper

Directions:
1) To make meatballs: Put meat in a food processor and process until finely chopped. In a large bowl, mix flour with baking powder and salt. Add chopped meat, onion, celery, garlic, thyme, pepper and eggs and mix with your hands until thoroughly blended. Form mixture into 16 meatballs and flatten slightly.
2) To fry meatballs: Heat 1/4-inch oil in a large skillet until it shimmers. Add meatballs and cook over high heat until browned on bottom. Turn meatballs, reduce heat to moderate and cook until browned on second side, about 3 minutes. Transfer meatballs to a large plate.
3) To make sauce: Heat oil in a medium saucepan. Add garlic, onion, thyme and oregano and cook over moderate heat until softened, about 4 minutes. Add tomatoes, cover and cook over moderate heat for 6 minutes, stirring occasionally. Using an immersion blender, puree sauce until slightly chunky; alternatively, puree the sauce in a food processor and return the sauce to the saucepan. Set aside.
4) To prepare olives: Put olives into a small saucepan and cover with water. Bring to a boil over high heat. Immediately drain and add to tomato sauce. Season to taste with salt and pepper and bring to a simmer. Add meatballs and heat through. Serve with pasta, rice or gnocchi Parisienne. Yield: 4 servings.


One Year Ago Today: Eggs in Purgatory


Two Years Ago Today: Crock-Pot: Thai-Style Sweet and Sour Chicken


You might also enjoy these recipes:
Lightened-Up Swedish Meatballs - Healthy and Delicious
Mexican Meatball Street Tacos - I Wash...You Dry
Turkey Pesto Parmesan Meatballs - Elle's New England Kitchen
Chicken Meatballs with Stir Fry Veggies - Sweet Basil Kitchen
Sweet and Sour Meatballs - A Bitchin' Kitchen
Chilli Chicken Meatballs - Simply Delicious
Kofte with Tzaziki Sauce - What's Cooking on the Mommy Porch
Ricotta Stuffed Meatballs - Proud Italian Cook
Pork Meatballs in Chipotle Sauce: Albondigas - One Perfect Bite
Pineapple Glazed Ham Balls - Simply Recipes
Related Posts with Thumbnails

Printfriendly