Monday, July 26, 2010

Pasta with Zucchini, Parmesan and Garlic Oil


From the kitchen of One Perfect Bite...What do you get when finely shredded zucchini is tossed with Aglio e Olio? In my kitchen it becomes an easy entrée that's perfect for a Meatless Monday meal. If you have a julienne peeler to use for shredding the zucchini, you can have this dish on the table in about 20 minutes. I'm not much for kitchen gadgets, but this is one I heartily recommend you add to your inventory. If you haven't seen one of these, you can find one here. I'm not affiliated with these people and my purpose in featuring the peeler is to simplify food preparation rather than sell a kitchen tool. Zucchini that is finely julienned needs no cooking and can be tossed with hot pasta without additional fussing. It helps, however, to have the vegetables at room temperature if you take this route. It's important when you make a dish as simple as this to use ingredients of the highest possible quality. Fortunately, that does not always mean the most expensive. I always serve this pasta with focaccia bread and a crisp green salad to add a bit of texture to the meal. I know you'll enjoy this very easy dish. Here's the recipe.

Pasta with Zucchini, Parmesan and Garlic Oil...from the kitchen of One Perfect Bite

Ingredients:

3/4 lb. dried spaghetti
1 (8-oz.) zucchini, finely julienned
1 (8-oz.) yellow squash, finely julienned
Salt and freshly ground pepper
1/2 cup extra-virgin olive oil
2 tablespoons fresh minced garlic
1/4 teaspoon red pepper flakes
1/3 cup chopped Italian parsley or fresh basil
1/2 cup + 2 tablespoons freshly grated Parmesan cheese

Directions:

1) Bring large pot of water to boil; add salt. Add pasta. Cook until al dente, about 10 minutes.
2) Season zucchini and squash with salt and pepper. Set aside.
3) Heat 1/4 cup olive oil in small skillet over medium-high heat until hot. Add garlic. Sauté briefly, until light brown. Add pepper flakes and basil or parsley. Mix well. Remove from heat.
4) When pasta is done, drain, reserving about 1/2 cup cooking water. Return pasta to pan. Add zucchini, reserved 1/4 cup oil, garlic mixture from step 3, and 1/2 cup cheese. Toss well, adding cooking water as needed to make a smooth sauce. Taste for seasoning and add salt and pepper as needed. Sprinkle with remaining 2 tablespoons cheese and serve at once. Yield: 4 to 5 servings.

You might also enjoy these recipes:
Fusilli with Walnuts and Garlic Sauce - One Perfect Bite
Penne with Asparagus and Lemon Sauce - One Perfect Bite
Pasta Puttanesca - One Perfect Bite
Fresh Garden Vegetables with Pasta - Living the Gourmet
Cold Sesame Noodles - The Parsley Thief
Rigatoni Peperonata - The Comfort of Cooking

Sunday, July 25, 2010

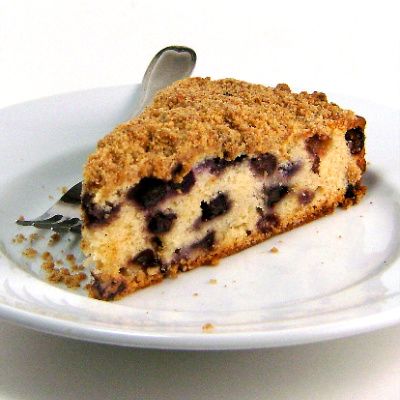
Blueberry Buckle - Cowboy Camp Meeting for Blue Monday


Blueberry Buckle


Cowboy Church Camp Meeting


Pastor Tom's Right-Hand Man

From the kitchen of One Perfect Bite...Bob and I happened on the camp meeting while looking for decent blueberries. The blue striped tent, positioned along the river and abutting the bridge couldn't be missed. I'll admit to being cat curious and instigating a trip down the embankment to the the camp grounds. We took a few pictures before being joined by Jeb, who handles security and parking for the event. He was as curious about our presence as we were about the revival meeting. Jeb kindly led us through the intricacies of the event and how it came to be. More information about events such as these can be found here. While a man of few words, when asked about attendance he ventured, "Some nights it's a healthy handful, some nights we're packed." Ever the good disciple, he clearly hoped we'd be back and spoke of that a bit, but then shared with us locations of berry fields and farms we would have otherwise missed. I had promised Bob I'd make a blueberry buckle if we could find fruit that had any flavor. Thanks to Jeb, I was able to keep that promise and we had a lovely dessert. Bob loves it because of its thick sugar topping. The topping cracks as the dish cooks and the craters in it surface are how this buckle got its name. The recipe I use was originally developed by Martha Stewart and the topping is based on one made by her mother. Both recipes are delicious and I think best of kind. I really think you love this buckle. Here are the recipes.

Blueberry Buckle...from the kitchen of One Perfect Bite courtesy of Martha Stewart

Ingredients:
Streusel Topping
1 cup all-purpose flour
1/4 cup packed light-brown sugar
1 teaspoon ground cinnamon
1/4 teaspoon salt
6 tablespoons unsalted butter, room temperature
Cake
1/2 cup (1 stick) unsalted butter, room temperature, plus more for pan
2 cups all-purpose flour, plus more for pan
1-1/2 teaspoons baking powder
1/2 teaspoon salt
3/4 cup sugar
1 large egg
1 teaspoon pure vanilla extract
1/2 cup milk
5 cups wild or cultivated blueberries
Streusel Topping

Directions
1) To make streusel topping: In a medium bowl, combine flour, sugar, cinnamon, and salt. Using a pastry blender or fork, cut in butter until fine crumbs form. Using hands, squeeze together most of mixture to form large clumps. Topping be frozen in an airtight container for up to 6 months.
2) Heat oven to 350 degrees. Butter a springform baking pan, and dust with flour, tapping out excess. Set aside.
3) In a medium bowl, sift together the flour, baking powder, and salt; set aside.
4) In the bowl of an electric mixer fitted with the paddle attachment, cream butter and sugar on medium speed until light and fluffy, about 3 minutes. Reduce mixer speed to low, and add egg and vanilla, beating until fully combined.
5) Add reserved flour mixture, alternating with the milk, a little of each at a time, starting and ending with the flour mixture. Remove from mixer. Gently fold in blueberries.
6) Pour batter into prepared pan; sprinkle streusel topping over cake. Bake until cake tester comes out batter-free, 60 to 70 minutes. Transfer to a wire rack to cool for 10 minutes. Remove from pan; cool for 15 minutes before serving. Yield 8 to 10 servings.

You might also enjoy these recipes:
Blueberry Glace Pie - One Perfect Bite
Blueberry Flognarde - One Perfect Bite
Old-Fashioned Blueberry Crumb Bars - One Perfect Bite
Blueberry Ebelskiver - Baking Bites
Blueberry Zucchini Bread - Closet Cooking
Red Rice Salad - Lisa Is Cooking

This post is being linked to:
Smiling Sally - Blue Monday

Saturday, July 24, 2010

Watermelon Smoothie - Pink Saturday


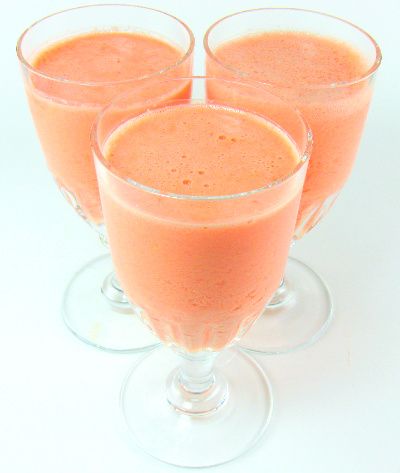
From the kitchen of One Perfect Bite...I found myself alone for lunch today and didn't really feel like cooking. I wanted to stay away from sandwiches and thought a smoothie would be filling enough to carry me through the afternoon. I had a large piece of watermelon sitting in the refrigerator and decided to use it as the base for a smoothie. I have, in the past, found the National Watermelon Promotion Board to be a great source of recipes and, sure enough, they had a recipe for a simple smoothie that was just what I was looking for. There are a lot of recipes floating in cyberspace that sound more like milk shakes than smoothies and I really was looking for something lighter and more healthy. I liked the recipe because it uses yogurt as a thickener. It took five minutes to assemble this version of a watermelon smoothie. It was time well-spent. It's a delicious drink when made with ripe watermelon. I look forward to having it again. I think you might enjoy it as well. Here's the recipe.

Watermelon Smoothie...from the kitchen of One Perfect Bite courtesy of the National Watermelon Promotion Board

Ingredients:
2 cups seeded watermelon chunks
1 cup cracked ice
1/2 cup plain yogurt
1-2 tablespoons sugar
1/2 teaspoon ground ginger
1/8 teaspoon almond extract

Directions:
Combine all ingredients in blender container. Blend until smooth. Yield: 2 to 3 servings.

You might also enjoy these recipes:
Watermelon, Cucumber and Tomato Salad - One Perfect Bite
Iced Watermelon Drinks - One Perfect Bite
Watermelon, Black Bean and Corn Salsa
Watermelon and Feta Salad - Two Peas and Their Pod
Watermelon Gazpacho - The Perfect Pantry
Strawberry Watermelon Slush - Real Mom Kitchen

This post is being linked to:
Pink Saturday, sponsored by Beverly at How Sweet the Sound.

Friday, July 23, 2010

London Broil with Garlic and Parsley Sauce


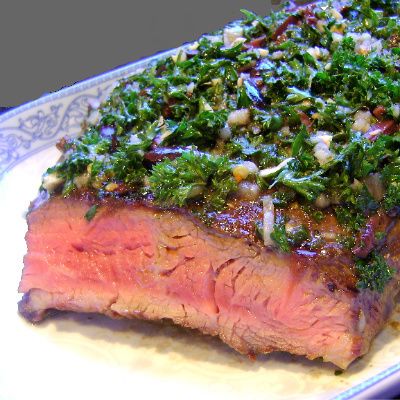
From the kitchen of One Perfect Bite... I first sampled this dish at the deli counter of Central Market in Austin, Texas. That was over ten years ago, but I have yet to see it featured in delis or markets here. I'm going to assume there are other areas of the country where the dish is also unknown and proceed with a recipe for this toothsome steak. This is a simple way to prepare cuts that are normally served for London Broil. London broil refers to a method of cooking rather than a specific cut of meat. This recipe was developed to be used with thin cuts such as flank or flat iron steaks. Cuts from the round and shoulder can be used, but cooking time will vary and the meat may not be as tender. Regardless of the cut, I always tenderize the meat. I use a jaccard, but piercing the steak at intervals with a fork will also work. The steaks are not marinated and they are seasoned only with kosher salt and fresh cracked pepper. I've found that marination isn't necessary when a strong sauce is used at the end of cooking. The sauce used here is an adaption of the Argentinian chimichurri. Earlier this week we featured a recipe for a parsley salad and any leftovers from that dish are perfect for use in this application. When there are no leftovers to be had, I used chopped flat leaf parsley to make the sauce. Whenever possible I use a flat iron steak for this recipe. It has become my favorite among the affordable steaks for grilling. While the recipe was developed to be cooked on an outdoor grill, it can be made stovetop in a grill pan or broiled. Here's the recipe for this surprising delicious dish.

London Broil with Garlic and Parsley Sauce...from the kitchen of One Perfect Bite adapted from Cook's Country magazine

Ingredients:
1/2 cup minced flat leaf parsley or leftover parsley salad
1/4 cup minced red onion
2 teaspoons minced garlic
1/4 cup red wine vinegar
1/4 cup extra-virgin olive oil
1-1/4 teaspoons salt, divided use
1-1/4 teaspoons cracked black pepper, divided use
1/8 teaspoon red pepper flakes
1-1/2 pounds Flat-iron or flank steak

Directions:
1) Combine parsley, onion, garlic, vinegar, olive oil, 1/4 teaspoon each salt and pepper and pepper flakes in a small bowl. Season both sides of steak with remaining salt and pepper.
2) Grill steak over very hot grill until both sides are brown, about 5 minutes per side.
3) Transfer steak to a shallow pan and coat with parsley sauce. Tent dish with foil and allow meat to rest for 5 to 10 minutes. Slice steak thinly against grain and serve with parsley sauce if desired. Yield: 4 servings

You might also enjoy these recipes:
North African Steak Pimenton - One Perfect Bite
Stuffed Flank Steak Spirals - One Perfect Bite
Asian-Style London Broil - One Perfect Bite
Chicken-Fried Flank Steak with Country Gravy - Chewing the Fat
Charmoula Strip Steaks with Pomegranate Glaze - Annie Bakes
Herbed Flank Steaks - 400 Calories or Less

Thursday, July 22, 2010

Sweet Potato Biscuits


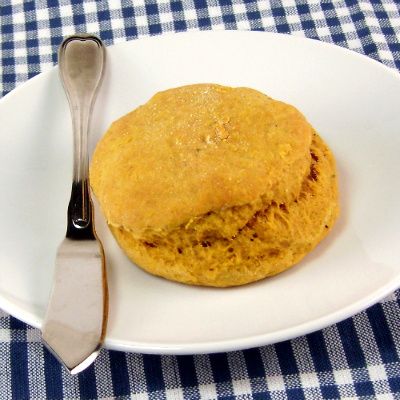
From the kitchen of One Perfect Bite...This is not the food of my people. I was raised on sour dough, seeded rye and grain so whole it could crack your teeth. Biscuits, save for shortbread, were not in my purview and I was well into my thirties before I figuratively crossed the Mason-Dixon line and had a true cream biscuit. I loved it, vowed to master its making, but, instead, went home and again made cinnamon buns and kaiser rolls. The foods of a lifetime are the ones learned in the kitchen's of our childhood. Biscuit had no place in my early memories, so they slid from my culinary radar. Then fate intervened and sent a Southern son-in-law my way. Biscuits and their mastery became important as we tried to weave the traditions of his childhood into those of our table. While striving for mastery, I came across a feature that caught my eye and changed the direction in which I was heading. Adam Ried, in an article written for The Boston Globe, claimed, "The wedding of biscuit to sweet potato is an occasion of culinary bliss." Pushing hyperbole aside, I was intrigued by his claim and decided to try his recipe. It makes moist and tender biscuits with a riveting color that comes from roasted and caramelized sweet potatoes. I really like these, but they are not a mix and bake affair. Their execution requires planning and they are a poor choice for a busy kitchen with limited hands to help. If you make these at a time you are not under stress, I think you'll be delighted with the results. Here's the recipe.

Sweet Potato Biscuits...from the kitchen of One Perfect Bite courtesy of Adam Ried

Ingredients:

1 medium-large sweet potato, about 14 ounces
1/4 cup cold buttermilk
2 cups all-purpose flour, plus extra for patting out dough and cutting biscuits
1 tablespoon baking powder
1/2 teaspoon baking soda
1 tablespoon light brown sugar
Pinch cayenne
Salt and black pepper
8 tablespoons (1 stick) cold unsalted butter, cut into roughly 1/2-inch cubes

Directions:

1) Set oven rack in middle position and heat the oven to 425 degrees. Line a large baking sheet (roughly 18 by 13 inches) with parchment paper or a silicone liner, and set aside.
2) Prick sweet potato in several spots with a fork. Place it on a small baking sheet, and bake until tender, about 1-1/4 hours. Cut potato open, peel back skin (to release steam), cool it to room temperature, about 40 minutes. Peel off skin, and roughly mash flesh (you should have about 1-1/2 cups). Add buttermilk, mix very well, and set aside. Again preheat oven to 425 degrees F.
3) In a food processor, process 2 cups flour, baking powder, baking soda, brown sugar, cayenne, 1 teaspoon salt, and 1/2 teaspoon black pepper until well blended. Scatter butter pieces evenly over flour mixture in food processor and pulse until mixture resembles coarse cornmeal, about 6 2-second pulses. Add sweet potato mixture in dollops in several spots over flour and butter mixture, and pulse until flour and sweet potato mixtures combine and just begin to come together into a light-orange dough mass, 10 to 15 2-second pulses.
4) Generously flour a clean work surface, turn out dough, and sprinkle top with flour. Knead dough gently, folding it in half and rotating it 3 or 4 times, just until it is uniform and cohesive (try to keep the kneading to a minimum). Sprinkle a little bit more flour on the work surface and dough to prevent sticking, if necessary, and gently pat the dough into a circle that is roughly 8 inches in diameter and 1 inch high (the height is more important than the shape or diameter, which may vary). Dip a sharp 2-1/2-inch biscuit cutter into flour and using brisk, decisive, straight-down punches (avoid rotating or twisting cutter in dough), cut out rounds of dough as close to one another as possible (to maximize the number of rounds), dipping cutter into flour before each new cut. Transfer dough rounds to prepared baking sheet, positioning them about 1 inch apart. Push dough scraps together and knead them gently once or twice until cohesive. Again pat out the dough until it is 1 inch high, dip cutter into flour, and in same manner as before, cut out as many dough rounds as possible, and transfer them to the baking sheet with first batch.
5) Bake until biscuits are puffed, light golden on top, and deep brown on bottom, 15 to 17 minutes, rotating sheet halfway through baking time for even cooking. Transfer biscuits to a wire rack, cool for about 15 minutes, and serve warm. Yield: 10 to 12 biscuits.

Cook's note: Variations of sweet potato biscuits can be found here.

You might also enjoy these recipes:
Drop Biscuits with Cheddar Cheese and Garlic - One Perfect Bite
Blueberry Biscuits - The Runaway Spoon
Cinnamon Raisin Biscuits - Salad in a Jar
Berry Biscuit Cups - Cooking Stuff
Biscuits in Sausage Gravy - Chaos in the Kitchen
Jalapeno Cheddar Biscuits - Foodie Memoirs
Southern Buttermilk Biscuits - Katy's Kitchen

Wednesday, July 21, 2010

Raspberry Kuchen


From the kitchen of One Perfect Bite...This is a lovely old fashioned cake that's completely without pretense. Chances are your mother or grandmother made a cake quite similar to this one. It was codified by Better Homes and Gardens and it's been around for a while, fading in and out of fashion as eating habits change. The original recipe can be found in the no longer new, Better Homes and Gardens: New Baking Book. We used to call it "Poor Man's Cheese Cake," but it's officially called a Raspberry Kuchen. A kuchen is a cake-like dessert that has a soft dough crust and a topping of custard or cheese that contains berries or other fruits. I love this recipe for many reasons. There are no stray egg whites or yolks left to deal with when the cake is finished. What's not used in the crust is used in the custard and that appeals to my "green" instincts. The cake, which can be made without a mixer, is very easy to do and has the added advantage of being low in fat and only moderately sweet. Best of all, it can be made with fresh or frozen berries of any type. Frozen berries will produce a creamier cake because of the liquid they exude as the cake bakes. Cane berries of all sorts have come to market here in Oregon, but to tell the truth, they're not up to speed this year. Hopefully, they'll improve this week and we'll have something worth putting by. Until then, I'm relying on the stash in my freezer. I used frozen berries to make the cake today, so it's wonderfully creamy in taste and appearance. I hope those of you who are not familiar with this cake will give it a try. Here's the recipe.

Raspberry Kuchen
...from the kitchen of One Perfect bite inspired by Better Homes and Gardens: New Baking Book

Ingredients:
Base
1 cup all-purpose flour
1/2 cup sugar
1/8 teaspoon salt
1 teaspoon baking powder
1/4 cup butter, melted
2 egg whites
1 teaspoon vanilla

2 cups fresh or frozen cane berries

Filling
1-1/2 cups plain low-fat or nonfat yogurt
2 tablespoons all-purpose flour
1/2 cup sugar
2 slightly beaten egg yolks
1 slightly beaten whole egg
1-1/2 teaspoons finely shredded lemon zest
1 teaspoon vanilla

Directions:
1) Preheat oven to 350 degrees F. Lightly grease bottom and sides of a 9-inch springform pan. If using frozen raspberries, thaw at room temperature for 15 minutes; drain.
2) In food processor bowl or medium mixing bowl, stir together 1 cup flour, the first 1/2 cup sugar, salt and baking powder. Add melted butter, 2 egg whites and first teaspoon vanilla. Cover; process or stir by hand until mixed.
3) Spread onto the bottom of springform pan; sprinkle with berries. Set aside.
4) For filling, place yogurt in a large mixing bowl; sprinkle with 2 tablespoons flour. Add remaining sugar, yolks, whole egg, zest and remaining vanilla. Mix until smooth; pour over berries.
5) Bake for about 55 minutes or until center appears set when shaken gently. Cool for 15 minutes; remove sides of pan. Cover; chill until serving time, up to 24 hours. If you are feeling brave, you can remove pan bottom. Transfer to a serving plate. Yield: 10 - 12 servings.

You might also enjoy these recipes:
Orange Yogurt Cake - One Perfect Bite
Yogurt Cheese Cake - One Perfect Bite
Greek-Style Yogurt Pie with Fruit Preserves - One Perfect Bite
German Rahm Kuchen - A Feast for the Eyes
Cheese Kuchen - Madame Chow's Kitchen
Grandma's Pear Kuchen - Jules Food

Tuesday, July 20, 2010

Flaked Parsley Salad with Black Olives and Cheese


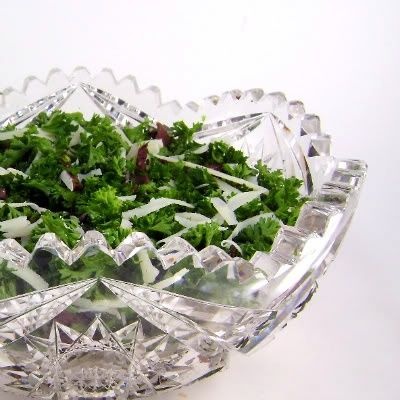
From the kitchen of One Perfect Bite...Those of you who have traveled the backroads and byways of the Mediterranean are probably familiar with this salad. I learned of it ten years ago while paging through an article written by Paula Wolfert, a respected food writer and teacher with expertise in the food of the region. The recipe was unusual enough to catch my eye and simple enough to hold my attention. While I love to serve the salad with grilled meat or fish, I also like to incorporate it as an ingredient in other recipes that will be featured later in the week. Its main ingredient is fresh curly parsley. Lots of it. The parsley leaves are removed from the stems and torn into tiny bits. It's really important that no short cuts be taken with this step. Large clumps and stems will spoil this salad and make it quite ordinary. Once you have about four cups of shredded parsley flakes they are combined will olives and shallots and tossed with the simplest of oil and vinegar dressings. The resulting salad is delicious when it's made with really fresh parsley. It's not worth your while to make it with parsley of an uncertain age. Older parsley is tough and the salad will taste like rabbit fodder. It's also important not to dress the salad until just before serving. The salad becomes compacted if it sits too long after the oil and vinegar have been added. I first made this out of curiosity, but what began as an experiment has become a regular feature of my summer table despite its pains and pitfalls. I know that many of you share my passion for the unusual, so I decided to post this recipe despite its simplicity. I really think you'll like it. Here's the recipe.

Flaked Parsley Salad with Black Olives and Cheese...from the kitchen of One Perfect Bite, inspired by Paula Wolfert

Ingredients:
1/4 pound very fresh curly parsley, washed and thoroughly dried
1/2 cup (about 24) Kalamata olives, rinsed, drained pitted and slivered
1/4 cup minced shallots or red onion
1/2 teaspoon Worcestershire sauce
3 tablespoons extra virgin olive oil
1 tablespoon cider vinegar
Salt and freshly ground pepper to taste
1/4 cup coarsely grated Pecorino-Romano cheese

Directions:

1) Remove parsley from stems. Discard stems and tear each leaf into tiny bits. You should have four cups of loosely packed parsley flakes.
2) Combine parsley, olives, shallots, Worcestershire, oil, vinegar in a medium bowl. Add salt and pepper to taste. Toss gently to combine. Transfer to a serving bowl and sprinkle with cheese. Yield: 6 servings.

You might also enjoy these recipes:
Corn and Radish Salad - One Perfect Bite
Mediterranean Radish Salad - One Perfect Bite
Asparagus and White Bean Salad - One Perfect Bite
Moroccan Carrot Salad - The Perfect Pantry
Feta and Watermelon Salad - Girlichef
Heirloom Tomato Salad - Chef Tom's Blog
Spicy Lentil, Radish and Parsley Salad - Cook Sister
Greek-Style Zucchini Salad - Closet Cooking
Related Posts with Thumbnails

Printfriendly