Showing posts with label cream cheese. Show all posts
Tuesday, June 28, 2016
Lemon Lover's Cheese Buns
From the kitchen of One Perfect Bite...I had a project that was going to keep me housebound today, so, I thought it would be a perfect time to get the yeast out and make some bread and rolls for the weekend ahead. As it worked out, the recipe I'm sharing with you tonight is for buns I've decided to tote to a class that ends tomorrow. These buns are a personal favorite, but I don't often make them. They are delicious and I could eat them without restraint if they were sitting in my kitchen. These kolachke-like cheese bun are light and flavorful, and they make a wonderful addition to any breakfast or brunch table. The soft dough is silky and a joy to work with. You can, of course, substitute plum or jelly fillings for the cheese that is used here, but I love the lemon and cheese combination and rarely vary from the base recipe. I have another recipe for kolachkes, which you can find here, that I use when other fillings are desired. I hope you will give this recipe a try. While they don't freeze well, the buns will keep for 24 hours if they are well wrapped and refrigerated and I am not in the kitchen nibbling away at them. Here is how they are made.
Labels:
cream cheese
,
kolachkes
,
lemon
,
yeast bread and rolls recipes
Tuesday, March 8, 2016
Lemon Sticky Buns
From the kitchen of One Perfect Bite...Easter will be here before we know it and my plans for the holiday are already underway. I tested this recipe a couple of weeks ago and I was so pleased with the results that I wanted to share it with you. My version of these lemon sticky buns is a compilation that comes from many sources. I owe Alton Brown kudos for his interpretation of overnight cinnamon buns. It is a fabulous recipe and I used it as a base for my lemon version of the buns. His recipe is not hard to follow, but you can stumble if you are not aware of time constraints the recipe places on the cook. The dough for these rolls needs to rise slowly in the refrigerator for at least 8 hours. The slow rise adds great flavor to the rolls, as well as easing the work required to pull off a holiday brunch. The lemon version is quite sticky, so be sure to grease your pans well or you will not be able to remove them from the pan. I let mine cool on a rack for about 10 minutes before I turn them out for a final cooling. While the rolls can be frozen in their unbaked state, they are best if served the day they are made. If you are a lemon lover, these rolls have your name on them. They are fancy enough for a company breakfast and I know you will love them. Here is how they are made.
Labels:
cream cheese
,
lemon
,
sticky buns
,
yeast bread recipes
,
yeast rolls
Tuesday, September 29, 2015
An Apple and Cream Cheese Loaf Cake
From the kitchen of One Perfect Bite...I don't have great luck with cookbooks. Generally, if between their bindings, I find two recipes that will work for my family, I consider myself lucky and move on. There are, however, exceptions. Shortly after I began One Perfect Bite, I came across The Grand Central Baking Book and happily moved from page to page, experimenting far more often than I usually do, because I was so delighted with what I found. The recipe I'm featuring tonight comes from that book and it is making an encore performance because I can't let September pass without baking it at least once for my crew. It has, with good reason, become a family favorite and I suspect those of you who try it will quickly add it to your fall dessert rotation. The cream cheese gives the cake a lovely crumb and uniquely smooth texture, while the apples add their unique flavor and moisture to the finished loaf. I think you'll love this treasure of a recipe. Here is what I had to say about the recipe when it first appeared on One Perfect Bite.
Sunday, November 2, 2014
We Are Back with a Cream Cheese and Cherry Loaf Cake
From the kitchen of One Perfect Bite...We are back and I have many a tale and recipe to share with you in a series that I'll begin tomorrow. I had planned to start those features today, but I had an outstanding obligation to the volunteers who have been working phones for Tuesday's election. I still haven't been to the grocery store, so I had to use what I had on hand to come up with the cakes I made for them today. This is a simple, quite basic recipe that produces a really lovely cake. On an even happier note, it gave me the opportunity to use a jar of maraschino cherries that's been staring me in the face every time I open my pantry door. I am, as you have probably surmised, not a big fan of said cherries and, truth be told, I'm not very creative when it comes to using them in anything other than a Shirley Temple. I decided to use them because I knew they would add a lovely jewel-tone color to the loaves and appeal to those of the crew who like really sweet things as well. My only caution for those of you who decide to make the cakes, is to make sure you pat the cherries dry before you add them to the batter. While little girls love pink cakes and they might work for Valentines Day, I suspect the country at large is simply not ready for them. The cake is appropriate for brunch, tea or dessert and I think those of you who like sweet things will really enjoy the loaves. Here is how the cakes are made.
Labels:
cake recipes
,
cream cheese
,
dessert recipes
,
maraschino cherries
Thursday, June 26, 2014
Blueberry and Cream Cheese Pound Cake
From the kitchen of One Perfect Bite...This is a slightly altered version of a cake that graced Midwestern farm tables for years. It is super easy to make and it's simply delicious - the kind of delicious that makes my socks going up and down. This butter-rich cake is wonderfully moist and has a gorgeous velvet crumb that almost melts on the tongue. It is also eminently portable and all of this makes it a perfect candidate for a barbecue or picnic. If you are still looking for a slightly different holiday dessert, I hope you'll keep this in mind. I know you'll enjoy it. Here is how this simple cake is made.
Labels:
blueberry
,
bundt cake recipes
,
cake recipes
,
cream cheese
,
dessert recipes
,
lemon
,
pound cake recipes.easy
Tuesday, May 6, 2014
Cream Cheese Pound Cake with Citrus Glaze
From the kitchen of One Perfect Bite...I find it next to impossible to bypass recipes for cheesecake or pound cake, so it was a given that when I stumbled on this recipe I would have to give it a try. The recipe comes from Bon Appetit magazine and I thought the citrus flavors would make a wonderful base for macerated fruit. Fresh berries have made their way to our markets and I wanted to sample the cake with berries to see if it would work as a simple Mother's Day dessert. Fortunately, I read the comments others had made, here, so I knew there were some problems associated with the recipe. I, who have grown too soon old and too late smart, decided to try it anyway and see what would happen. I'm glad I did. This cake has wonderful flavor and if you enjoy layers of citrus in your desserts, I suspect this recipe will quickly make it to your permanent rotation. I am, however, only cautiously recommending the recipe to you. While I did not experience the difficulties some reported, the fact that so many reported the same problem makes me leery to endorse it. Apparently, the cake has a tendency to sink as it cooks and that is more than mildly off putting if yours is the one that falls. I do hope, however, that some of you are adventurous enough to give this recipe a try. The cake is delicious and out of the ordinary. Here is how it is made.
Labels:
cake recipe
,
citrus
,
cream cheese
,
pound cake recipe
,
recipe
Tuesday, January 28, 2014
Cream Cheese, White Chocolate and Almond Coffee Cake
From the kitchen of One Perfect Bite...This coffee cake is a bit of a cheat. It gets a head start by using frozen bread dough which can be homemade or the kind you purchase at the supermarket. Once the dough has thawed, this ladder-style coffee cake can be table ready in about 90 minutes. The recipe is simple and straight forward, but there is one point at which you might get into trouble. The filling for the ladder should be spreadable but not runny. Sometimes a large egg will add too much liquid to the filling and cause it to spill out from the dough. You can avoid this by using a smaller egg, or adding the large egg by tablespoons until the filling can be spooned onto the bread dough and still hold its shape. While this coffeecake is over the top when made with Danish or puff pastry, it is still quite good when ordinary bread dough is used. If you like white chocolate and need a new recipe for coffeecake, why not give this one a try. Here is how this simple cake is made.
Labels:
almond
,
coffee cake
,
cream cheese
,
easy
,
frozen bread dough
,
white chocolate
,
yeast bread
Thursday, December 19, 2013
Countdown to Christmas - Chocolate Shells with Eggnog Cheesecake Mousse
From the kitchen of One Perfect Bite...This is a bit fussier than most of the desserts I've been experimenting with this holiday season, but it's really not that all hard to do. Making the chocolate shells can be off-putting to some, and while they are a bit messy to prepare, wikihow has a marvelous tutorial that will walk you through the steps needed to get them to your table. You'll find them much easier to make if you use parchment liners for your muffin cups. They make for a smooth release, and while standard liners work, these make the job much easier. If they are not available in your area, parchment liners can be ordered, here. Once you've made the shells they must be kept cold to prevent unwarranted melting,so it is best to fill them just before serving. I've filled mine with a mousse-like, eggnog flavored cheesecake that is delicious and almost effortless to make. This filling is versatile and can also be served in small pudding cups or used to fill cream puffs. This is a nice holiday dessert and it might work well for those of you who are looking for something a bit different to serve your guests. The dessert works best if it is assembled just before serving, but all of the components can be prepared well ahead of time. If you have time. I hope you'll give the shells a try. I think you will be quite pleased. Here is how the shells and filling are made.
Chocolate Shells with Eggnog Cheesecake Mousse...from the kitchen of One Perfect Bite inspired by Taste of Home magazine
Ingredients:
1-1/2 cups semi-sweet chocolate chips
1 package (8 ounce) Cream Cheese, softened
1 cups cold eggnog
2/3 cups cold whole milk
1 packages (3.4 ounces each) instant vanilla pudding mix
1/4 teaspoon rum extract
Pinch of ground nutmeg
1 cup heavy whipping cream, divided use
Directions:
1) To make chocolate cups: Melt chocolate over a double boiler until smooth. Line a 12-cup cupcake tray with silicone (parchment) paper liners and scoop approximately 1 tablespoon melted chocolate into each cup. Use a pastry brush to evenly coat each cupcake liner and paint chocolate up the sides of each liner, stopping about 1/2-inch from the top. Freeze tray for several hours or overnight. Peel off cupcake liners and store the chocolate cups in the freezer.
2) To make eggnog mousse: In a large bowl, beat the cream cheese until smooth. Beat in the eggnog, milk, dry pudding mixes, extract and nutmeg until smooth. Whip 1/2 cup cream until stiff peaks form. Fold whipped cream into pudding mixture. Cover and refrigerate for 6 hours or overnight.
3) Just before serving, whip remaining 1/2 cup heavy cream until stiff peaks form. Spoon eggnog mixture into chocolate cups. Top each filled chocolate shell with whipped cream. Yield: 12 servings.
Older Posts


One Year Ago Today: Two Years Ago Today:
Jansens Temptation Peanut Brittle

Three Years Ago Today: Four Years Ago Today:
Quick Bread Round-Up Moravian Spice Cookies
Labels:
chocolate cups
,
countdown to christmas
,
cream cheese
,
dessert
,
eggnog mousse
Sunday, November 10, 2013
Butterscotch Cheesecake
From the kitchen of One Perfect Bite...I've been searching for a new dessert to serve for the holidays and I finally found one that makes my socks go up and down. I can't wait to share it with my family and friends and I think that those of you love the flavor of butterscotch and the creamy texture of cheesecake are in for a real treat. This cake is really special. While it is very rich, when served in small portions it's a wonderful way to end a special meal. The recipe is straightforward, and, like all cheesecakes, this one is very easy to make. The only caution I have to share with you regards its propensity to stick to the pan. The springform pan you use must be well-greased and the cake itself should be released from the sides of the pan with a knife about ten minutes after it is taken from the oven. The trick here is releasing the sides of the cake without removing the springform ring. The soft cake needs a thorough chilling to firm, so I leave it in the pan to assure it keeps its shape and is not unduly nicked or gouged while in the refrigerator. This cake freezes well and can be made a week or so before it is to be served. That's always good news for the holiday hostess. For best results, the frozen cake should be allowed to thaw overnight in the refrigerator. I really hope you'll give this recipe a try. I'd love to have your feedback on this one. Here is how the cake is made.
Butterscotch Cheesecake...from the kitchen of One Perfect Bite courtesy of Taste of Home magazine
Ingredients:
1-1/2 cups graham cracker crumbs
1/3 cup packed brown sugar
1/3 cup butter, melted
1 can (14 ounces) sweetened condensed milk
3/4 cup cold 2% milk
1 package (3.4 ounces) instant butterscotch pudding mix
3 packages (8 ounces each) cream cheese, softened
1 teaspoon vanilla extract
3 eggs, lightly beaten
Optional garnish: whipped cream and crushed butterscotch candies
Directions:
1) Preheat oven to 325 degrees F. Place a well-greased greased 9-in. springform pan on a double thickness of heavy-duty foil (about 18-in. square). Securely wrap foil around pan.
2) In a small bowl, combine cracker crumbs and sugar; stir in butter. Press onto bottom of prepared pan. Place pan on a baking sheet and bake for 10 minutes. Cool on a wire rack.
3) In a small bowl, whisk both milks and pudding mix for 2 minutes. Let stand for 2 minutes or until soft-set.
4) Meanwhile, in a large bowl, beat cream cheese until smooth. Beat in pudding and vanilla. Add eggs and beat on low speed just until combined. Pour over crust. Place springform pan in a large roasting pan. Add 1-inch of hot water to larger pan.
5) Bake for 65-75 minutes or until center is almost set and top appears dull. Remove springform pan from water bath. Cool on a wire rack for 10 minutes. Carefully run a knife around edge of pan to loosen; cool 1 hour longer. Remove ring and refrigerate overnight. Garnish with whipped cream and
butterscotch candies if desired. Yield: 12 servings.
Older Posts


One Year Ago Today: Two Years Ago Today:
Peruivian Causa Rellena Oven Roasted Cauliflower

Three Years Ago Today: Four Years Ago Today:
Manhattan Clam Chowder Polpettone - Tuscan Stove-Top Meatloaf
Labels:
butterscotch
,
cake
,
cheesecake
,
cream cheese
,
dessert
,
easy
Sunday, July 7, 2013
Chocolate Truffle Cheesecake
From the kitchen of One Perfect Bite...I love cheesecakes and over the years I've amassed an embarrassing number of recipes for them. As a young cook, I instantly recognized how easy they were to make, so they appeared with great regularity at my table. With the passage of time, however, my metabolism slowed, calories became a concern and I served them less frequently. That being said, I probably should fess up and tell you, that despite that, there is almost always a cheesecake in my freezer. It's my fail safe for feeding unexpected guests or supplying refreshments for last minute meeting requests. I'm always on the lookout for new cheesecakes and while browsing through recipe blogs, I came across one for a chocolate truffle cheesecake on a blog called Moogie and Pap. The recipe first appeared on the Hershey's website, so I knew that the cake would have intense chocolate flavor that I hoped would meld into the creaminess that is associated with cheesecake. I made the cake immediately and it has been in my files ever since. There are a couple of tricks that will help to make this cake as pretty as it is tasty. To prevent cracking, you'll want to put a pan of boiling water on the floor of your oven. If the cake, particularly the brownie layer, is allowed to overcook, it can be difficult to slice. I make it a point to use the lower time limit suggested for baking this cake because we like it moist. You'll probably have to experiment to see how well-done you want the cake to be. If you like chocolate and are also a cheesecake addict, you'll love the creamy richness of this cake. Here is how it is made.
Chocolate Truffle Cheesecake...from the kitchen of One Perfect Bite courtesy of Hershey's Kitchen
Ingredients:
Brownie Layer
6 tablespoons melted butter or margarine
1-1/4 cups sugar
1 teaspoon vanilla extract
2 eggs
1 cup plus 2 tablespoons all-purpose flour
1/3 cup Hershey's cocoa
1/2 teaspoon baking powder
1/2 teaspoon salt
Cheesecake Layer
3 packages (8 ounces each) cream cheese, softened
3/4 cup sugar
4 eggs
1/4 cup heavy cream
2 teaspoons vanilla extract
1/4 teaspoon salt
2 cups (12 ounce package) Hershey's Special Dark Chocolate Chips, divided
1/2 teaspoon shortening (do not use butter, margarine, spread or oil)
Directions:
1) Heat oven to 350 degrees. Grease 9-inch springform pan.
2) To make brownie layer: Stir butter, sugar, and vanilla together in a large bowl.. Add eggs and stir until blended. Stir in flour, cocoa, baking powder and salt. Mix well. Spread mixture in prepared pan.
Bake for 25 to 30 minutes , or until brownie layer pulls away from sides of pan.
3) While brownie layer bakes make cheesecake layer. Beat cream cheese and sugar with an electric mixer
3. Meanwhile for Truffle Cheesecake Layer: In a bowl of an electric mixer, beat cream cheese and sugar on medium speed until smooth. Gradually beat in eggs, heavy cream, vanilla and salt until well blended. Set aside 2 tablespoons chocolate chips. Microwave remaining chocolate chips on Medium temperature for 1-1/2 minutes, or until chips are melted and smooth when stirred. Gradually blend melted chocolate into cheesecake batter.
3) When brownie layer is done, remove it from oven and immediately spoon cheesecake mixture over it. Return to oven and continue baking for 45 to 50 minutes or until center is almost set. Remove from oven to wire rack. With knife, loosen cake from side of pan. Cool to room temperature. Remove side of pan.
4) Place remaining 2 tablespoons chocolate chips and shortening in small microwave-safe bowl. Microwave at Medium for 30 seconds or until chips are melted and mixture is smooth when stirred. Drizzle over top of cheesecake. Cover; refrigerate several hours until cold. Garnish as desired. Cover and refrigerate leftover cheesecake. Yield: 8 to 10 servings.
If you have enjoyed your visit here, I hope you'll take a minute to...
One Year Ago Today: Tortilla Pie
Two Years Ago Today: Sour Cherry Crumb Cake
Three Years Ago Today: Rosemary Aioli
Four Years Ago Today: Shrimp Toast
Labels:
cake
,
cheesecake
,
chocolate
,
cocoa
,
cream cheese
,
dark chocolate
,
dessert
,
easy
Saturday, May 11, 2013
Creamy Chicken and Broccoli Casserole
My Thought for the Day can be found, here. If you like it, please let us know with an official thumbs up.
From the kitchen of One Perfect Bite...This is a nice recipe to have on hand when you are short of time and have a hungry crew waiting to be fed. I found the recipe in Family Circle magazine and make it once or twice a year. It is not a recipe that will make or break your reputation as a cook, but it is simple and satisfying and children love its creaminess. The casserole can be on the table in about 30 minutes from start to finish. While the dish is moist and creamy, there is not a lot of sauce, so you'll probably want to serve it with a side of rice rather than noodles. I like to keep a handful of recipes like this on hand, specifically for busy days. I hope you'll file this recipe for busy days of your own. Here's how this very simple casserole is made.
Creamy Chicken and Broccoli Casserole...from the kitchen of One Perfect Bite courtesy of Family Circle magazine
Ingredients:
1 pound boneless, skinless chicken breast, cut into 1-inch pieces
1 large onion, chopped
4 cups broccoli florets
1 can (14.5 ounces) petite diced tomatoes, drained
1/4 cup reduced-fat scallion and chive cream cheese (such as Philadelphia)
1 tablespoon + 1 teaspoon olive oil
1/2 teaspoon salt
1/4 teaspoon black pepper
1 tablespoon flour
1/2 teaspoon dried thyme
Directions:
1) Heat 1 tablespoon oil in a large nonstick skillet over medium-high heat. Add chicken to pan and cook for 4 minutes or until browned. Remove chicken from skillet.
2) Reduce heat to medium and add 1 teaspoon oil, onion and 1/4 teaspoon each salt and pepper to skillet and cook for 5 minutes or until softened. Add flour to skillet and cook 1 minute, stirring. Add broccoli, thyme and 1/2 cup water to skillet. Cover and cook for 4 minutes or until broccoli is crisp-tender.
3) Remove cover and add chicken, remaining 1/4 teaspoon salt, tomatoes and cream cheese to pan. Stir until well blended. Yield: 4 servings.

One Year Ago Today: Strawberry and Lemon Crush

Two Years Ago Today: Stuffed Anaheim Peppers and Homemade Enchilada Sauce

Three Years Ago Today: Spoonbread with Leeks and Gruyere Cheese

Four Years Ago Today: Cotes de Porc A L'Auvergnate - Braised Porkwith Cabbage and Cream
Labels:
broccoli
,
casserole
,
chicken
,
cream cheese
,
easy
,
main course
Monday, March 11, 2013
Glazed Dublin Tea Cake

From the kitchen of One Perfect Bite...This cake is special. It manages to balance tart and sweet and has a crumb that is as soft as velvet. The recipe comes from The Ultimate Irish Dessert Recipe Collection found on the Fantasy Ireland website, which can be viewed here. The cake is easy to make, but I do have a couple of tips to share with you regarding the ingredients you use to prepare it. Cake flour should be used if you want a soft crumb and you'll have the best result if all the ingredients, including the buttermilk, are at room temperature when the element of the cake are mixed together. It also important to apply the glaze to the cake while it is still warm. The glaze will not spread properly on a cold cake. In Ireland, this type of cake is usually made with currants, but raisins are used here. If you wish, they can be soaked in juice or a liqueur of some type, but it really is not necessary. I hope you will give this simple recipe a try. The cake is a perfect accompaniment to a cup of tea and I think you'll be delighted with this Irish treat. Here is how it is made.
Glazed Dublin Tea Cake...from the kitchen of One Perfect Bite courtesy of Fantasy Ireland
Ingredients:
Cake
3/4 cup butter, room temperature
1 cup sugar
2 teaspoons vanilla extract
2 eggs, room temperature
3 ounces cream cheese, room temperature
1- 3/4 cup cake flour
1-1/4 teaspoon baking powder
1/4 teaspoon salt
1 cup seedless raisins
2/3 cup buttermilk, room temperature
Glaze
1/2 cup powdered sugar, sifted
2 teaspoons fresh lemon juice
Directions:
1) Preheat oven to 325 degrees F. Generously grease a 9-inch (7-cup capacity) loaf pan. Cut a piece of waxed or parchment paper to fit into bottom of pan and grease it as well. Dust pan with flour and tap out excess. Set aside.
2) Cream butter, sugar, and vanilla until fluffy. Add eggs, 1 at a time, beating each until fluffy. Add cream cheese. Mix well.
3) Sift flour, baking powder, and salt together in a separate bowl. Put raisins in a small bowl. Add 1/4 cup of flour mixture to raisins and toss until well-coated.
4) Add remaining flour to batter, alternating with buttermilk. Mix until smooth. Use wooden spoon to stir in raisins and and any excess flour left in bowl. Stir until well-combined.
5) Transfer batter to prepared pan. Smooth surface with spatula. Bake on center rack for 80-90 minutes, until well-browned and toothpick inserted in center comes out clean. It is normal for cake to crack on top.
6) Make glaze while cake is baking by combining sugar and lemon juice in a small bowl. Stir until very smooth.
7) Let cake rest in pan for 10 minutes. Carefully remove cake from pan to cooling rack. Spread glaze on warm cake. Let cake cool completely. Yield: 10 to 12 servings.
Cook's Note: Cake can be stored 3 days at room temperature in foil or cake tin. Cake can also be frozen up to 3 months if wrapped airtight.

One Year Ago Today: Black and Tan Brownies

Two Years Ago Today: Double Chocolate Mint Brownies

Three Years Ago Today: Florentine Schiacciata - Carnival Cake

Four Years Ago Today: Toasted Cashew and Caramel Squares
Labels:
cake
,
cream cheese
,
dessert
,
easy
,
ireland.st.patrick's day
,
tea cake
Wednesday, February 20, 2013
Roasted Garlic Cauliflower Mash
Mazola's Roasted Garlic Cauliflower Mash
From the kitchen of One Perfect Bite...February is American Heart Health Month and the folks at Mazola Cooking Oil are observing the month with a campaign designed to get cooks to take a good look at the ingredients they use to prepare food for their families. The focus of their campaign is cooking oil and they have developed a series of recipes to encourage you to use Mazola oil in place of the one you are currently using. When it comes to healthy cooking, we all know the oils we use have not been created equal, but I must admit I did not know that corn oil has more cholesterol-blocking plant sterols than the others I commonly use in my kitchen. The numbers are arresting. Corn oil has four times as many sterols as olive oil and 40% more than canola oil. The difference was significant enough to send me to the Mazola website to see their Heart Healthy Recipes for 2013. I was delighted with what I found. While I plan to make several of their recipes, I decided to start with the Roasted Garlic Cauliflower Mash, which you can link to HERE. I had a plain roast chicken on the evening's menu and the mash was a perfect way to add some extra flavor to a meal that was lacking in flair. Mashed cauliflower was the rage during the last low-carbohydrate diet craze, but most recipes for the mashed potato substitute were bland and uninspiring. The version I found on the Mazola site is really flavorful and the recipe is straight forward. The only caution I have to share with you is the importance of draining the cauliflower really well before you mash it. If it is too watery, you will have soup rather than a mash with substance and that would be a shame. This is a delicious dish and I will be making it again. Be sure to visit the Mazola site for this and other heart healthy recipes. They have some wonderful dishes to share with you.This post is sponsored by Mazola Corn Oil. All opinions are my own.

One Year Ago Today: Slave Freedom Fritters - Calas

Two Years Ago Today: Lemon Thins

Three Years Ago Today: Shrimp Omelets from the Pearl River Delta
Labels:
cauliflower mash
,
cream cheese
,
mazola promotion
,
roasted garlic
,
side dish
,
vegetable
Saturday, February 2, 2013
Oh, Baby! It's Hot Hot Hot Jalapeno and Bacon Dip

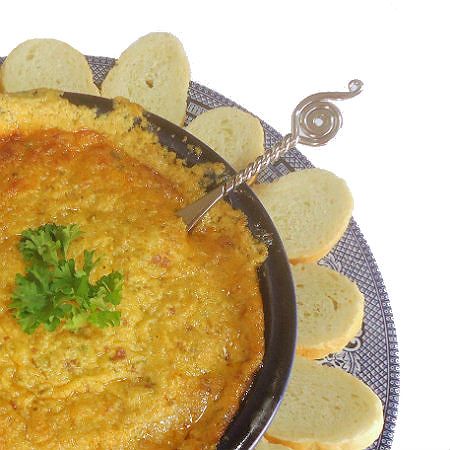
From the kitchen of One Perfect Bite...If your family likes heat, and you can count a teenager or two among those who will watching the game with you on Sunday, I hope you'll give this recipe a try. It defines simplicity and makes enough dip to feed a small country. It also doubles as a fabulous burger topping and it is reputed to cure bunions and cause the planets to align. Now, I'm personally not much into dips. I've made a ton of them over the years because others love them, but my game addictions are fresh hot pretzels or hot dogs on stale buns, even when the game is watched at home. I guess I'm a purist. That means I have to rely on the judgment of others when it comes to rating dips and spreads. Over the years, we've established a base line against which all the dips I make are judged. It pains me to admit this, but the old Knorr Spinach Dip is their hands down favorite and the one against which all others are judged. The dip, found here, is a 50's relic that I suspect most of you have never tasted, but if ever you do, I think you'll better understand how it captured the loyalty of several generations of Americans. At any rate, my crew thinks that tonight's dip is good enough to share the same table with their favorite. It is loaded with bacon and jalapenos and if you like either you'll enjoy the dip. Here is how it is made.
Hot Hot Hot Jalapeno and Bacon Cheese Dip...from the kitchen of One Perfect Bite
Ingredients:
2 (8-ounce) blocks of cream cheese, room temperature
1 cup shredded extra-sharp cheddar cheese
1/2 cup sour cream
1/2 cup mayonnaise
1 tablespoon minced garlic
1 teaspoon smoked paprika
8 strips of crisp cooked bacon, coarsely crumbled + 1 tablespoon bacon drippings
1/2 to 1 (4-ounce) can diced jalapenos
Directions:
Preheat oven to 350 degrees F. Combine cream cheese, cheddar cheese, sour cream, mayonnaise, garlic, paprika and bacon drippings in bowl of a food processor. Pulse until mixture is perfectly smooth. Fold in crumbled bacon. Depending on heat tolerance, fold in 2 to 4 ounces of diced jalapenos. Scrape into a shallow 1-quart baking dish and bake until bubbly and lightly browned, about 20 to 25 minutes. Serve warm with a baguette or pita or tortilla chips. Yield: About 3-1/2 cups.
One Year Ago Today: Grilled Chicken with Tamarind and Coconut Glaze
Two Years Ago Today: Triple Chocolate Cheese Cake
Three Years Ago Today: Warm Asian Rice Salad
Labels:
appetizer
,
bacon
,
cheddar cheese
,
cream cheese
,
dip
,
easy
,
hot
,
snack
,
spread
,
super bowl
Thursday, January 17, 2013
Herbed Cheese and Corn Muffins with Sweet and Hot Cream Cheese Spread

From the kitchen of One Perfect Bite...I made a pork posolé for dinner tonight. I've featured it before and the recipe I use to make it can be found here. While it bubbled away in the crock-pot, I decided to give these special corn muffins a try. I found the recipe in Food and Wine magazine and I thought the muffins would be a perfect accompaniment to some of the spicy winter soups and stews the Silver Fox loves. While I tend to be a purist, I must admit these are delicious and the guy I made them for thought they were a "triumph". He really said that. I do so rue the day he first read Dickens. Judgments here are never simply described and what comes from my kitchen gets labeled in grandiose Victorian terms, even when a simple "good" might be more fitting. They are, after all, just corn muffins and no one expects them to rock the world. That said, they are a bit different and if you are looking for a new recipe, you might want to give this version a try. There is nothing here not to like, so I do hope you will enjoy them. Here's how they are made.
Herbed Cheese and Corn Muffins with Sweet and Hot Cream Cheese Spread...from the kitchen of One Perfect Bite courtesy of Food and Wine magazine
Ingredients:
1-1/2 cups all-purpose flour
3/4 cup stone-ground cornmeal
1 tablespoon baking powder
1 tablespoon sugar
1 teaspoon kosher salt
4 ounces extra-sharp cheddar cheese, shredded (1-1/4 cups), divided use
1/4 cup chopped chives
1 cup milk
1 large egg, lightly beaten
1/4 cup canola oil, plus more for brushing
2 jalapeños
8 ounces cream cheese, softened
1/4 cup hot pepper jelly
Directions:
1) Preheat oven to 400 degrees F. and spray a 12-cup muffin tin with baking spray.
2) In a medium bowl, whisk flour and cornmeal with baking powder, sugar and salt. Lightly stir in 1 cup of the cheddar cheese and chives.
3) In a small bowl, whisk milk with the egg and the 1/4 cup of canola oil. Fold liquid ingredients into dry ingredients just until evenly moistened. Spoon batter into muffin cups. Sprinkle the tops with the remaining 1/4 cup of cheddar cheese.
4) Bake for 22 to 25 minutes, until muffins are springy and golden. Let muffins cool for 5 minutes, then turn them out onto a rack to cool.
5) Meanwhile, brush jalapeños lightly with oil and roast directly over a gas flame or under the broiler, turning, until lightly charred, about 5 minutes. Transfer chiles to a bowl, cover with plastic wrap and refrigerate to cool slightly, about 5 minutes.
Peel, seed and finely chop jalapeños. Mix them with cream cheese and pepper jelly. Serve muffins with pepper jelly cream cheese. Yield: 12 muffins.
One Year Ago Today: Shrimp Noodles
Two Years Ago Today: Old-Fashioned Ginger Bread with Cream Cheese Pockets
Three Years Ago Today: Tuscan Bean Soup
Labels:
cornmeal
,
cream cheese
,
easy
,
jalapenos
,
muffin
,
quick bread
,
savory
,
side dish
,
spread
Subscribe to:
Posts
(
Atom
)