Showing posts with label nuts. Show all posts

Monday, December 7, 2015

Chocolate Nut Brittle

Photo courtesy of The New York Times

From the kitchen of One Perfect Bite...This brittle is neither easy nor inexpensive to make, but I promise it is worth the time and money it takes to put together. The recipe for the brittle was the creation of Suvir Saran, a chef who is highly regarded by his colleagues. His brittle is different from most others because of the spices that are used to give it its unique flavor. This is a great recipe and fortunately the brittle freezes well, so it can be made weeks before things get crazy in the kitchen. Unless you have nerves of steel, this is not a recipe you want to make at the last minute. I don't make a lot of candy for the holidays, but I'll be sure to include this with the other confections that I am planning to prepare. This is good - really good - stuff. Here is how the brittle is made.

Tuesday, June 2, 2015

Saints Preserve Us - Cherry and Almond Bars


From the kitchen of One Perfect Bite..."Summer time and the livin' is easy"...We were house sitting this past weekend and before we left for the cottage, I made cookies and some pastry to take with us. I also put together a couple of casseroles that could simply be reheated once we took up residence. The kitchen in this house is nearly impossible to work in, so I like to bring food of the heat and eat variety when we head that way. Meals this weekend were decidedly simple and the desserts that we brought with us were extremely easy to prepare. These cookie bars are a study in old-fashioned goodness. They are definitely not meant for company, but your family and friends will love them. You will too. They are effortless to make, and they invite creative substitution of ingredients. You can swap the type of nuts and preserves you use, and chances are you'll end up with a bar that keeps your crew coming back for more. While I suspect they will disappear before they stale, these cookies are great keepers. I do hope you'll give this recipe a try. Here is how the cookies are made.

Sunday, March 30, 2014

Treasure Cookies


From the kitchen of One Perfect Bite...Back in the day, a bar cookie called a "Hello Dolly" was all the rage. I was going through my Adelle Davis-Gayelord Hauser period at the time, so I never made the cookie for my family. That, however, never prevented me from sampling them when they appeared on someone else's table. The cookies were packed with an assortment of chips, coconut and sweetened condensed milk, and those who liked "stuff" in their cookies loved them. When I found this recipe in Taste of Home magazine, the old "Hello Dolly" came to mind. These drop cookies are very similar, but they are not quite clones. This is a moist, sweet confection that's packed with everything that's awful for you, so I know you're going to love them. They are simple to make, keep extraordinarily well and even I, who am not fond of sweet things, have to admit they are delicious. Here is how they are made.

Sunday, December 15, 2013

Countdown to Christmas - Hannie's Everyday Stollen


From the kitchen of One Perfect Bite...She was, hands down, the best bread baker in the neighborhood. Long time readers of my blog met Hannie five years ago and her Potato Bread was one of the first recipes I featured on my blog. She was a slight women who bubbled just as surely as the yeast she bloomed, and though only 5 feet tall, she could  beat and pound five pounds of flour into submission with no special equipment, save for her arms and a wooden spoon. She had what my mother called a "hand" and the loaves that came from her kitchen were often extraordinary. Hannie's kitchen truly bustled in the weeks that lead up to Christmas and one of the breads she shared with the neighbors was a loaf she called her everyday stollen. Now between you and me, there was nothing remotely ordinary about her everyday loaf. It was chock full of fruit and nuts, but its reputation suffered because Hannie also made Dresdener Stollen, a rich yeasted loaf filled with almond paste, that was so good it made grown men beg for mercy or at least another slice.  The ingredients used in that special bread were costly, so Hannie, instead, made her everyday stollen as Christmas gifts for the neighbors. I do hope you'll give this recipe a try. If you are comfortable working with yeast dough, you'll find this to be a simple recipe, but despite the ease with which it comes together, it makes a lovely loaf. For maximum flavor, soak the raisins in brandy or orange juice for about an hour before using them, and make sure the bread is done before removing it from the oven. Here is how this holiday bread is made.


Everyday Stollen...from the kitchen of One Perfect Bite

Ingredients:
Bread
2-1/4 teaspoons active dry yeast
2 tablespoons warm water
1 cup warm milk
3/4 cup butter, softened
1/2 cup sugar
2 large eggs, lightly beaten
1-1/2 teaspoons grated lemon peel
1/2 teaspoon salt
4-3/4 to 5-1/4 cups all-purpose flour
3/4 cup raisins
1/2 cup mixed candied fruit
1/2 cup chopped almonds
Glaze
1-1/2 cups confectioners' sugar
2 to 3 tablespoons milk

Directions:
1) Dissolve yeast in warm water in a large bowl. Add milk, butter, sugar, eggs, lemon peel, salt and 3 cups flour. Add raisins, candied fruit and almonds. Add enough remaining flour to form a soft dough. Turn onto a floured surface and knead until smooth and elastic, about 6-8 minutes. Place in a greased bowl, turning once to grease top. Cover and let rise in a warm place until doubled, about 1-1/2 hours.
2) Punch dough down and divide in half; cover and let rest for 10 minutes. Roll or press each half into a 12 x 7-inch oval. Fold a long side over to within 1 inch of opposite side and press edge lightly to seal. Place on greased baking sheets and curve ends slightly. Cover and let rise until nearly doubled, about 1 hour.
3) Meanwhile, preheat oven to 375 degrees F. Bake for 25-30 minutes, or until golden brown. Cool on wire racks.
4) Combine confectioners' sugar and enough milk to achieve a consistency suitable for drizzling. Drizzle over stollen. Yield: 2 loaves.

Follow Me on Pinterest                    

                                                    Older Posts


       One Year Ago Today:                                                                 Two Years Ago Today:
           Anise Biscotti                                                               Mulled Cranberry and Cider Punch


                 Three Years Ago Today:                                          Four Years Ago Today: 
                            Miso Soup                                        Warm Apple Pudding with Hot Caramel Sauce

Sunday, October 28, 2012

Raw Apple Muffins


From the kitchen of One Perfect Bite...These simple apple muffins are perfect for a fall brunch or coffee. They are easy to make and they are packed with flavors that come straight from fall's harvest orchards. The muffins need no special equipment to prepare and if you have a few bowls and a wooden spoon, you can have a table ready treat in a bit less than an hour. The muffins are similar in taste to Jewish or Shaker apple cakes and because they are so packed with fruit, they stay moist and flavorful for several days after they are made. The recipe was originally developed by Marion Cunningham, the author who rewrote The Fannie Farmer Cookbook. She died at the age of 90 this past summer and while perusing an old copy of her Breakfast Book I came across this recipe which I thought would be a perfect tribute to her skill in the kitchen. I know you will love these. They are not refined and may lack style, but I promise you'll find them to be delicious. Here's how the apple muffins are made.

Raw Apple Muffins...from the kitchen of One Perfect Bite courtesy of Marion Cunningham's Breakfast Book

Ingredients:

4 cups peeled and cored  apples cut  in 1/4-inch dice
1 cup of sugar
2 eggs, slightly beaten
1/2 cup vegetable oil
2 teaspoons vanilla extract
2 cups all-purpose flour
2 teaspoons baking soda
2 teaspoons cinnamon
1 teaspoon salt
1 cup raisins
1 cup coarsely chopped walnuts

Directions:

1) Preheat oven to 325 degrees F. Grease or insert paper liners into 16 standard size muffin cups.
2) Mix apples and sugar in one bowl and set aside.
3) Combine eggs, oil and vanilla in a second bowl and stir to blend well.
4) Combine flour, baking soda, cinnamon, and salt in a third bowl and stir until blended.
5) Add egg mixture to apples and sugar and mix well.
6) Sprinkle flour mixture over egg and apple mixture and mix well. This batter is very stiff and you may have to use your hands to assure ingredients are properly mixed. Fold raisins and walnuts into batter and mix until they are evenly distributed in  mixture. Spoon into prepared muffin tins.
7) Bake for about 25 minutes, or until a toothpick comes out clean when inserted into center of a muffin. Turn muffins onto a wire rack to cool. Serve warm. Yield: 16 muffins.


One Year Ago Today: Creamed Spinach


Two Years Ago Today: Fusilli with Spinach and Ricotta Cheese


Three Years Ago Today: Wasabi Glazed Salmon

Thursday, October 11, 2012

Orange Spiced Cashews


From the kitchen of One Perfect Bite...As we move toward the holidays, I like to stock the pantry with a supply of spiced nuts to serve with drinks or add some balance to a cheese tray. For years, I made a variation of the Union Square Cafe's bar nuts, and while I still love those fiery, yet sweet, morsels, I wanted to try something new this year. A quick search of my favorite food sites unearthed the orange spiced cashews that I'm featuring today. The recipe was develop for Martha Stewart Living, and once I saw it, I knew I had to give it a try. The recipe is simple to make and the spiced cashews are delicious. With that said, I have a caution to share with you. I strongly advise that creative impulses be contained, at least the first time you make these nuts. Too much orange zest will spoil them. Please don't ask how I know that. If you follow the recipe as it is written, I think you'll be delighted with the results. While I'll continue to make the Union Square version, I'll also make these available for folks who find the old standard too hot for their palates. If you are looking for something different to serve your guests, I hope you'll give this recipe a try. The cashews are delicious and I think you'll love them. Here's how they are made.

Orange Spiced Cashews...from the kitchen of One Perfect Bite courtesy of Martha Stewart

Ingredients:

2-1/2 cups whole cashews
1/4 cup light corn syrup
1/2 teaspoon coarse salt
1-1/2 teaspoons finely grated orange zest
1 teaspoon ground ginger
1/2 teaspoon ground coriander
1/2 teaspoon ground cumin
Pinch of cayenne pepper

Directions:
1) Preheat oven to 350 degrees F. Line two baking sheets with parchment paper; set aside. In a medium bowl, mix cashews with corn syrup until evenly coated. Set aside.
2) In a small bowl, combine salt, zest, ginger, coriander, cumin, and cayenne. Sprinkle mixture over nuts, and stir until nuts are evenly coated. Transfer to one of the prepared baking sheets; spread in a single layer, separating nuts.
3) Bake until the nuts are golden and the syrup is bubbling, about 15 minutes. Immediately transfer nuts to the other baking sheet. Separate cashews with a fork and let cool. Yield: 2-1/2 cups.


One Year Ago Today: Honey Muffins


Two Years Ago Today: Candied Walnuts


Three Years Ago Today: Pumpkin and Goat Cheese Lasagna

Thursday, April 26, 2012

Maple Flavored Banana-Nana Bread


From the kitchen of One Perfect Bite...This is a quick, easy and dependable bread that can be made in about 20 minutes. This is a great recipe to have when you are working in the usually sub-standard kitchens of dorms, summer cottages or vacation condos. If you have a bowl, a wooden spoon and a strong arm,  you'll have a table-ready bread in about 90 minutes. It is also a great recipe for new cooks or teens to try.  This loaf is a bit different than many you may have sampled. It uses pure maple syrup as a sweetener and gets a flavor boost from a generous quantity of dried banana chips. The addition of nuts is optional, but they do add a nice touch to the finished loaf. If you're feeling especially festive, glazed walnuts or pecans make a wonderful addition and take the bread to a whole nother level. The bread keeps well for several days, but I suspect it will be gone long before it can stale. Whenever possible, I make the bread the day before I plan to serve it. That gives the disparate ingredients a chance to meld and ripen and assures the bread will have wonderful flavor. I've just made a loaf of this, sans nuts, for the Silver Fox. His sweet tooth has come back to life and he'll be ready for an all-you-can-eat buffet any day now. That's awfully nice to see. I hope you'll give this bread a try. I don't think you'll regret it. Here's the recipe.

Maple Flavored Banana-Nana Bread...from the kitchen of One Perfect Bite

Ingredients:
2 cups all-purpose flour
1-1/2 teaspoons baking powder
1/4 teaspoon baking soda
1/4 teaspoon salt
2 eggs
1/2 cup pure maple syrup
1/2 cup vegetable oil
1/4 cup brown sugar
1 cup mashed ripe bananas (about 2 large)
1/2 teaspoon maple flavored extract
1 cup coarsely chopped banana chips
1 cup chopped toasted walnuts or pecans (optional)

Directions:
1) Preheat oven to 350 degrees F. Grease a 9 x 5-inch loaf pan. Set aside.
2) Combine flour, baking powder, baking soda and salt in a medium bowl; set aside.
3) Beat eggs, maple syrup, oil, maple extract and brown sugar in a large bowl. Stir in bananas. Gradually stir in flour mixture, just until moistened. Fold in banana chips and walnuts. Scrape mixture into prepared pan. Level with an offset spatula.
4) Bake 50 to 55 minutes, or until a toothpick inserted in center comes out almost clean. Cool in pan 10 minutes; remove from pan and cool completely on wire rack. Yield: 1 loaf.


One Year Ago Today: Shaved Asparagus Salad with Aged Gouda and Hazelnuts


Two Years Ago Today: Goat Herder's Mac n' Cheese


Three Years Ago Today: Coffee and  Walnut Snack Cake


Thursday, August 25, 2011

Peanut Butter and Banana Bread


From the kitchen of One Perfect Bite...I wish all delicious things could be beautiful and appealing to the eye. Unfortunately, it doesn't always work that way. This quick bread is a perfect example of what I mean. It is wonderfully moist and flavorful, but it is homely in the extreme, and when these ingredients are used, there's not much that can be done to improve its appearance. The combination of bananas, peanut butter and chocolate is irresistibly tasty, but as you can see, they turn the batter a blotchy, muddy tan that is less than pleasing to the eyes. I normally wouldn't bother with something like this, but the bread has such outstanding flavor, that I keep granting it clemency, and bake it over and over again. The recipe was developed by Beth Lipton and I found it at the library in her book, You Made That Dessert?. I really like the earthiness of this bread and I recommend it to you, but with a caution or two. First, do not attempt to make this with natural peanut butter. It is too thin to work as a butter replacement in this recipe. Second, avoid using regular chocolate chips if you can. They will blotch more than the miniatures as the loaf bakes and you'll end up with a hot mess on your hands. Last, and, most important of all, the bread should sit for a day before it is eaten. The flavor improves remarkably when it's given the opportunity to ripen. This is a moist loaf and it keeps well if properly wrapped. I think you will like this. Here's the recipe.

Peanut Butter and Banana Bread with Chocolate Chips and Walnuts ...from the kitchen of One Perfect Bite courtesy of Beth Lipton

Ingredients:
1-1/4 cups all-purpose flour
1 teaspoon baking soda
1/2 teaspoon salt
1/2 cup creamy peanut butter (do not use "natural")
2/3 cup sugar
3 large ripe bananas, mashed
2 large eggs, at room temperature, lightly beaten
1/2 cup chopped walnuts or chopped pecans (optional)
1/2 cup miniature chocolate chips (optional)

Directions:
1) Preheat oven to 350 degrees F. Mist a 5 x 9-inch loaf pan with cooking spray.
2) Whisk flour, baking soda, and salt together in a small bowl until combined.
3) Place peanut butter and sugar in a large bowl. Beat with an electric mixer on medium-low speed until well-blended, about 2 minutes. Beat in mashed banana and eggs; mix well.
4) Using a wooden spoon or flexible spatula, stir flour mixture into the peanut butter–banana mixture, mixing until just combined, scraping down sides of the bowl as needed. Stir in chopped nuts and/or chocolate chips, if using. Scrape batter into the pan and smooth top.
5) Bake 45 minutes. Cover pan loosely with foil and bake 10 to 15 minutes longer, or until a toothpick inserted in center of loaf comes out clean. Cool bread on a wire rack for 10 minutes before removing from pan. It helps to run a paring knife around edges of pan to loosen bread before turning it out. Invert bread onto a wire rack. Carefully turn bread right-side up. When cool, slice and serve. Yield: One 9-inch loaf. Serves 8.


One Year Ago Today: Peanut and Pumpkin Soup


Two Years Ago Today: Apple Custard Pie with Streusel Topping


Your might also enjoy these recipes:
Banana-Applesauce Bread - My Kitchen Adventures
Wonderful Pistachio and Banana Bread - Nibbles and Feasts
Vegan Mango and Banana Bread - The Sweets Life
Orange-Glazed Banana Nut Bread - One Perfect Bite
Marbled Banana Nutella Bread - Sugar Plum

Tuesday, May 24, 2011

Stir-Fried Asparagus with Chopped Nuts and Ginger


From the kitchen of One Perfect Bite...I know, I know. I'm really am sorry. Today's photo is dull and less vibrant than I'd like it to be. While planning for the week, I made a mental note to photograph this dish before it was tossed with soy sauce. My intent was lost somewhere between the drawing board and the wok, and as you can see, I mechanically added soy sauce to the pan, giving the asparagus and nuts the exact hue I was trying to avoid. I do things like that. All the time. Fortunately, all that's hurt is my pride, and the photo is a more accurate depiction of the finished dish than my staged attempt would have been. I'm on my own for supper tonight and this is the type of dish I like to make when Bob is not home. We both like this stir-fry, but while I consider it an entree, he considers it a side dish, and that can make dinner more complicated than I like it to be. I had this with a bowl of steamed rice and it made for a wonderful meal, one, I might add, that is perfect for Meatless Monday. Asparagus floods our local markets at this time of year and it can be purchased for less than $3 a pound. I take advantage of the season while it lasts. This is an especially easy dish to make. It uses ingredients that can be found in any grocery store and can be table ready in less than 30 minutes. I use tamari when I make this, but regular soy sauce can be used as a substitute. More information about tamari can be found here. I find it to be more flavorful regular soy sauce, so I keep a supply of it on hand. The only caution I have to share with you regarding this recipe, is a reminder not to overcook the asparagus. Make sure your wok or pan is hot before adding oil to it. This step prevents food from sticking to the pan as you stir-fry. If you have all the ingredients ready to go, this comes together in seconds. It should be served immediately. While cashews are more authentically Asian, you can use peanuts or cashews to make this dish. While there is no true substitute for the nuts, water chestnuts or sunflower seed kernels can be added to provide texture for those who are allergic to them. I know that those of you who try this dish will love it. Here's the recipe.

Stir Fried Asparagus with Chopped Nuts and Ginger...from the kitchen of One Perfect Bite

Ingredients:
1-1/2 pounds asparagus, cleaned and diagonally cut into 1 -1/2-inch pieces
1 tablespoon vegetable oil
2 teaspoons dark sesame oil
1 tablespoon fresh ginger, finely chopped
1 tablespoon tamari or soy sauce
1/2 cup salted peanuts or cashews, chopped

Directions:
1) Heat a wok or frying pan. Add vegetable and sesame oil and heat until oil shimmers.
2) Add ginger and cook for 1 minute, stirring often.
3) Add asparagus and cook for 4 minutes, until barely tender and still bright green. Stir in nuts and tamari or soy sauce. Cook 2 minutes longer. Serve immediately. Yield: 2 to 3 main course servings.


One Year Ago Today: Creamy Onion and Blue Cheese Soup


Two Years Ago Today: Blueberry Salsa


You might also enjoy these recipes:
Asparagus Pea and Saffron Risotto - A Feast for the Eyes
Asparagus Tart - Healthy and Gourmet
Shaved Asparagus Pizza - Annie's Eats
Asparagus Gratin - Closet Cooking
Cream of Asparagus Soup - Savoring Today
Asparagus and Grogonzola Souffle - Guvi's
Braised White Asparagus and Leek Salad - FOODalogue
White Asparagus Panna Cotta - Almond Corner
Asparagus Salad with Hard-Boiled Egg - Coconut and Lime
Asparagus Risotto - Vegalicious Recipes

Saturday, November 20, 2010

Nānkhatāi - Diwali - Pink Saturday


From the kitchen of One Perfect Bite...All of today's pictures are linked to Diwali, the Hindu holiday that celebrates the return of Lakshmi, the goddess of prosperity. The holiday is much like our Christmas with odd bits of Independence Day and Halloween thrown in. Please understand, I mean no disrespect. Lanterns are lit, families gather and gifts are exchanged during this joyous celebration of light. Firecrackers are used to frighten away evil spirits that might threaten the return of the goddess and children go door to door seeking a reward for the entertainment they provide. The cookie, called a Nānkhatāi, is an eggless shortbread that has a sandy texture. It is sold during the holiday by street vendors who specialize in sweetmeats and other treats. The pigeon is another story. The bird is not a mutant. He is one of many that have been tinted for Diwali. Why? I'm clueless and have been unable to find anyone who can give me a sensible answer. The design being created on the street outside the fence is called a rangoli and it's meant to welcome visiting deities. It, and thousands like it in other Hindu homes, will be lit at night with myriad small lanterns that will give streets the appearance of being swarmed by fireflies or glow worms. It is quite a sight. While I was able to sample most of the foods associated with Diwali, I missed these cookies and wanted to try them once I returned home. I made them today and I must say I'm not thrilled with the results. The cookie is fine, but, with so much good shortbread around, it merits only a lukewarm review. I decided to post it with reservations because it is a Indian dessert and I wanted to conclude my tour of India with something sweet. I'll let you be the judge of its merits. Here's the recipe.

Nānkhatāis...from the kitchen of One Perfect Bite courtesy of Culinary Annonations

Ingredients:

1/2 cup confectioners’ sugar
1/2 cup refrigerated ghee (clarified butter) or unsalted butter
1/2 teaspoon pure vanilla extract
1/2 cup unbleached all-purpose flour (maida)
1/2 cup semolina flour (rava)
3/4 teaspoon ground cardamom [or 1/4 teaspoon ground nutmeg]
3/4 teaspoon baking powder
2 tablespoons chopped nuts for topping

Directions:
1) Line a cookie sheet with parchment or wax paper. Pre-heat oven to 325 degrees F.
2) Sift confectioners' sugar into a mixing bowl. Add refrigerated ghee/butter and cream mixture until fluffy. Add vanilla and mix to incorporate.
3) Sift flour, semolina and baking powder into another bowl. Whisk in cardomom. Add flour mixture to creamed mixture in two parts. Once a cookie dough forms, transfer it to a cold working surface and knead a few times. Break dough into 20 equal-sized portions and shape into flattened rounds. Make a thumb impression in center of each and press in a few pieces of nuts.
4) Bake cookies for about 20 to 25 minutes. Check at 20 minute interval to ensure that cookies do not brown or develop any deep color. Be aware that these cookies will crack slightly. That is as it should be. Cool on wire racks. Store airtight. Yield: 18 to 20 cookies.

You might also enjoy these recipes:
Semolina and Almond Salwa - eCurry
Gulab Jamun - Phem Fatale
Strawberry Busundi - Food Lyrics
Milk Cake - The Vegetarian Way
Pumpkin Kulfi - Eggless Cooking
Rasmalai - The Inner Gourmet

This post is being linked to:
Pink Saturday, sponsored by Beverly at How Sweet the Sound.

Thursday, October 15, 2009

Pumpkin Cake


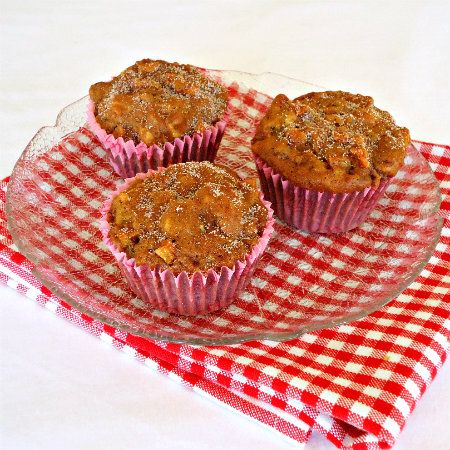
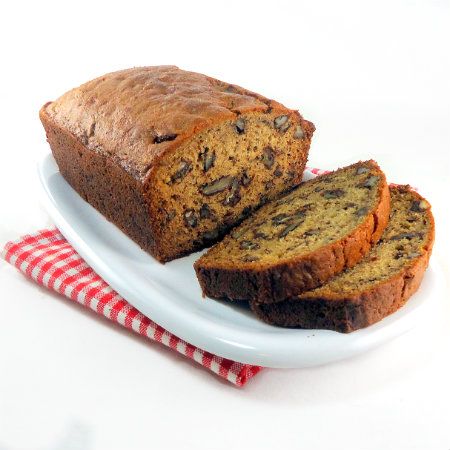
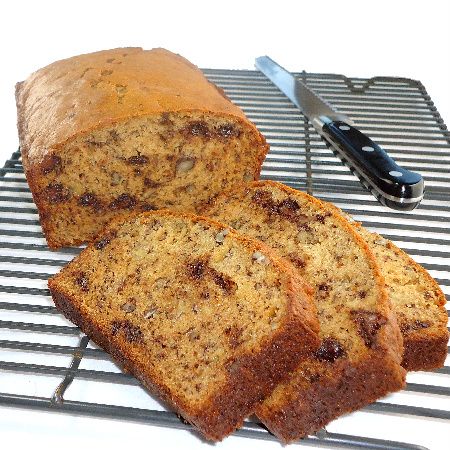
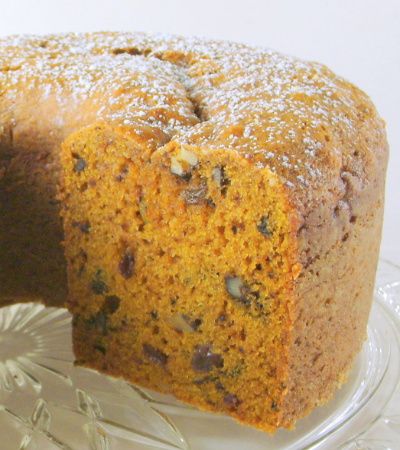
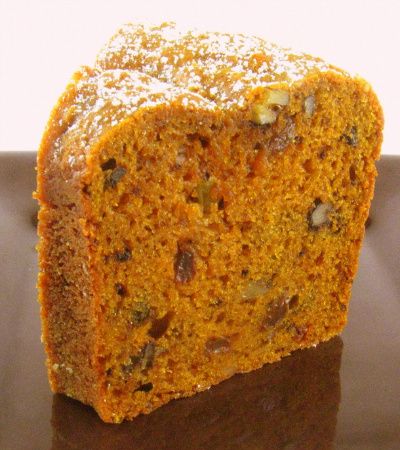
From the kitchen of One Perfect Bite...This is an old cake from one of Maida Heatter's first cookbooks. It's a lightly spiced pumpkin cake that's chock full of nuts and macerated raisins. The raisins are soaked in dark rum for an hour or so before being added to the cake batter. Raisins plumped in this fashion aren't necessary, but they add a lovely adult touch to an otherwise simple cake. Apple juice could also be used. I like this cake because it's easy to assemble, needs no special equipment to make and uses no exotic ingredients, save for the rum which is optional. When my children were small, I loved to make this cake for them, sans rum of course. It's only mildly sweet and the raisins and nuts add some nutritional value to otherwise empty calories. I did, however, have one child who would confound me. To this day, a raisin has never passed her lips. By the time she finished pulling raisins from this cake or a slice of raisin bread they'd look like Flemish lace. It was the habit years ago to serve this cake with a ginger flavored whipped cream. It's still a lovely garnish, but I prefer to keep things really simple and use a dusting of confectioners' sugar to finish the cake. Here's the recipe.

Pumpkin Cake...from the kitchen of One Perfect Bite courtesy of Maida Heatter

Ingredients:
3 cups sifted all--purpose flour
2 teaspoons baking soda
2 teaspoons baking powder
1 tablespoon cinnamon
1/2 teaspoon powdered ginger
1/4 teaspoon powdered cloves
1/4 teaspoon nutmeg
1/4 teaspoon allspice
1 teaspoon salt
1 cup raisins, macerated in rum or apple juice for an hour, then drained and patted dry
3 1/2 ounces (1 cup) walnuts, broken into medium-size pieces
2 cups plain pumpkin puree
2 cups sugar
1-1/4 cups safflower oil, corn oil, or other salad oil (not olive oil)
4 large eggs
Optional: Confectioners sugar

Directions:
1) Adjust rack one-third up from bottom of oven and preheat to 350 degrees. Butter a 10 x 4-1/2 inch tube pan. Line bottom with paper cut to fit and butter paper.
2) Sift together flour, baking soda, baking powder, cinnamon, ginger, cloves, nutmeg, allspice, and salt. Add a tablespoon of sifted dry ingredients to raisins in a small bowl. With your fingers, toss raisins to separate them and coat each one with the dry ingredients. Stir in nuts and set aside.
3) In large bowl of electric mixer, place pumpkin, sugar, and oil. Beat at medium speed until smooth. Add eggs individually, beating after each until incorporated.
4) On low speed add sifted dry ingredients, beating only until smooth. Remove from mixer. Stir in raisins and nuts. Turn into prepared pan. Rotate pan briskly to level top.
5) Bake 1 hour and 5 minutes or until a cake tester comes out dry. Cool on a rack for about 10 minutes. The baked cake will only fill about three-quarters of pan.
6) Cover cake with a rack and invert. Remove pan and paper. Cover with another rack and invert again. Cool right side up on the rack.
8) When cool, top may be dusted with confectioners sugar sifted through a fine mesh strainer.
Serve as is or with a generous spoonful of whipped cream. Yield: 10 to 12 servings.

Thursday, November 13, 2008

Stuffed Delicata Squash


Delicata is a thin-skinned winter squash with a nutty taste and fine grained texture. It's unusual within the squash family because its skin can be eaten. It's perfect for holiday meals and its small size make it a natural for stuffing. This rich version can be prepared early in the day and reheated just before serving. The nut stuffing sets it apart from ordinary fare and puts it in the category of harvest treat - perfect for Thanksgiving.

Stuffed Delicata Squash

Ingredients:
3 small Delicata squash
1-1/2 teaspoons salt, divided use
1 teaspoon freshly ground pepper, divided use
2 teaspoons olive oil + additional oil for drizzling
1/2 cup finely minced onion
1 cup finely diced celery
1 tablespoon freshly chopped garlic
1/2 cup dry sherry
3 stale, dry English muffins, cut in 1/4-inch dice
1 cup finely chopped toasted hazelnuts
1/2 cup finely chopped toasted pecans
1 teaspoon dried thyme
1/4 teaspoon dried sage
1/4 to 1/2 cup stock (vegetable or chicken)
2 large pasteurized eggs, lightly beaten

Directions:
1) Cut squash in half crosswise. Scoop out centers. Place in a large microwavable container. Drizzle with olive oil and sprinkle with 1 teaspoon salt and 1/2 teaspoon pepper. Place 2 teaspoons water in bottom of container; cover with a lid or parchment paper. Microwave on HIGH power for 5 to 7 minutes, or until squash is tender. Remove and let sit for 10 minutes.
2) Heat 2 tablespoons olive oil in a large saute pan until hot. Add onions and celery and saute until softened, about 3 minutes. Add garlic and saute until fragrant. Add sherry and cook until reduced by half. Set aside to cool. Add diced muffins, hazelnuts, pecans, thyme, sage, reserved 1/2 teaspoon salt and 1/2 teaspoon pepper; toss to combine. Stir in eggs and enough stock to bind mixture. Mix well. Spoon into squash cavities. Carefully transfer to an oven-to-table pan. Refrigerate until ready to proceed.
3) Preheat oven to 350 degrees F. If squash has been refrigerated, bring to room temperature. Bake for 30 minutes, or until stuffing is heated through. If you prefer the squash can also be finished in a microwave (5 minutes on HIGH). Yield: 6 servings.
Related Posts with Thumbnails

Printfriendly