Tuesday, July 31, 2012

Julia Child's Basque Piperade


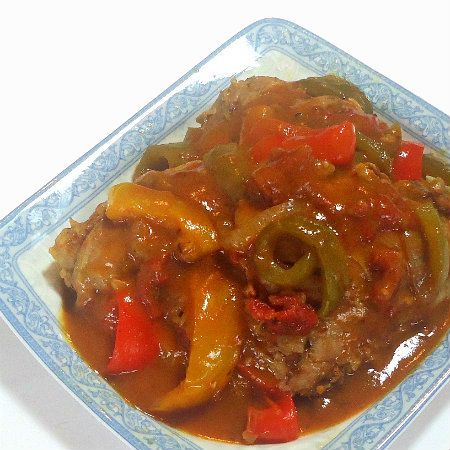
From the kitchen of One Perfect Bite...Each summer, just about this time,  I start to daydream about the heady and distinctive food of the French Basque region. The Basque people occupy a narrow strip of land nestled between the Atlantic Ocean and the western Pyrenees in a region that spans the border between France and Spain. While Basque food tends to be unique, elements of both cuisines can be found in the food favored by the people of this region. Ingredients you might be familiar with, include Bayonne ham and piment d’Espelette, a chili pepper that is used to flavor one of the region's best known dishes, piperade. A fleeting thought of piperade, visually triggered by bins of peppers appearing in farmer's markets, usually begins my reverie, and before I can help myself, I find myself slicing peppers with a vengeance and speed that rivals that of the guillotine. Come September, my freezer will have neatly labeled packets of  stewed and seasoned peppers that will bring sunshine to my winter kitchen.  Plainly stated, I love piperade and serve it often as a main course or side dish, depending on my fancy. The dish is made with sauteed onions, bell peppers and tomatoes that are flavored with Espelette pepper. It can be served with rice or potatoes, and eggs, meat and poultry can also be added to make the dish more substantial. The dish has wonderful color that, by accident or design, reflects the red, green and white colors of the Basque flag. It also has a robust flavor that I find addicting. The recipe I use to make piperade was developed by Julia Child and can be found in her book, The Way to Cook. While there are many fine recipes for piperade floating around, I continue to use hers. It's like an old friend and my kitchen just wouldn't be the same were it to be swapped with another. If you have never had piperade, I hope you will give this recipe a try. It is wonderful and quite easy to make. Use proscuitto to replace Bayonne ham and hot Hungarian paprika as a substitute for piment d’Espelette. I most often use piperade in a braised chicken dish that is so simple it needs no recipe. A cut-up chicken is first sauteed and then placed in a casserole with piperade. It simmers, stovetop, for about 45 minutes and is served with white rice. If you like well-flavored food, I know you will love casserole. Here's the recipe.

Piperade...from the kitchen of One Perfect Bite courtesy of Julia Child

Ingredients:
6 medium tomatoes or 1 (14.5-oz.) can diced tomatoes, drained
1 tablespoon + 2 teaspoons olive oil
4 ounces thinly sliced Bayonne ham or proscuitto, cut into 1/2-inch squares
2 medium yellow onions, halved and thinly sliced
2 medium garlic cloves, minced
2 tablespoons fresh Italian parsley, coarsely chopped
1 tablespoon fresh thyme leaves, coarsely chopped
1 medium dried bay leaf
2 medium red, yellow, or orange bell peppers, cleaned and sliced lengthwise into 1/4-inch strips
2 medium green bell peppers, cleaned and sliced lengthwise into 1/4-inch strips
Kosher salt
2 teaspoons piment d’Espelette or hot Hungarian paprika

Directions:

1) If using fresh tomatoes, bring a large saucepan of water to a boil over high heat. Prepare an ice water bath by filling a medium bowl halfway with ice and water. Using tip of a knife, remove stem and cut a shallow X-shape into bottom of each tomato. Place tomatoes in the boiling water and blanch until the skin just starts to pucker and loosen, about 10 seconds. Drain and immediately immerse tomatoes in ice water bath. Using a small knife, peel loosened skin and cut each tomato in half. With a small spoon, scrape out any seeds, then core and coarsely chop remaining flesh. Set aside.
2) Place a large Dutch oven or other heavy-bottomed pot with a tight-fitting lid over medium heat and add 1 tablespoon of oil. When oil shimmers, add ham or proscuitto and cook, stirring occasionally, until it’s golden brown, about 8 minutes. Using a slotted spoon, transfer to a plate and set aside.
3) Return pan to heat, add remaining 2 teaspoons oil, and, once heated, add onion and garlic. Cook, stirring rarely, until soft and beginning to color, about 8 minutes. Stir in herbs and pepper slices and season well with salt. Cover and cook, stirring rarely, until peppers are slightly softened, about 10 minutes.
4) Stir in diced tomatoes, browned ham, and piment d’Espelette or paprika and season well with salt. Cook uncovered until mixture melds and juices have slightly thickened, about 10 minutes. Remove bay leaf and serve. Yield: 4 to 6 servings.


One Year Ago Today: Key Lime Cheesecake


Two Years Ago Today: Watermelon Limeade


Three Years Ago Today: Baked French Toast with Cardamom and Apricot Preserves

Monday, July 30, 2012

Chicken Breasts with Garlic Wine (Poulet au Vin d'Ail)


From the kitchen of One Perfect Bite...This simple, yet elegant, entree is nearly effortless to prepare. It takes less than 30 minutes to make, but it is prepared in two stages. The recipe includes a garlic wine that must be made a day or two before the chicken is sauteed. Dry white wine or dry vermouth is infused with a mixture of garlic and herbs and allowed to sit until their flavors permeate the wine. The wine is what gives this chicken its wonderful flavor. I use French vermouth to make the garlic wine used in this recipe. Years ago, Julia Child suggested the use of vermouth when good white wine was not available for cooking. I rarely have a bottle of white wine sitting on the door of my refrigerator, so I use vermouth in its stead. It can be kept for ages if properly stored and it makes an excellent cooking wine. I use Noilly Prat, Original French Dry Vermouth, for most of my cooking, but I also use an aperitif called Lillet, when we have it in the house. Lillet, by the way, is the "vermouth" used to make the famous Vesper martini popularized by James Bond in the movie Casino Royale. From my perspective, the advantage to using a brand specific vermouth is the consistency with which it performs. The folks at Cook's Illustrated also recommend Gallo vermouth for cooking. It has the advantage of being much less expensive than its French counterparts and it is more readily available in some communities. I have yet to use it, but it is on my must-try list. If you have an aversion to tarragon, omit it, but do not double the amount of thyme used in the recipe. This is a lovely, company worthy entree that was developed by Paula Wolfert. She has never let me down and I know that those of you who try this chicken will really enjoy it. The dish comes from Southwestern France and it is simple to prepare, visually appealing and absolutely delicious. I do hope you will try it. Here's the recipe.

Chicken Breasts with Garlic Wine (Poulet au Vin d'Ail)...from the kitchen of One Perfect Bite courtesy of Paula Wolfert

Ingredients for garlic wine:
9 garlic cloves
2 sprigs of thyme
2 sprigs of tarragon
1/4 teaspoon freshly crushed peppercorns
1 cup dry white wine or dry French vermouth

Ingredients for chicken:
3/4 cup Garlic Wine (recipe follows)
4 boneless chicken breast halves
Coarse kosher salt and freshly ground pepper
Flour, for dredging
2 tablespoons clarified butter
1 tablespoon extra virgin olive oil
2 teaspoons fresh tarragon, plus additional for seasoning
1/3 cup heavy cream

Directions:
1) To make garlic wine: One to two days before serving, halve garlic cloves and put them in a 1-pint canning jar along with thyme, tarragon and crushed pepper corns. Bring wine or vermouth to a boil in a small saucepan. Pour over ingredients in jar. Let cool, then cover and refrigerate for 1 to2 days. Strain wine through cheesecloth and return to a clean jar. Discard solids. Cover and refrigerate until ready to use.
2) To prepare chicken: Trim chicken breasts and flatten slightly with a rolling pin to form cutlets of an even thickness. Season with salt and pepper, then dredge in flour, shaking off excess. Heat clarified butter and oil in a large skillet over moderately high heat until sizzling. Add chicken breasts and sauté on both sides, until lightly browned and just cooked through, about 5 minutes total. Do not overcook. Transfer chicken to a platter and cover with foil to keep warm. Discard all but 1 tablespoon fat from skillet. Add tarragon and cook over gentle heat for 10 seconds. Add garlic wine and water, scraping pan with a wooden spoon to deglaze. Bring contents of pan to a boil. Add cream and boil to reduce until thick enough to coat a spoon. Adjust seasoning with salt, pepper, and more tarragon to taste. Pour the sauce over the chicken and serve at once. Yield: 4 servings.


One Year Ago Today: Baja Summer Slaw


Two Years Ago Today: Beginner's Whole Wheat Batter Bread


Three Years Ago Today: Apple Onion Bread with Cheddar Cheese

Sunday, July 29, 2012

Pavlova with Lemon Curd and Mixed Berries


From the kitchen of One Perfect Bite...This is one of my favorite seasonal desserts and I make it several times each summer. Pavlova is a light meringue dessert that is usually topped with whipped cream and fresh fruit. This airy dish was named after Anna Pavlova, a Russian prima ballerina who toured Australia and New Zealand in the late 1920's. The dessert was created in her honor and I'm told it is still wildly popular in those countries. A well-made Pavlova has a crackly crisp crust and a soft marshmallow interior that makes it a perfect base to hold a creamy filling and seasonally fresh fruit. The version I'm featuring today is based on a recipe that first appeared in Gourmet magazine. It differs slightly from more classical preparations in that it uses lemon curd to fill the shell on which the berries rest. The combination of sweet and tart is irresistibly delicious, but because this is a meringue dessert, some care must be taken when assembling it. The eggs should be at room temperature if you want to achieve maximum volume and the meringue should be baked at a low temperature to achieve a light crust, while still retaining a soft marshmallow interior. The meringue should dry in the oven and as it does, it will crack. The shell is very fragile, and while the recipe developers say it can be frozen, I wouldn't count on being able to do that. That crackly crisp crust also crumbles. The tartness of the lemon curd is a perfect foil for the sweetness of the berries and meringue shell and the yin and yang nature of this dessert is close to perfect. The only caution I have to share with you regards the appearance of the Pavlova. In my kitchen, anyway, it is unpredictable and can range from stunning to something best described as a hot mess. I live in a generally damp climate that probably explains the variance, but the inconsistency prevents me from telling you that this dessert makes my socks go up and down. It is, however, really, really, really good and I know you will love its play of flavors. This deserves to be tried. Here's the recipe.

Pavlova with Lemon Curd and Mixed Berries ...from the kitchen of One Perfect Bite courtesy of Gourmet Magazine

Ingredients:
Meringue
1 cup superfine granulated sugar
1 tablespoon cornstarch
3 large egg whites at room temperature 30 minutes
3 tablespoons cold water
1 teaspoon distilled white vinegar
Lemon Curd
2/3 cup granulated sugar
1 tablespoon cornstarch
1/8 teaspoon salt
1/3 cup fresh lemon juice
1/2 stick unsalted butter
3 large egg yolks
2 teaspoons grated lemon zest
Topping
1-1/2 cups heavy cream, divided use
4 cups mixed berries

Directions:
1) To make meringue: Place a rack in center of oven and preheat to 300 degrees F. Trace a 7-inch circle on a sheet of parchment paper. Turn parchment over and put on a baking sheet.Whisk superfine sugar and cornstarch together in a small bowl. Beat whites with a pinch of salt using an electric mixer at medium speed until they hold soft peaks. Add water (whites will loosen) and beat until whites again hold soft peaks. Increase speed to medium-high and beat in sugar mixture 1 tablespoon at a time. After all sugar has been added, beat 1 minute more. Add vinegar and beat at high speed until meringue is glossy and holds stiff peaks, about 5 minutes (longer if using hand-held mixer). Gently spread meringue inside circle on parchment, making edge of meringue slightly higher than center (the "crater" is for curd and fruit). Bake until meringue is pale golden and has a crust, about 45 minutes (inside will still be marshmallow-like). Turn oven off and prop door open slightly with a wooden spoon. Cool meringue in oven 1 hour.
2) To make lemon curd: While meringue bakes, stir together sugar, cornstarch, and salt in a 2-quart heavy saucepan, then add lemon juice and butter. Bring to a simmer over medium-high heat, whisking, then continue to simmer, whisking constantly, 1 minute. Lightly beat yolks in a small bowl and whisk in 1/4 cup lemon mixture, then whisk into remaining lemon mixture in saucepan. Reduce heat to low and cook, whisking constantly, until curd is thickened, about 2 minutes (do not let boil). Transfer to a bowl and stir in zest. Chill, surface covered with parchment, until cool, about 1 1/2 hours.
3) To assemble: Beat heavy cream until it just holds stiff peaks, then fold 1/2 cup beaten cream into curd to lighten. Spoon lemon curd into meringue and mound berries on top. Serve remaining whipped cream on the side.

Cooks' notes:
•For best results, keep oven door closed as much as possible during baking.
•Meringue can be made 2 days ahead and frozen, wrapped well in plastic. Thaw before serving.
•Curd can be made 2 days ahead and chilled.


One Year Ago Today: Frenchified Meatloaf


Two Years Ago Today: Curried Egg Salad


Three Years Ago Today: Warm Poached Sausage and Potato Salad

Saturday, July 28, 2012

Take Your Pick - Warm or Cold Shrimp Rolls


From the kitchen of One Perfect Bite...The glut of lobsters that caused prices to plummet on the East coast has had no effect on their pricing here in Oregon. Inexpensive lobster rolls are fading into memory long before my appetite for them has dwindled. I spent some time today tweaking recipes for lobster rolls that I had found in the latest issue of the Food Network Magazine. One recipe, the Maine roll, was made with mayonnaise and served cold. The other, a recipe for a Connecticut roll meant to be served warm, featured just cooked lobster meat dressed in a hot seasoned butter. Both versions sounded appetizing, but cost dictated that shrimp be used to replace the lobster used in the original recipes. I steamed the shrimp, and, in both instances, I played a bit with the spicing that was originally used. I also substituted lightly toasted potato rolls for the hot dog buns in the ingredient list. I really liked both these recipes. I'm sure they are wonderful when made with lobster, but the rolls are also delicious when made with shrimp. I'll be making these again and I hope that you will give them a try. Here are the recipes.


Cold Shrimp Rolls...from the kitchen of One Perfect Bite inspired by the Food Network Magazine

Ingredients:
1 to 1-1/2 pound cooked shrimp, chilled and coarsely chopped
1/3 cup mayonnaise
1/4 cup diced celery
Zest and juice of 1 small lemon
Salt to taste
4 split top hot dog-type buns

Directions:
Mix mayonnaise, diced celery, and lemon zest and juice in a bowl. Stir in chilled shrimp and season with salt. Lightly toast buns. Fill each bun with a portion of shrimp mixture. Garnish with celery leaves if desired. Yield: 4 servings.


Warm Shrimp Rolls...from the kitchen of One Perfect Bite inspired by the Food Network Magazine

Ingredients:
1 to 1-1/2 pounds warm cooked shrimp, coarsely chopped
4 tablespoons warm melted butter
Juice of 1 small lemon
1 small clove garlic, minced
1/4 teaspoon sweet smoked paprika
Salt to taste
4 split top hot dog-type buns

Directions:
Combine butter, lemon juice, garlic and paprika in a small pan. Heat until garlic is fragrant. Remove from heat. Add shrimp and toss to coat. Season to taste with salt. Keep warm. Warm or lightly toast buns. Fill each bun with a portion of shrimp mixture. Garnish with a slice of lemon if desired. Serve warm. Yield: 4 servings.


One Year Ago Today: Stir Fried Snow Peas


Two Years Ago Today: Israeli Salad


Three Tears Ago Today: Roasted Beet Salad

Friday, July 27, 2012

A Light and Meatless Manicotti


From the kitchen of One Perfect Bite...When my children were in high school they were heavily involved in activities and team sports that made the counting of fat grams and calories unnecessary. Pasta, in various forms, appeared frequently on my table, and manicotti was a special favorite. The version I used was made with crepes and covered with a lovely tomato sauce that simmered for hours on the back burner of the stove. It was delicious, but because it was labor intensive and undeniably fattening for those of us who do not regularly run 5 minute miles, it disappeared from my table as the house began to empty. My oldest daughter, whose kitchen these days is a happening place, re-introduced us to manicotti last week. Her version is lean and mean and about as figure friendly as pasta can get. She found the recipe in Cooking Light magazine several years ago and it has since become a standard on her menu roster. Her decision to make it concerned me a bit. I had visions of a very late dinner as she began to stuff the tubes for the small army that was waiting for dinner that evening. I never should have doubted her. Proving, yet again, that the apple does not fall far from the tree, she pulled  a pastry bag from her luggage. It had been packed expressly for this  purpose, and she had the tubes filled in less than 15 minutes. Dinner was served on time and I must say it was delicious. I hope you will give this pasta a try. Its flavor belies the low-fat products with which it is made and because the imanicotti is not cooked before stuffing, this version is a huge time and step saver. I know that those of you who try it will be really pleased with this figure friendly and easy to assemble pasta. Here's the recipe.

Meatless Manicotti...from the kitchen of One Perfect Bite courtesy of Cooking Light

Ingredients:

2 cups (8 ounces) shredded part-skim mozzarella cheese, divided use
1 (16-ounce) carton fat-free cottage cheese
1 (10-ounce) package frozen chopped spinach, thawed, drained, and squeezed dry
1/4 cup (1 ounce) grated fresh Parmesan cheese
1 1/2 teaspoons dried oregano
1/4 teaspoon salt
1/4 teaspoon black pepper
1 (8-ounce) package manicotti (14 shells)
1 (26-ounce) jar fat-free tomato-basil pasta sauce
Cooking spray
1 cup water

Preparation:

1) Preheat oven to 375 degrees F. Spray 13 x 9-inch baking dish with cooking spray.
2) Combine 1-1/2 cups mozzarella, cottage cheese, spinach, Parmesan cheese, oregano and salt and pepper  in a medium bowl. Spoon about 3 tablespoons cheese mixture into each uncooked manicotti.
3) Pour half of tomato-basil pasta sauce into prepared baking dish. Arrange stuffed shells in a single layer over sauce, and top with the remaining sauce. Pour 1 cup water into dish. Sprinkle the remaining 1/2 cup mozzarella evenly over sauce. Cover tightly with foil. Bake for 1 hour, or until shells are tender. Let stand 10 minutes before serving. Yield: 7 servings.


One Year Ago Today: Cauliflower Salad with Red Peppers, Black Olives and Anchovies


Two Years Ago Today:  Red Bell Peppers Stuffed with Orzo and Feta Cheese


Three Years Ago Today: Kona Coffee Cookies

Thursday, July 26, 2012

Blueberry Pudding Cake + The Floating Post Office


Sometimes we stumble across traditions that are so charming they are meant to be shared with others. Those associated with the floating post office on Lake Winnipesaukee are among them. The Motor Vessel (M/V) Sophie C.  is the oldest floating post office in the United States and she has provided summer mail service to islands in the lake since 1892.  The mail is delivered daily, but the ship also carries ice cream and other treats for children on the islands to purchase. The ship sounds her horn when approaching a mail drop and the children, young and old, gather on the pier and wait for the boat to dock.  Once mail bags have been exchanged, they swarm onto the Sophie and pick their treat for the day. The children traditionally thank the mailcrew with a diving exhibition as the ship pulls away from their island. The islands are quite diverse. Some house million dollar estates, while others, like that owned by the Appalachian Mountain Club, provide residents with very modest shelters, an outhouse and kerosene lanterns. The property, named long before the Pennsylvania nuclear plant was built, is called Three Mile Island. The name was not changed following the partial meltdown that occurred at the plant. Oversight? Intentional irony? Who knows?


From the kitchen of One Perfect Bite...This simple pudding cake is a delight to make and eat. It comes from Gourmet magazine and has been designated a favorite of the magazine's editorial staff. The cake requires no special equipment and can be made in about 15 minutes. It consists of a simple batter that is covered with quickly stewed and sweetened blueberries. The berries sink as the cake bakes and the end result is an old-fashioned pudding cake that is delightful when served warm with a scoop of really good ice cream. This is a great cake for young or novice cooks to make. Here's the recipe.


Blueberry Pudding Cake...from the kitchen of One Perfect Bite courtesy of Gourmet magazine

Ingredients:

1/3 cup + 1/2 cup sugar, divided use
1/4 cup water
1 tablespoon fresh lemon juice
1 teaspoon cornstarch
10 oz. blueberries (2 cups)
1 cup all-purpose flour
1-3/4 teaspoons baking powder
1 teaspoon salt
1 large egg
1/2 cup whole milk
1 stick (1/2 cup) unsalted butter, melted and cooled slightly
1 teaspoon vanilla

Directions:

1) Place oven rack in middle position and preheat oven to 375 degrees F. Butter a 9-inch square baking pan.
2) Stir together 1/3 cup sugar with water, lemon juice, and cornstarch in a small saucepan, then stir in blueberries. Bring to a simmer, then simmer, stirring occasionally, 3 minutes. Remove from heat.
3) Whisk together flour, baking powder, salt, and remaining 1/2 cup sugar in a medium bowl.
4) Whisk together egg, milk, butter, and vanilla in a large bowl, then add flour mixture, whisking until just combined.
5) Spoon batter into baking pan, spreading evenly, then pour blueberry mixture evenly over batter (berries will sink). Bake until a knife inserted into center of cake portion comes out clean, 25 to 30 minutes. Cool in pan on a rack 5 minutes.


One Year Ago Today: Red Pepper Soup with Ginger and Fennel


Two Years Ago Today: Pasta with Zucchini, Parmesan and Garlic Oil


Wednesday, July 25, 2012

Southwestern Soft Taco Casserole


Our grandsons...a happy band of brothers.


From the kitchen of One Perfect Bite...I am back home and ready, really ready, to take up whisk and spoon and create again in my own familiar and well-equipped kitchen. The break from routine and repetition was really needed and the time spent with family was simply priceless. As you can see, our grandsons are growing like over-fertilized weeds and our time with them, while short, is treasured. On reflection, I, too, am often tempted to say to the passing moment, "Stay, thou art so fair." Instead, I worked my way through blog related email tonight and hope to catch up with your comments and questions tomorrow morning. Thanks so much for your patience and continued support in my absence. The posts for the remainder of this week will be simple, but scrumptious, vacation fare. Next week, at the request of the Silver Fox, who, at the moment, is up to his ears in pasta and ground beef, I'll be featuring dishes from France and the Mediterranean. They are not at all toney, but I know you'll enjoy them.

The recipe I'm featuring tonight is one my younger daughter prepared for us while we were in New Hampshire. It is fast, easy and delicious and, better still, quantities can be doubled or tripled when you have a gang to feed. It can be made well in advance of serving and it also freezes well, freeing you for other chores or time with family and friends. Her version of the recipe uses just 7 ingredients, and, while it varies slightly, I think the recipe first appeared in Taste of Home magazine with a slightly expanded ingredient list. Optional ingredients in the recipe below are highlighted in red. If you have not yet sampled this casserole, I hope you'll give it a try. Here's the recipe.


Southwestern Soft Taco Casserole...from the kitchen of One Perfect Bite courtesy of Melissa Mabe and Taste of Home magazine

Ingredients:
1 pound ground beef
1/2 cup chopped green pepper
1/2 cup chopped onion
2/3 cup water
1 envelope taco seasoning
1 can (15 ounces) black beans, rinsed and drained
1 can (14.5 ounces) Mexican diced tomatoes, undrained
1 can (15 ounces) corn, drained
6 flour tortillas (8 inches), cut in half
1 can (16 ounces) refried beans
3 cups (12 ounces) shredded Mexican cheese blend

Directions:
1) Preheat oven to 350 degrees F.
2) In a large skillet, cook beef, and, if using, green pepper and onion, over medium heat until meat is no longer pink; drain. Add water and taco seasoning; bring to a boil. Reduce heat; simmer, uncovered, for 2 minutes. Stir in black beans, tomatoes and corn. Simmer, uncovered, for 10 minutes.
3) Place four tortilla halves in bottom of a greased 13 x 9-in. baking dish. If using, spread tortillas with half of refried beans. Then spread with half of beef mixture and sprinkle with 1 cup cheese. Repeat layers. Top with remaining tortillas and cheese.
4) Cover and bake for 25-30 minutes, or until heated through and cheese is melted. Yield: 9 servings.


One Year Ago Today: Orange and Rhubarb Bread


Two Years Ago Today: Blueberry Buckle

Tuesday, July 24, 2012

Lemon-Glazed Blueberry Bread


From the kitchen of One Perfect Bite...This is a lovely summer cake and it is a delight to make when blueberries are in season and at the peak of flavor. This recipe pairs the berries with lemon and the tart-sweet combination is further enhanced with an intense lemon glaze that makes the cake truly memorable. This is really easy to make, but whenever I bake it, I end up with a flat-topped loaf that's lacks visual appeal. I like this cake well enough to work around its shortcomings, so, I perform a little plastic surgery before I serve it. My first incision splits the cake in half lengthwise. Then it's cut crosswise into serving size cubes. No one, save for those who read this post or watched the surgery being performed, is any the wiser. The rest of the world thinks this is the way the cake was meant to appear, and I'd like to keep my manipulation of it, our little secret. Mums the word, right? I hope you'll give this recipe a try. I know that once you taste it, the the cake will become a summer favorite that you'll bake year after year. Here's the recipe.


Lemon-Glazed Blueberry Bread
...from the kitchen of One Perfect Bite inspired by Martha Stewart

Ingredients:

1 stick unsalted butter + more for pans
2 cups all-purpose flour + plus more for pans
1-1/2 cups sugar
1 tablespoon finely grated lemon zest + 1/2 cup + 2 tablespoons fresh lemon juice (from 4 lemons)
3/4 cup heavy cream
1 teaspoon pure vanilla extract
1/4 teaspoon baking powder
1/4 teaspoon baking soda
Salt
2 large eggs
6 ounces blueberries (1-1/4 cups)

Directions:
1) Preheat oven to 350 degrees F. Butter one 9 x 5 x 3-inch loaf pan. Dust with flour and tap out excess.
2) Combine 1/2 cup sugar and 1/2 cup lemon juice in a small saucepan over medium heat. Simmer, stirring occasionally, until sugar dissolves and syrup is thickened, about 4 minutes. Let stand while making cakes.
3) Meanwhile, combine heavy cream, remaining 2 tablespoons lemon juice, and vanilla in a bowl. Whisk together flour, baking powder, baking soda, and 1/4 teaspoon salt in another bowl.
4) Beat butter, lemon zest, and remaining cup sugar with a mixer on medium speed until pale and fluffy. Reduce speed to low, and add eggs, 1 at a time, beating well after each addition. Beat in flour mixture in 3 additions, alternating with cream mixture, beginning and ending with flour. Gently fold in blueberries using a rubber spatula.
5) Scrape batter into prepared pan. Bake until a toothpick inserted into the center of loaf comes out clean, about 55 minutes.
6) Transfer pan to awire rack, and brush tops of cake with lemon syrup. Let stand for 15 minutes. Turn out cake from pans, and brush all over with remaining syrup. Let cool completely on wire racks. Yield: 8 to 10 servings.


One Year Ago Today: Milk Chocolate Bundt Cake


Two Years Ago Today: Watermelon Smoothie


Three Years Ago Today: Orange Phoenix Chicken with Grilled Bok Choy

Monday, July 23, 2012

Pan Grilled Shrimp with Barbecue Spices


From the kitchen of One Perfect Bite...Life isn't fair. In a year when the lobster catch is huge and the clawed monsters are selling for $4.99 a pound, my family remains committed to shrimp, lots and lots of them. I've lived with the curse for years and in my dotage I've become convinced their love of the crustacean is directly proportional to its current market value. The more expensive it becomes, the more they love it. At any rate, short of finding a trove of really small lobsters, it's shrimp for dinner tonight. Scampi sounds awfully good to me right now. Don't get me wrong. The pan grilled shrimp I'm featuring today are great, but I've decided the recipe is impractical when you have a gang to feed. I made a test batch of the grilled shrimp before heading east, and I must say they are very, very nice and quite easy to do. The recipe, however, is not workable when you have ten or twelve people to feed. The cook would never get to leave the grill, so, a change of menu is definitely in order here. It will be scampi for dinner tonight. Shrimp with with lots of garlic butter and crusty bread and a salad so crisp it hurts the ears would really hit the spot. As to the featured recipe, it's great and should be shared. The recipe was developed by Bobby Flay and while it won't work in this vacation cottage, it would be perfect for a small backyard gathering. I hope some of you will try it. Here's the recipe.

Pan Grilled Barbecued Shrimp with Barbecue Spices...from the kitchen of One Perfect Bite courtesy of Bobby Flay

Ingredients:

1/4 cup smoked sweet paprika
2 tablespoons ancho chile powder
2 tablespoons light brown sugar
2 teaspoons ground cumin
2 teaspoons kosher salt
1 teaspoon ground black pepper
2 pounds (21-24 count) large shrimp, shell on
6 tablespoons canola oil, divided
12 cloves coarsely chopped fresh garlic, divided
1/2 cup thinly sliced green onion

Directions:
1) Heat grill to high. In a large bowl, combine paprika, chile powder, sugar, cumin, salt and pepper. Add shrimp and toss until coated well.
2) In a large cast-iron skillet or stainless-steel saute pan placed on grill, heat 2 tbsp oil. Add one-third each of shrimp and garlic, Saute, turning once, until shrimp is opaque and just cooked through, about 3 to 4 minutes. Stir in one-third of scallions and transfer to a large platter or turn out onto brown paper bags.
3) Wipe out skillet with paper towels and repeat, in 2 more batches, with remaining oil, shrimp, garlic and scallion. Serve immediately.
4) To cook indoors: In a large cast-iron or nonstick skillet, heat 2 tbsp oil over medium-high heat. Saute shrimp and garlic in batches as above. Stir in scallions and serve. Makes 4 to 6 servings.


One Year Ago Today: Thai-Style Green Beans


Two Years Ago Today: London Broil with Garlic and Parsley Sauce


Three Years Ago Today: Tomato Brunch Sandwiches

Sunday, July 22, 2012

Glazed Lemon Pound Cake


From the kitchen of One Perfect Bite...This is another lovely cake that's perfect to use as a base for summer berries. The recipe was develop by Piper Davis for inclusion in the Grand Central Baking Book. While the recipe, as it was originally published, appears below, I made a few changes to the cake I made for my family. It was my intention to serve the cake with blackberries, so I swapped orange zest for the lemon that was called for in the original recipe. I also eliminated the glaze that soaks into the cake when it is released from the pan. I replaced it with a loose icing that's made with a combination of confectioners' sugar and orange flavoring. The lemon version of this cake is delicious, but we've had a lot of the lemon-blueberry combination these past few weeks and I thought a little variety would be good for the soul. About this time every summer, I start to dream of naked melons and plain fruit. My tolerance for sweets, which is never very high, ebbs at this time of year. It's temporary, I know, but I can't wait to taste those Oregon melons and the first of the summer apples. In the meantime, I'm surrounded by folks who really enjoy sweet things and I aim to please. This is a lovely cake that I know will bring lemon lovers to their knees. If your tastes run to the tart-sweet, you'll love this cake. I hope you'll give it a try. Here's the recipe.

Glazed Lemon Pound Cake...from the kitchen of One Perfect Bite inspired by Grand Central Baking Book

Ingredients:
4 cups all-purpose flour (1 lb. 4 oz.)
2 teaspoons salt
1 teaspoon baking soda
1-1/2 stick unsalted butter room temperature
2-1/2 cups granulated sugar
4 eggs room temperature
1-1/4 cup buttermilk room temperature
1/4 cup lemon juice
2 tablespoons lemon zest finely chopped
Glaze
1/2 cup granulated sugar
1/4 cup fresh lemon juice
2 tablespoons water

Directions:
1) Preheat oven to 350 degrees F. Grease and lightly flour a 10-inch tube pan.
Measure dry ingredients into a bowl and whisk to combine.
2) Using a stand mixture with a paddle attachment, beat butter and sugar on medium high seed until mixture is very light in color (almost white) and texture is fluffy, about 6 minutes. Scrape bottom and sides of mixing bowl several times to ensure butter is evenly incorporated.
3) Crack eggs into a liquid measuring cup and, with mixer on low speed, slowly add eggs,letting them fall into the bowl one at a time and incorporating each egg completely before adding the next. Scrape bottom and sides of bowl.
4) Measure buttermilk and lemon juice into a liquid measure and stir in lemon zest. With mixer on low speed, add one-third of dry ingredients, then half of buttermilk mixture, mixing just until combined after each addition. Repeat, using half of remaining dry ingredients and all of remaining buttermilk. Add remaining dry ingredients and stop mixing before fully incorporated. Finish mixing by hand, using a sturdy spatula and being sure to scrape up from bottom of bowl.
4) Scrape batter into prepared tube pan and use spatula to smooth surface of batter. Run a paring knife through batter in one smooth motion, 1-inch from the edge of the pan to help cake rise evenly. Bake 45 minutes, rotate pan and reduce temperature to 325 degrees F. Bake 30 to 35 more minutes. The cake is ready when it pulls away from edges of the pan slightly and springs back when pressed lightly in center. The top will probably split. Use a cake tester to check doneness.
5) While the cake is baking prepare glaze. Combine granulated sugar, lemon juice and water in a small pan set over medium-high heat. Bring mixture to a boil. Reduce heat to medium, and simmer until glaze thickens and becomes syrupy, about 4 to 5 minutes.
6) Remove cake from oven and cool on a rack for 10 minutes. Loosen sides and around tube with a knife. Invert cake onto rack and quickly turn it over so top side of cake is facing up. Using a skewer, poke holes in top of cake. Slowly pour glaze over top of cake. When glaze has been absorbed transfer cake to a serving plate. Cool completely before serving. Yield: 15 to 16 servings.


One Year Ago Today: Prawn Curry


Two Years Ago Today: Sweet Potato Biscuits


Three Years Ago Today: Chicken and Rice Salad Veracruz

Saturday, July 21, 2012

Zucchini Bread with Pineapple and Walnuts


From the kitchen of One Perfect Bite...Every year I engage in some insanity with friends who were in my Master Gardener's class. It actually is a challenge. At this time of year, our local farm stands sell huge zucchini for a dollar. These monsters are 18 to 24 inches long and if you dropped on your foot, serious damage could be done to your toes. At any rate, the challenge is to see who can make the best use of the dollar zucchini. The first year we did this was easy. We all had clean slates and didn't have to concern ourselves with repetitions or copy cat entries. However, we've done this for five years now and it is getting harder and harder to come up with new things to make. In past years I've worked on savory entries that could be served as meals. This year I want to confuse everyone and work my way through the sweet end of the spectrum. I made this bread just before we left for New Hampshire and it is one of the loaves that traveled with me from one coast to the other. It was given luggage space because the combination of zucchini and pineapple was a delightful surprise and I wanted to share it with my daughters. If you have not yet tried the combination, I hope you will give this moist and flavorful bread a try. I promise you won't regret it. Here's the recipe I used.

Zucchini Bread with Pineapple and Walnuts...from the kitchen of One Perfect Bite courtesy of Lane County Extension Service

Ingredients:
1 cup packed brown sugar
1/2 cup softened butter
1 cup grated zucchini
1 (8-oz.) can crushed pineapple (with juice)
2 eggs
2 cups all-purpose flour
1 teaspoon baking soda
1 teaspoon ground cinnamon
1/4 teaspoon salt
1/4 teaspoon ground allspice
1/2 cup chopped walnuts
Glaze
1/2 cup confectioners' sugar
1 teaspoon corn syrup
1/4 teaspoon ground cinnamon

Directions:
1) Heat oven to 350 degrees F. Grease and flour bottom only of a 9 x 5 inch loaf pan.
2) Cream brown sugar and butter in a large bowl until light and fluffy. Reserve 1 tablespoon pineapple juice. Stir in pineapple, zucchini, and eggs. Add flour, baking soda, cinnamon, salt, and allspice. Blend well. Fold in nuts. Spread evenly in prepared pan.
3) Bake for 60 to 70 minutes, or until toothpick inserted in center comes out clean. Cool 10 minutes, and then remove from pan and finish cooling on a wire rack.
4) To Make Glaze: Combine confectioners' sugar, reserved 1 tablespoon pineapple juice, corn syrup and 1/4 teaspoon ground cinnamon. Mix until smooth, and spoon over warm loaf. Cool completely on wire rack. Wrap and store in refrigerator. Yield: 8 to 12 servings.


One Year Ago Today: Savory Spinach and Rice Cakes


Two Years Ago Today: Raspberry Kuchen


Three Years Ago Today: Lemon-Herb Slow Cooker Chicken

Related Posts with Thumbnails

Printfriendly