Thursday, June 30, 2011

Relish the Relish - Two Hot Dog Toppers


From the kitchen of One Perfect Bite...It's a miracle that any of us raised in the 40's and 50's lived to tell the tale. We biked without helmets, skated without knee pads and rode shotgun without seat belts. Folks were not yet health conscious and, unless your mother was a dietician, pantry shelves sagged under the weight of newly introduced dips, chips and spreads. Casseroles ruled the day and a quick dinner of hot dogs and chips was not unusual. One of the treats of the time was a cheese stuffed hot dog wrapped in bacon. 
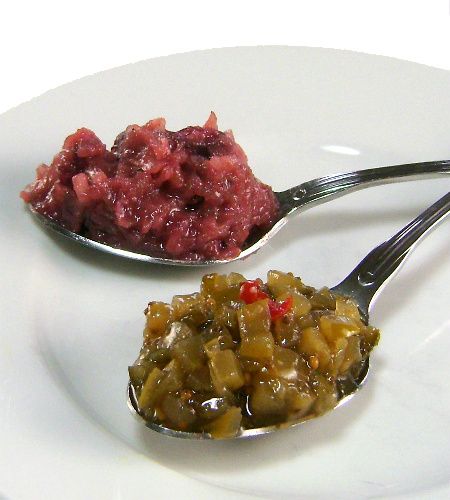
When I stumbled on a recipe for them written by Emeril Lagasse , I really had to laugh. The lowly hot dog had come full circle. As bad as these might be for you, they are delicious, and had Proust sampled one, culinary literature might forever have been changed. Over the next few days, folks are going to consume a lot of hot dogs, so, I thought this would be a good time to share some recipes for condiments to serve with them. As it happens, I have two recipes for relish that I think you'll enjoy. They are easy to make and will allow you to put your own stamp on the hot dogs you serve this holiday weekend. Here's how they're made.


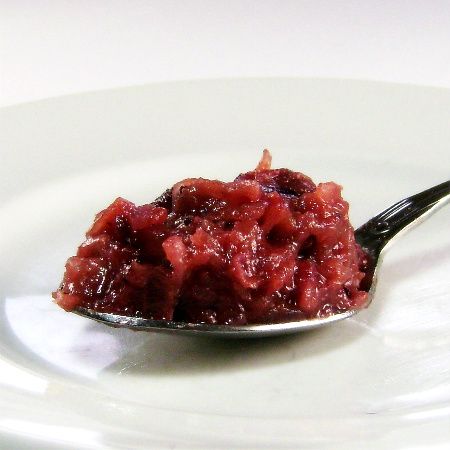
Cranberry and Sauerkraut Relish...from the kitchen of One Perfect Bite courtesy of Taste of Home Magazine

Ingredients:
1 medium onion, chopped
1 tablespoon olive oil
1 cup whole-berry cranberry sauce
1 tablespoon Dijon mustard
1 teaspoon sugar
1/2 teaspoon garlic powder
1/4 teaspoon hot pepper sauce
1/2 cup sauerkraut, rinsed and drained

Directions:
In a small saucepan, saute onion in oil until tender. Add cranberry sauce, mustard, sugar, garlic powder and pepper sauce. Cook and stir for 5-10 minutes or until cranberry sauce is melted. Add sauerkraut; heat through. Cool to room temperature. Refrigerate Yield: 1-1/2 cups.


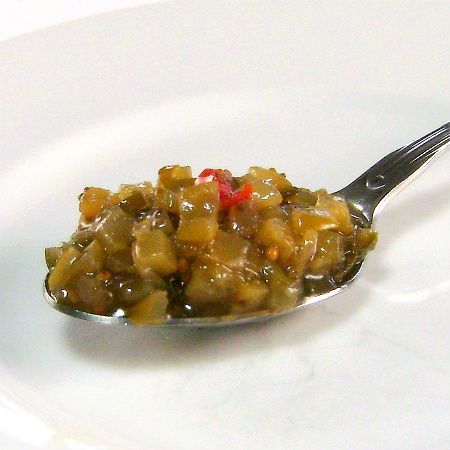
Quick Pickle Relish...from the kitchen of One Perfect Bite courtesy of Michael Chiarello

Ingredients:
1 cup diced dill pickle
1/4 cup hot/sweet mustard
1 tablespoon pickle brine
1 tablespoon fresh dill, chopped
Optional: 1 teaspoon drained, chopped pimento

Directions:
Combine all ingredients, stir and serve with hot dogs or hamburgers.


One Year Ago Today: Red Pepper Relish


Two Years Ago Today: Parmesan Crisps


You might also enjoy these recipes:
Sweet or Savory Pickle Relish - Cooking with Corey
Sweet Pickle Relish - Stefani's Cooking Spot
Dill Pickle Relish - The Tasty Kitchen
Corn Relish - Simply Recipes
Pickled Pepper Relish - One Perfect Bite

Wednesday, June 29, 2011

Crusty Farm-Style Fried Chicken


From the kitchen of One Perfect Bite...I was delighted when this recipe was reprinted by the editors of Farm Journal. I had originally seen it in one of their old cookbooks, and made it for the first time nearly fifty years ago. I was newly married and trying to capture the warmth and aura of country cooking in a very modest big city kitchen. Thoughts of that kitchen still make me smile. It had an ancient stove, a refrigerator and a sink with a drain board that was also used for assembly and chopping. I first made this chicken there. The recipe was great and I used it for years, but when our nest began to empty and calories had to be watched more carefully than the children ever were, the recipe was retired and fell out of sight and mind. I stumbled on it again last year and simply had to make it again. The biggest drawback was scaling ingredients to feed fewer people. I halved the ingredients and used two (2-1/2 pound) chickens to make this for our dinner. There were four of us at the table that evening and I still had leftovers for the following day. If you are unable to find packets of the powdered garlic dressing, an Italian mix can be substituted. I think those of you who try this chicken will love it. It is a perfect choice for holiday picnics or alfresco dining. Here's the recipe as it originally appeared in Farm Journal (AGWeb).


Crusty Farm-Style Fried Chicken
...from the kitchen of One Perfect Bite courtesy of Farm Journal

Ingredients:
3 (3 pounds) broiler-fryers..cut in pieces
2 envelopes garlic salad dressing mix (i.e. Good Seasons)
3 tablespoons flour
2 teaspoons salt salt
1/4 cup lemon juice
2 tablespoons soft butter
1 cup milk
1-1/2 cups pancake mix
Vegetable oil for frying

Directions:
1) Wipe chicken pieces with a damp paper towel. Combine salad dressing mix, flour and salt in a small bowl. Add lemon juice and butter, mix to a smooth paste. Brush chicken on all sides with spice paste. Store coated chicken in refrigerator over night.
2) About 1-1/2 hours before serving heat 1/2-inch of oil in large skillet. Dip chicken in milk, then coat with pancake mix. Lightly brown in hot oil. When browned place in a shallow baking pan, one layer deep. Spoon half of remaining dipping milk over chicken. Cover with foil. Bake at 375 degrees F for 30 minutes. Remove foil, baste with pan drippings and bake 20 to 30 minutes more. Remove from Oven and serve immediately. Yield: 6 to 8 servings.


One Year Ago Today: Lemon Coleslaw


Two Years Ago Today: Red Cooked Pork


You might also enjoy these recipes:
Perfect Fried Chicken - Chef at Large
Double Dipped Fried Chicken - The Red Spoon
Southern Fried Chicken - The Galley Gourmet
Crispy Oven Fried Chicken - Living the Gourmet
Batter Fried Chicken - What's Cookin' Chicago?

Tuesday, June 28, 2011

Cottage Cheese Rolls


From the kitchen of One Perfect Bite...I always tuck bread or rolls into my picnic hamper. I love the way the yeasty aroma permeates the basket and leaves no doubt that buried treasure lies within. I have a real weakness for good bread and can't imagine a proper picnic without a soft or crusty loaf as part of the meal. I first had these rolls at a block party when I was a child. They came from Hannie's German kitchen and they were still warm when she put them on the table. The rolls, obviously, created a taste memory that is not easily forgotten. I've since done some research, and learned that the rolls are much like those made in Central Europe in the days before World War II. I wanted to know why cottage cheese was used in the buns, and, unfortunately, came up with no good answers. While Hannie used cottage cheese to add protein to the bread, I was unable to discover why it was first used in those European kitchens. Chances are it was an afterthought, used to prevent the waste of cheese on the verge of spoiling. That is purely a guess on my part, but the history of the region suggests it is probably close to the mark. The cheese helps produces light rolls that have a vaguely sour taste. They are extremely good, but the dough, which rises quickly, is difficult to work with. It is very sticky. It will be hard to resist the temptation to add more flour than the recipe actually calls for. Resist with all your might. Some suggest using floured hands to knead the dough. I prefer to keep my hands wet. While, I know it seems counterintuitive, damp hands will do the trick and prevent too much flour from being added to the dough. Save for the stickiness, these rolls are easy to make. While, I think they are best from the oven, they keep well for several days if properly wrapped. The recipe can be doubled, and herbs such as dill or chives make a nice addition if you want to add additional flavor to the rolls. Here's the recipe.

Cottage Cheese Rolls... from the kitchen of One Perfect Bite

Ingredients:
2-1/4 teaspoons active dry yeast
1/4 cup warm water (110° to 115°)
1 cup (8 ounces) 4% cottage cheese
1 large egg
2 tablespoons granulated sugar
1 teaspoons salt
1/4 teaspoon baking soda
2-1/4 cups all-purpose flour

Directions:
1) Combine yeast and water in a large mixing bowl. Set aside.
2) Heat cottage cheese in a small saucepan set over medium heat until it registers a temperature of 110 to 115 degrees F.
3) Add cottage cheese, egg, sugar, salt, baking soda and 1 cup flour to yeast mixture. Beat until perfectly smooth. Stir in remaining flour to form a firm dough (dough will be sticky).
Turn onto a floured surface; knead until smooth and elastic, about 6-8 minutes. Place in a greased bowl, turning once to grease top. Cover and let rise in a warm place until doubled, about 1 hour.
4) Punch dough down. Turn onto a lightly floured surface; divide into 15 pieces. Shape each piece into a roll. Place 2 in. apart on greased baking sheets. Cover and let rise until doubled, about 30 minutes.
5) Bake at 350 degrees F for 10-12 minutes or until golden brown. Remove to wire racks. Yield: 15 rolls.


One Year Ago Today: Baba Ganoush


Two Years Ago Today: Blue Corn Muffins


You might also enjoy these recipes:
Homemade Hamburger Rolls - Food is Love
Multigrain Rolls - Annie's Eats
Warm and Buttery Olive Oil and Rosemary Rolls - The Recipe Girl
Sour Cream Yeast Rolls - Real Mom Kitchen
Honey Yeast Rolls - Plain Chicken

Monday, June 27, 2011

Blueberry Cream Squares


From the kitchen of One Perfect Bite...I love the celebrations of summer and the simple foods we've come to associate with them. Show me a marching band, throw in some fireworks and I'll pull out a virtual parade of recipes to help celebrate the occasion. Most come from memories garnered under the hot and hazy skies of my Midwestern childhood. These dishes are not for the health or diet conscious, but because they are served just once a year, I feel no need to apologize for the wretched excesses that will appear here over the next few days. I wanted to start with an old-fashioned dessert that is trying to make a comeback. These use to be called icebox cakes, the most famous of which is the still popular chocolate wafer cake. An icebox cake can loosely be defined as a cake that does not require baking. Cake slices, cookies, or crumbs of some type, are used as a base to hold the layers of the cake together. Almost all of them use copious amounts of heavy cream, though it is possible to make them with lower calorie whipped topping. I've always insisted that fresh fruit cancels the calories in whipped cream, so my icebox cakes always contain some type of fruit. Ergo, this cake is good for you. Kinda. Good or bad, this was part of our 4th of July celebration when I was a child. If you'd like to take a stroll down memory lane, the recipe follows.

Blueberry Cream Squares...from the kitchen of One Perfect Bite adapted from Farm Journal

Ingredients:

1 cup (8 ounces) sour cream
3/4 cup (6 ounces) blueberry yogurt
1 envelope unflavored gelatin
3/4 cup cold water
3/4 cup sugar, divided
1/2 teaspoon vanilla extract
1-1/4 cups graham cracker crumbs
6 tablespoons butter, melted
1 cup fresh blueberries
1/2 cup heavy whipping cream, whipped

Directions:
1) Combine sour cream and yogurt in a small bowl. Set aside.
2) Sprinkle gelatin over cold water in a small saucepan and let stand for 1 minute. Add 1/2 cup sugar. Cook and stir over low heat until gelatin is completely dissolved.
3) Remove from heat; stir in vanilla and sour cream mixture until blended. Transfer to a large bowl. Chill until partially set.
4) Combine graham cracker crumbs, butter and reserved 1/4 cup sugar in a small bowl. Set aside 1/4 cup for topping. Press remaining crumb mixture into an ungreased 8-inch square dish. Set aside.
5) Stir blueberries into partially set gelatin mixture. Fold in whipped cream. Spoon into crust. Sprinkle with reserved crumb mixture. Chill until set. Refrigerate leftovers. Yield: 9 servings


One Year Ago Today: Curried Cream of Cauliflower and Apple Soup


Two Years Ago Today: Blue Corn Muffins


You might also enjoy these recipes:
Frozen Mocha Cheesecake - Sage Cuisine
Icebox Cake - Smitten Kitchen
Strawberry Icebox Cake - TheKitchen
Peanutty Icebox Cake - One Perfect Bite
Meyer Lemon Icebox Cake - No Recipes

Sunday, June 26, 2011

London Broil with Ravigote Sauce


From the kitchen of One Perfect Bite...As far as I'm concerned, there should always be room in a recipe collection for one more way to cook a London broil. If you try this one, I think you'll understand why I'm so enthusiastic about it. I found the recipe in The Gourmet Cookbook and it really makes a fine steak. Nowadays, we all know that London broil is a method of cooking, rather than a cut of meat. The true origins of the steak are not known, but we do know that it was originally made with a flank steak that was quickly pan fried and cut across the grain for serving. Flank steak was chosen for the preparation because it was so cheap. Times change, and, because flank steak has become expensive, the name is now applied to any lean cut of beef that needs to be marinated or tenderized before it is grilled. To work as London broil, the cut should have a single muscle like that found in a steak coming from the top round or shoulder. These cuts of beef can be grilled, broiled or pan fried as long as they are not overcooked. The thickness of the steak will determine cooking time. The steaks used by home cooks to make London broil are rarely over 1-1/2 inches in thickness, so it is not difficult to correctly time their cooking. The sauce that is served with this steak adds a wonderful brightness to the dish. It is French in origin and based on a veloute sauce that is cut with white wine vinegar and mustard. It is a perfect accompaniment to London broil and it is much easier to make than a Bearnaise sauce. The steak and the sauce make a wonderful summer meal. I hope you'll try this recipe. It will not disappoint.

London Broil with Ravigote Sauce...from the kitchen of One Perfect Bite adapted from The Gourmet Cookbook

Ingredients:
Marinade
2 tablespoons minced garlic
2 tablespoons soy sauce
2 tablespoons red wine vinegar
1 tablespoon vegetable oil
1/2 teaspoon red pepper flakes
1/2 teaspoon sugar
1/2 teaspoon salt
1 (1-1/2 pound) London Broil, about 1-1/2-inch thick from sirloin or shoulder
Ravigote Sauce
1 tablespoon Dijon mustard
2 teaspoons white wine vinegar
1/3 cup olive oil
1/3 cup finely chopped onion, soaked in water for 3 minutes, drained, and squeezed dry
1 tablespoon minced shallots
1 tablespoon finely chopped chives or scallions
2 tablespoons capers, drained and chopped
2 tablespoons minced fresh parsley
1/4 teaspoon dried tarragon, crumbled
Salt and freshly ground black pepper

Directions:

1) To prepare steak marinade: Combine garlic, soy sauce, vinegar oil, red pepper flakes, sugar and salt in a blender jar. Blend marinade well. Place London Broil in a large resealable plastic bag. Pour marinade over all. Seal bag and marinate at room temperature for 1 hour, turning occasionally. Alternatively, cover and chill overnight.
2) To make sauce: Whisk together mustard and vinegar together in a small bowl. Add oil in slow stream whisking until mixture is emulsified. Stir in onion, shallot, chives, capers, parsley, tarragon, and salt and pepper to taste. Combine ingredients well. (May be made one day in advance and served chilled or slightly warmed.)
3) To grill London Broil: Preheat gas grill on high for 10 minutes. Lightly oil grill rack. Lift steak from marinade. Sear steak, covered, turning once until grill marks appear on both sides, about 2 minutes total. Reduce heat to moderate and grill steak, covered, turning occasionally until meat thermometer registers 120 degrees F, about 8 to 10 minutes. The steak can also be cooked in a well-seasoned grill pan set over moderately high heat, for about 7 minutes per side. Transfer to a plate, tent with foil and let sit for 10 minutes before serving. Thinly slice steak with knife held at a 45 degree angle and serve with sauce. Yield: 4 to 6 servings.


One Year Ago Today: Watermelon Cucumber and Tomato Salad


Two Years Ago Today: Raspberry Ripple


You might also enjoy these recipes:
London Broil with Mushrooms - Delightful Repast
Mom's Pan-Fried London Broil Steak - Simply Recipes
Garlic and Herb Grilled London Broil - Real Mom Kitchen
London Broil with Garlic and Parsley Sauce - One Perfect Bite
Recipe Favorites: Marinated Flank Steak (London Broil) - Kalyn's Kitchen

Saturday, June 25, 2011

Watermelon and Tomato Salad


From the kitchen of One Perfect Bite...This lovely salad is perfect to serve with summer's al fresco meals and I wanted you to have the recipe for it well in advance of the 4th of July holiday. It's very easy to prepare and it adds a lovely brightness to any meal where it is served. While the various element of the salad can be assembled early in the day, they should be combined and dressed just prior to serving. The salad is best served icy cold and, for optimal visual effect, you'll want to use the yellow tomatoes called for in the recipe. 'm using a photo from Taste of Home magazine to illustrate the way the salad should look. I had to make it this evening using only red tomatoes and it did not photograph well. I'll replace their photo with one of my own before the holiday. The magazine photo has been replaced with one of my own. I know many of you are going to question the use of the mango if this recipe. It adds a tart sweetness to the dressing that is hard to duplicate with other ingredients, so I'm going to say it is necessary in this application. I'm fairly certain that those of you make the salad will be pleased with the results. If you need more than six servings, the recipe can, of course, be doubled. Here's how it is made.

Watermelon and Tomato Salad ...from the kitchen of One Perfect Bite adapted from a recipe developed for Taste of Home Magazine

Ingredients:

Salad Dressing
1-1/2 tablespoons lime juice
1 tablespoons white balsamic vinegar
1 tablespoons olive oil
1 tablespoons honey
1 small mango, peeled and chopped
1/2 teaspoon grated lime peel
1/2 teaspoon kosher salt
1/8 teaspoon white pepper
Salad
4 cups cubed seedless watermelon
3/4 pound yellow tomatoes, coarsely chopped (about 3 medium)
3/4 pounds red tomatoes, coarsely chopped (about 3 medium)
1 small sweet onion, thinly sliced and separated into rings
1/3 cup minced fresh cilantro

Directions:
1) For dressing, place lime juice, white balsamic vinegar, olive oil, honey, mango, lime peel, salt
and pepper in a blender; cover and process until pureed.
2) In a large bowl, combine watermelon, tomatoes, onions and cilantro. Just before serving, add dressing and toss to coat. Serve with a slotted spoon. Yield: 6 servings.


One Year Ago Today: Apple Raisin Chutney


Two Years Ago Today: Arista - Tuscan Herbed Pork Loin


You might also enjoy these recipes:
Watermelon Salad with Grapefruit-Mint Vinaigrette - Confections of a Foodie Bride
Minty Peach and Watermelon Salad with Feta - What's for Lunch, Honey?
Minty Watermelon Salad - Never Enough Thyme
Watermelon Salad - Life's Ambrosia
Watermelon Salad with Rose and Mint Syrup - Technicolor Kitchen

Friday, June 24, 2011

50 Women Game-Changers in Food - #3 Fannie Farmer - Rhubarb Custard Pie


From the kitchen of One Perfect Bite...We've reached the third week of a challenge that explores the food and recipes of the women who made Gourmet's list of the 50 most influential women in the food industry. It might surprise some to know that Fannie Farmer, a name that becomes less familiar with the passage of time, garnered third place on the list. The first spot went to Julia Child for her cooking and the way it stimulated interest in food and how it is prepared. Alice Waters took second place for her part in the greening our kitchens, and her efforts to simplify
and improve the quality of the food we eat by inspiring the use of fresh and local ingredients in its preparation. Fannie Merritt Farmer, closed ranks behind them and grabbed third place because of her recipes. The Fannie Farmer Cookbook, formally known as The Boston Cooking-School Cook Book, was the first cookbook to include standard, or exact, measures in its recipes. Her book was first published in 1896. A stroke at the age of 16 kept her at home for many years and she turned to cooking to help pass the time. She became an accomplished cook, and, as her health improved, she was able to formally study cooking at the prestigious Boston Cooking School. Her true interest, however, was in the science of food and nutrition and she wanted to share what she had learned with home cooks. Little Brown agreed to publish her first book, but they had so little faith in the possibility of its success, that she had to pay for the printing of the first edition herself. The arrangement proved to be fortuitous because it made her sole owner of the book's copyright. Her book has been continuously in print since its first publication, some 4,000,000 copies ago. Newer editions of the cookbook look nothing like the one that was first published and its recipes now follow a formula common to modern cookbooks. That's fine and prudent, but I wanted to follow a recipe as she had written it all those years ago. Call it whimsy. I finally settled on one I had found for rhubarb custard pie. It is an old fashioned delight. It will never replace the strawberry-rhubarb pie made in today's kitchens, but it's not half bad, and, sometimes, not half bad is good enough. Her original recipe for the pie appears below, courtesy of Bartlelby.com. I doubled the ingredients to produce the pie photographed for this post. Each category that is covered in the book begins with common instructions for all the recipes within that group. That is followed by a breakdown of ingredients needed for a specific recipe. The section on pies looks like this.


Chapter XXVIII.
PIES.


PASTE for pies should be one-fourth inch thick and rolled a little larger than the plate to allow for shrinking. In dividing paste for pies, allow more for upper than under crusts. Always perforate upper crusts that steam may escape. Some make a design, others pierce with a large fork.

Flat rims for pies should be cut in strips three-fourths inch wide. Under crusts should be brushed with cold water before putting on rims, and rims slightly fulled, otherwise they will shrink from edge of plate. The pastry-jagger, a simple device for cutting paste, makes rims with fluted edges.

Pies requiring two crusts sometimes have a rim between the crusts. This is mostly confined to mince pieces, where there is little danger of juice escaping. Sometimes a rim is placed over upper crust. Where two pieces of paste are put together, the under piece should always be brushed with cold water, the upper piece placed over, and the two pressed lightly together; otherwise they will separate during baking.

When juicy fruit is used for filling pies, some of the juices are apt to escape during baking. As a precaution, bind with a strip of cotton cloth wrung out of cold water and cut one inch wide and long enough to encircle the plate. Squash, pumpkin, and custard pies are much less care during baking when bound. Where cooked fruits are used for filling, it is desirable to bake crusts separately. This is best accomplished by covering an inverted deep pie plate with paste and baking for under crust. Prick with a fork before baking. Slip from plate, and fill. For upper crusts, roll a piece of paste a little larger than the pie plate, prick, and bake on a tin sheet.

For baking pies, eight inch perforated tin plates are used. They may be bought shallow or deep. By the use of such plates the under crust is well cooked. Pastry should be thoroughly baked and well browned. Pies require from thirty-five to forty-five minutes for baking. Never grease a pie plate; good pastry greases its own tin. Slip pies, when slightly cooled, to earthen plates.

Rhubarb Pie............
1-1/2 cups rhubarb 1 egg
7/8 cup sugar 2 tablespoons flour

Skin and cut stalks of rhubarb in half-inch pieces before measuring. Mix sugar, flour, and egg; add to rhubarb and bake between crusts. Many prefer to scald rhubarb before using; if so prepared, losing some of its acidity, less sugar is required.

Additional recipes and tributes to Fannie Farmer can be found on these excellent blogs.

Val - More Than Burnt Toast
Joanne - Eats Well With Others
Taryn - Have Kitchen Will Feed
Susan - The Spice Garden
Claudia - A Seasonal Cook in Turkey
Heather - girlichef

Everyone is welcome to participate. If you'd like to join us next Friday when we salute Martha Stewart let me know via email.

Thursday, June 23, 2011

Picnic Pasta Salad


From the kitchen of One Perfect Bite...This is a nice recipe to have in the hopper for family picnics or neighborhood block parties. It's really fast to make and easy to assemble. There is no real cooking involved and if you can boil water you are home free. As a matter of fact, a spaghetti pot with an insert for draining makes it possible for even young cooks to make this picnic treat. One small caution. They have a tendency to sneak the "good stuff", so you'll probably want to keep your eyes on them as they assemble the salad. Someday, I'll tell you the story of the shrimpless shrimp pasta salad, but for now the memory is still too painful for discussion. The pasta can be served cold or at room temperature and, should you have the need, the recipe can be doubled. I use a mildly flavored giardiniera when I make this, but if you enjoy heat, by all means, go for the hotter variety. The recipe was developed by Michele Larson for Taste of Home magazine, and I guarantee that those of you who try it will enjoy her antipasto-type pasta. Here's the recipe.

Picnic Pasta Salad...from the kitchen of One Perfect Bite courtesy of Michele Larson and Taste of HomeMagazine

Ingredients:
8 ounces medium pasta shells
1 jar (16 ounces) giardiniera
1/2 pound fresh broccoli florets
1/4 pound cubed part-skim mozzarella cheese
1/4 pound hard salami, cubed
1/4 pound deli ham, cubed
1 package (3-1/2 ounces) sliced pepperoni, halved
1 large green pepper, cut into chunks
1 can(6 ounces) pitted ripe olives, drained
Dressing
1/4 cup olive oil
2 tablespoons red wine vinegar
1 tablespoons lemon juice
1/2 teaspoon Italian seasoning
1/2 teaspoon coarsely ground pepper
1/4 teaspoon salt

Directions:
1) Cook pasta according to package directions.
2) Meanwhile, drain giardiniera, reserving 1/3 cup liquid. Combine giardiniera, broccoli, mozzarella, salami, ham, pepperoni, green pepper and olives in a large bowl.
3) Drain pasta and rinse in cold water; stir into meat mixture.
4) Whisk oil, vinegar, lemon juice, Italian seasoning, pepper, salt and reserved giardiniera liquid. Pour over salad and toss to coat. Refrigerate until serving. Yield: 12 servings.


One Year Ago Today: Limeade Concentrate


Two Years Ago Today: Scallops Provencal


You might also enjoy these recipes:
Tuna Pasta Salad with Dill - Much a Munch
Pasta Salad with Feta, Sun-Dried Tomatoes and Spinach - Kalofagas
Not Your Mama's Macaroni Salad - The Recipe Girl
Pesto and Chickpea Pasta Salad - Eat Me, Delicious
Shrimp Pasta Salad - Simply Recipes
Sheri's Greek Pasta Salad - A Bountiful Kitchen
French Pasta Salad - Eat Me, Delicious
Pesto Pasta Salad - Hippy Dippy Cook
Recipe for Macaroni Salad with Fresh Tomatoes, Fresh Basil and Feta - Kalyn's Kitchen

Wednesday, June 22, 2011

Sloppy Joes - Middle School Culinary Throwdown


Sixth Grade Culinary Throwdown


From the kitchen of One Perfect Bite...Will he cook? To be sure! Will he be a cook? I suspect not. His smile, for a least another year, is blinding bright, but it's a perfect match for an upbeat disposition, that as yet, shows no signs of teenage angst. He loves numbers and music and, having seen Wright's Falling Waters, concluded he would like to be an architect. His fallback plan, at least this year, is plasma physics. Zach is my oldest grandson. His love of food and cooking has convinced me that there is a recessive gene for food that scientists have yet to identify. There has to be an inherited component to this addiction we pass on to our children. Zach is wearing chef's whites, because food service providers in his school district sponsored a culinary "throwdown" and invited seventh graders to participate. Zach loves to cook and was one of the first of his classmates to register for the competition. The book of life will show their dishes took no prizes, but they won hearts and the team spirit award for their congeniality. That's my guy!


Our children and grandchildren learn to cook at an early age. It starts with pancakes on Saturday morning and they graduate to more involved cooking as they get older. This summer, I've worked on recipes the older grandchildren can make on their own while they're visiting with us. While the dishes are easy to prepare, they are also delicious and I hope the boys will have fun making them. I won't be posting most of them because they are so simple to make, that I'm afraid I'll offend you. You can be sure that those that make it to One Perfect Bite are "best of show" and will work well, especially for those of you who will be feeding teens this summer. Here's the first recipe I want to share with you.

Sloppy Joes
...from the kitchen of One Perfect Bite

Ingredients:

2 pounds ground beef
1 large onion, chopped
1-1/4 cups ketchup
1/2 cup water
1 tablespoon brown sugar
1 tablespoon white vinegar
1/2 teaspoon salt
1/2 teaspoon ground mustard
1/2 teaspoon chili powder
1/4 teaspoon ground allspice
8 sandwich buns, split

Directions:

1) Cook beef and onion in a large skillet set over medium heat until meat is no longer pink. Drain.
2) Stir in ketchup, water, brown sugar, vinegar, salt, mustard, chili powder and allspice. Bring to a boil. Reduce heat; simmer, uncovered, for 35-40 minutes or until heated through.
3) Spoon about 1/2 cup meat mixture onto each bun. Yield: 8 servings.


One Year Ago Today: Hawaiian Banana Bread


Two Years Ago Today: Morning Glory Petal Bread


You might also enjoy these recipes:
Beer Burgers - The Four Points Foodie
Spicy Beef-Bean Taco Filling - Hungry Harps
Sophisto Joes - The Teacher Cooks
Meatloaf with Tomato Relish - Family Spice
Taco Seasoned Ground Beef - Closet Cooking
Easy Sloppy Joes - Cooking Alliance
Sloppy Joes - Pioneer Woman Cooks
Crockpot Sloppy Joes - Jenn CooksEasy Sloppy Joes - Cinnamon Spice and Everything Nice
Sloppy Joes - Fabulously Frugal

Tuesday, June 21, 2011

Elote - Mexican Corn on the Cob


From the kitchen of One Perfect Bite...Elote, or Mexican corn on the cob, is a treat that I should make more often for my family. While it will never replace the spare glory of corn that's been freshly picked and steamed, this spicy treat, hawked by vendors in Mexico and the desert Southwest, is a real palate pleaser. While elote is usually grilled, it can be steamed or broiled before it is slathered with a mixture of butter, real mayonnaise and lime juice. The final fillip, applied just before serving, is a liberal sprinkling of cotija cheese and cayenne pepper. Cotija is a semi-hard and crumbly cheese that resembles Parmesan. It is used to add some saltiness and texture to the finished ears of corn. The corn is best served piping hot and all the condiments should be applied to it while the kernels are still warm enough to bathe in the butter and mayonnaise as they melt. I must admit to a bit of theme and variation when I make this. Rather than sprinkle the corn with cayenne pepper, which I find very harsh, I add a half teaspoon of mashed chipotle in adobo to the mayonnaise called for in the recipe. It adds gentle fire to the corn and I find it more pleasing to the tongue than cayenne. I also steam the corn when I make this recipe. I've found that's the best way to get consistently moist corn. I hope you'll give this a try. The classic recipe, sans my changes, appears below.

Elote - Mexican Corn on the Cob...from the kitchen of One Perfect Bite

Ingredients:
4 cobs of corn
2 tablespoons of butter
4 tablespoons of mayonnaise
4 lime wedges
1/2 cup of cotija cheese, crumbled
Cayenne to taste

Directions:
1) About 1 hour before cooking, soak unhusked corn in water.
2) Preheat oven to 350 degrees F. When hot, drain corn and cook in husks for 25 minutes. Remove from oven and cool for 5 minutes.
3) Pull husk layers down, leaving them attached to base of the cob, which can act as a handle.
If you like blackened corn, place under broiler for five minutes, I personally find this dries the corn, but this is really a matter of individual preference.
4) While corn is warm, spread 1/2 tablespoon of butter and 1 tablespoon of mayonnaise on each cob. Sprinkle each ear with 2 tablespoons cheese and some cayenne pepper. Squirt lime juice all over cob. Serve immediately. Yield: 4 servings.


One Year Ago Today: Raspberry and White Chocolate Ice Cream


Two Years Ago Today: Ultimate Cheaters Pulled Pork


You might also enjoy these recipes:
How to Grill Corn - A Spicy Perspective
BBQ Corn on the Cob - Shamrocks and Shenanigans
Grilled Corn on the Cob - Cookin' for My Captain
Sweet Microwave Corn on the Cob - Zestuous
Corn on the Cob with Feta and Mint - Meats, Roots and Leaves
Corn on the Cob with Chili Lime Butter - Stacey Snacks
Grilled Corn- What's 4 Dinner Tonight
Fire Roasted Summer Corn with Saffron Citrus Butter - Wicked Good Dinner
Summer Roasted Corn with Scallions and Prosciutto - L.A. Easy Meals
Corn in the Husk - Pots and Plots

Monday, June 20, 2011

Country Ribs with Rhubarb Barbecue Sauce


From the kitchen of One Perfect Bite...We took a stroll down memory lane this weekend. At Bob's suggestion, I made old-fashioned country ribs for our dinner this evening. These were the spareribs of our childhood. I was raised in an ethnically diverse neighborhood where economic constraints and large families made spareribs an impossibly expensive choice for a family meal. A small rack of ribs might be used to flavor a bubbling meat sauce, but they never appeared on the table as an entree. There was pork aplenty, but the barbecued ribs of our childhood were eaten with a knife and fork and came from the blade end of the pork loin. These so-called country ribs, resembled small pork chops and had lots of meat on them. When they were baked slowly and mopped with a well-flavored barbecue sauce they gained easy access to the realm of things that dreams are made of. Bob, a rib aficionado if ever there was one, came from a home where folks knew their ribs. I didn't want to botch his Father's Day request, so I used his mother's recipe to bake them, but substituted a barbecue sauce that I have come to prefer. The original recipe come from an old and dog-eared copy of the Better Homes and Gardens Cookbook. Coincidentally, their recipe can easily be adapted for use in a slow cooker. The barbecue sauce is a bit different from most that are used to baste ribs. Its unique flavor comes from the use of rhubarb which adds a tartness to a sauce that would otherwise be too sweet for most tastes. This makes for a great family meal. I know that those of you who try this recipe will enjoy the ribs. Here's how they are made.

Country-Style Ribs with Rhubarb Barbecue Sauce...from the kitchen of One Perfect Bite adapted from Better Homes and Gardens

Ingredients:
Ribs
4 pounds country-style ribs, cut into 4 to 6-inch pieces
1 lemon, thinly sliced
1 large onion, thinly sliced
Sauce:
1 cup chopped fresh or frozen rhubarb
2/3 cup water
1 medium onion, finely chopped
1 teaspoon canola oil
1 garlic clove, minced
1 cup ketchup
2/3 cup packed brown sugar
1/2 cup dark corn syrup
2 tablespoons cider vinegar
2 tablespoons Worcestershire sauce
1 tablespoon Dijon mustard
1-1/2 teaspoons hot pepper sauce
1/4 teaspoon salt

Directions:
1) Preheat oven to 450 degrees F.
2) Salt ribs; place in a shallow roasting pan, meaty side up. Roast at 450 degrees F for about 30 minutes. Drain excess fat from pan. Top ribs with lemon and onion slices.
3) Meanwhile, in a small saucepan, bring rhubarb and water to a boil. Reduce heat; simmer, uncovered, for 5-6 minutes or until tender. Remove from heat; cool slightly. Place rhubarb in a blender or food processor; cover and process until smooth. Set aside. In same saucepan, saute onion in oil until tender. Add garlic; saute 1 minute longer. Add remaining ingredients. Whisk in rhubarb puree until blended. Bring to a boil. Reduce heat; simmer, uncovered, for 5 minutes.
4) Pour sauce over ribs. Lower temperature to 350 degrees F. Bake until well done and fork tender, about 1-1/2 to 2 hours. I let my ribs cook for almost 2-1/2 hours. Baste ribs with sauce every 15 minutes. If sauce gets too thick, add more water. Yield: 6 to 8 servings.


One Year Ago Today: Sugar Snap Peas with Fresh Mint Oil


Two Years Ago Today: Coleslaw with Creamy Buttermilk Dressing


You might also enjoy these recipes:
BBQ Burger - Plain Chicken
Barbecue Pork Chops - My Catholic Kitchen
Baby Backribs with Fiery Peach BBQ Sauce - Kitchen Confidante
Throw and Go BBQ Chicken - Real Mom Kitchen
Southwestern-Style Baby Back Ribs - Inspired 2 Cook

Sunday, June 19, 2011

Homemade Almond Paste


I hope all who are celebrating Father's Day enjoy the day and are appropriately spoiled by their children. I found this quotation I thought you might enjoy. "By the time a man realizes that maybe his father was right, he usually has a son who thinks he's wrong." -- Charles Wadsworth


From the kitchen of One Perfect Bite...Sometimes necessity really is the mother of invention. I committed to make a European-style muffins, flavored with almond paste, for a Father's Day brunch. They aren't difficult to make and they really are delicious. Under normal circumstances, it would be a pleasure, not a problem, to make them for everyone. Lest you think Murphy sleeps once you're in retirement, we really need to have a chat. I live in a community where you can buy almost any ingredient, at least at Christmas time. Once stocks of specialty items like candied fruit are gone, that's it for the year. The trend is creeping down the food chain and we've all learned to buy a year's supply of pumpkin and fresh cranberries while they are available. I was taken aback today, when what I thought would be a quick dash to market, turned into a cook's tour of community grocery stores. I was looking for almond paste. I couldn't find any and in a fit of pique spoke badly of all grocers west of the Hudson River. My thoughts were very colorful and I apologize to any whose relatives I denigrated. Fortunately, my better angels, armed with steely resolve took control and came up with a plan to make almond paste and get on with the remains of the day. I used the recipe from an old Taste of Home yearbook and I was really happy with the results. I actually made two versions of the almond paste. One was a from scratch effort that required blanching of whole almonds before they were ground and mixed with the sugar and egg white. The second effort used prepackaged pulverized almond meal. Interestingly enough, there was no difference in the taste of the two batches. There was, however, an enormous differences in the color of the paste they produced. The one made from the purchased meal was an unappealing tan in color and could not be used in recipes where color is important. The batch made from the blanched almonds was far more appealing and is the one I used to cook with today. The almond paste is easy to make if you have a blender or food processor, and while I wouldn't recommend its use in all applications, it worked well in the muffins I prepared. Here's the recipe. This is a great one to keep in your files for a rainy day.

Homemade Almond Paste
...from the kitchen of One Perfect Bite courtesy of Taste of Home

Ingredients:

1-1/2 cups blanched almonds
1-1/2 cups confectioners' sugar
1 egg white
1-1/2 teaspoons almond extract
1/4 teaspoon salt

Directions:
1) Place almonds in a food processor; cover and process until smooth. Add confectioners' sugar, egg white, extract and salt; cover and process until smooth. 2) Divide almond paste into 1/2-cup portions. I like to roll each portion into a sausage shape and store them in airtight containers. Refrigerate for up to 1 month or freeze for up to 3 months. Yield: 1-1/2 cup.


One Year Ago Today: Lemon Anise Churros


Two Years Ago Today: Watermelon Agua Fresca


You might also enjoy these posts:
How to Make Homemade Vanilla Extract - The Old Hen Blog
How to Make Homemade Maple-Flavored Syrup - The Daily Dish
Dulce de Leche - Chocolate Apprentice
Homemade Chocolate Syrup - Small Notebook
Caramel Sauce - Simply Recipes

Saturday, June 18, 2011

Strawberry Orange Smoothies


From the kitchen of One Perfect Bite...Smoothies for a mob? I'm a coward and would never attempt it, but I've just come from a breakfast where it was done successfully. I thought those of you who regularly entertain large groups for brunch or breakfast, might like to make this smoothie for your family and guests to enjoy. There were about 50 people at the breakfast this morning. The smoothies were made about an hour before serving and kept in half-gallon containers. The containers were given a vigorous shake before the drinks were served, but there was no unsightly mess to spoil the appearance of the lovely tables that had been set for breakfast. The recipe can be doubled or tripled, but remember the limitations of your blender. Even an average batch will have to be made in two parts and then mixed together. I think you'll like this. It is a fast, easy and inexpensive way to help feed a gang. Here's the recipe.

Strawberry Orange Smoothies...from the kitchen of One Perfect Bite, courtesy of Deb Mac Neil

Ingredients:
3 cups orange juice
1 carton (8 ounces) strawberry yogurt
6 fresh strawberries
1 can (8 ounces) crushed pineapple, drained
1 medium firm banana, cut into chunks

Directions:
Place half of each ingredient in a blender; cover and process until blended. Pour into chilled glasses. Repeat with remaining ingredients. Serve immediately. Yield: 6 servings.


One Year Ago Today: Smoked Salmon Quesadillas


Two Years Ago Today: Buttermilk Spice Cake with Cream Cheese Frosting


You might also enjoy these recipes:
Berry Nice Smoothie - Chow and Chatter
Simple Strawberry Smoothies - A Spicy Perspective
Tropical Smoothies - The Royal Cook
Green Monster Smoothies - Annie's Eats
Very Berry Smoothie - Cooking from My Heart
Strawberry Banana Smoothies - Smitha's Spicy Flavors
Banana Date Smoothie - Cajun Chef Ryan
Strawberry Coconut Smoothie - Sweet Basil Kitchen
Hawaiian Surf Smoothie - Hungry Rabbit
Watermelon Smoothie - Home Cooking Rocks

This post is being linked to:
Pink Saturday, sponsored by Beverly at How Sweet the Sound.

Friday, June 17, 2011

Linguine with Peas, Garlic and Ricotta Salata - Alice Waters - Week Two of the Fifty Most Influential Women in Food


From the kitchen of One Perfect Bite...Like it or not, Alice Waters is one of the people whose voice and ideas have changed the way American people think about food. Her emphasis on fresh ingredients, local farms and artisanal food have led critics within the food industry to label her a zealot and roundly refute her importance to the fresh food revolution in the United States. I must say, at least to the untrained eye, it appears that the industry creates culinary heroes for the sole purpose of tearing them down. Grandma's admonition to "give the devil his due" seems to have fallen on deaf or jealous ears. It's a shame, and, as an observer, I mind the lack of collegiality within the industry. There are children who go to bed at night with empty bellies. Why not address that problem before you eat your young or put your elders on ice flows. Fortunately, outside that small circle of detractors, Alice Waters seems to be doing very well, and while we don't know their names, we do know hers . I like to think of it as karmic justice. Her restaurant, Chez Panisse, is doing well and she is well-received at public appearances. She also grabbed the number two spot on Gourmet's list of the most influential women in the food industry. We could all use a zealot or two in our lives. There is a purity to thoughtful resistance that I find appealing. I may not bend, but I do listen.

I'd also like to extend an invitation to you. A small group of food bloggers is using the Gourmet list of the 50 most influential women in food, found here, to expand their cooking repertoires. Each Friday, participants are free to select any recipe developed by the woman of the week. We'd love to have you join us. If you're interested send me an email and I'll get back to you with particulars. I was really happy to test the recipe that follows. The pasta is wonderful and I know you'll enjoy it. The Silver Fox loved it, though he ate two large servings without a pea making it into his mouth. That's my guy! I'm also including links to two other recipes developed by Alice Waters that have already appeared on my blog. They, too, are terrific. The following bloggers are participating this week's challenge. Be sure to pay these gals a visit. You won't be sorry. They all are great cooks and writers.

Valli - More Than Burnt Toast
Joanne - Eats Well With Others
Taryn - Have Kitchen Will Feed
Susan - The Spice Garden

Linguine with Peas, Garlic and Ricotta Salata...from the kitchen of One Perfect Bite courtesy of Alice Waters

Ingredients:
1/2 cup extra-virgin olive oil
4 large garlic cloves, thinly sliced
1 cup fresh baby peas (1 pound unshelled)
1 pound linguine
Salt and freshly ground pepper
1 tablespoon coarsely chopped marjoram
1/2 cup crumbled or shaved ricotta salata or feta cheese (about 2 ounces)

Directions:
1) Heat olive oil in a medium skillet. Add garlic and cook over low heat, stirring, until very soft and golden, about 3 minutes. Remove from heat.
2) In a large saucepan of boiling salted water, blanch peas in a strainer until just tender, about 3 minutes. Transfer peas to a bowl.
3) Add the linguine to saucepan and boil until al dente. Drain linguine, reserving 1/4 cup of cooking water. Return pasta to saucepan and toss with garlic oil, peas and reserved pasta water. Season with salt and pepper and sprinkle with marjoram. Top with the cheese and serve at once.
Yield: 4 servings.


Spring Vegetable Ragout


Apricot Souffle

Thursday, June 16, 2011

Sweet Berry Wine Sauce


From the kitchen of One Perfect Bite...I keep this lovely sauce in my refrigerator during the summer months. I think of it as a secret weapon and use it to turn the simplest of desserts into something really special. I keep a supply of vanilla ice cream in the freezer, and when it's topped with this gorgeous sauce I know I have a treat that can be served to unexpected guests without fuss or bother. It's very easy to make and, despite its simplicity, it has been well-received ever since its publication in Light and Tasty Magazine. I hope you'll give this sauce a try. I'm really proud of it. Here's the recipe.

Sweet Berry Wine Sauce...from the kitchen of One Perfect Bite

Ingredients:
1 cup water
1/2 to 1 cup sugar
2 cups frozen unsweetened mixed berries
1/2 cup port wine or grape juice
Optional garnish:
1/2 cup fresh raspberries
1/2 cup fresh blackberries
1/2 cup fresh blueberries

Directions:
Bring water and sugar to a boil. Add frozen berries and wine or juice; return to a boil. Reduce heat, simmer, uncovered for 5 minutes. Mash and strain berries, reserving juice. Return juice to pan. Bring to a boil; reduce heat and simmer until mixture is reduced to 3/4 cup. Cool to room temperature. If using, stir fresh berries into sauce just before serving. Chill.


One Year Ago Today: Scallion and Asparagus Salad


Two Years Ago Today: Blackberry Sherbet


You might also enjoy these recipes:
Strawberry Rhubarb Sauce - Half Baked
Creme Anglaise - Cook Italian.Com
Salted Caramel Sauce - The Amateur Gourmet
Strawberry Dessert Sauce - Drick's Rambling Cafe
Easy Microwave Mixed Berry Sauce - Baking Bites
How to Make Your Own Blueberry Syrup - Simple Bites
Rhubarb Syrup - Closet Cooking
Peach Sauce with Nutmeg - Smitten Kitchen
Strawberry Sauce - Our Best Bites
Mango Syrup - Annon's Thai Food
Related Posts with Thumbnails

Printfriendly