Thursday, January 31, 2013

Norman Cider Chicken


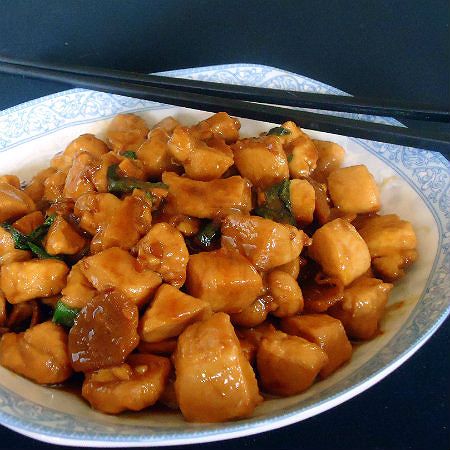
From the Kitchen of One Perfect Bite...This is a lovely dish to serve on a cold winter night. It combines the sweetness of apples with savory mushrooms, heady brandy and cream, and if you close your eyes very tightly, you might have visions of skipping through a Norman orchard at apple blossom time. My recipe is very loosely based on the classic bistro favorite, Poulet Vallee d'Auge, but it's much simpler to make. It was originally a slap-dash creation that I threw together for a family dinner back in the day when I was working and we still had a full compliment sitting at the table.  I don't want to mislead any of you who have had the authentic dish. I've taken shortcuts aplenty, but I think even Francophiles will enjoy this quick and simplified version. The recipe is self-explanatory, but I wanted to share a couple of tips with you. Whenever I make this dish, I make it a point to have all the chopped ingredients the same size. While it may be a personal quirk, I don't like to mix strips and cubes in dishes such as this one. I think it makes even cooking very difficult and the finished dish looks confused. For quick braises such as this one, I like to use 1-inch cubes for everything save the shallots. While I prefer to use heavy cream or crème fraîche in the sauce, half-and-half can be used if you are concerned with fat grams and calories. Hard cider is used in most classic versions of this recipe. That can be difficult to come by at this time of year, so I use a combination of brandy and cloudy cider and that works pretty well. I also peel the apple cubes I use in the dish, but I add them in two parts, once when the chicken cooks and again when the chicken is re-warmed in the sauce. I suspect the reason those chefs of old did not peel the apples was to prevent them from dissolving in their long-simmering sauces. My two-step method uses half the apples for the sauce, while the remainder are used to add texture to the finished dish. This cooks very quickly, so watch it carefully to avoid overcooking the chicken. The chicken can be served with rice or noodles, but these days I prefer to serve it with potato pancakes or rösti. I think the potatoes add a lovely counterpoint to the sweetness of the chicken. I hope you'll give this uniquely flavored dish a try. Here's the recipe.

Norman Cider Chicken
...from the kitchen of One Perfect Bite

Ingredients:

2 tablespoons vegetable oil
1/2 cup finely chopped shallots
1 cup quartered white mushrooms
1 large sweet apple, peeled and cut in 1-inch cubes to yield about 2 cups
1-1/2 pounds boneless, skinless chicken cut in 1-inch cubes
3 tablespoon brandy (preferably apple-jack or Calvados)
1 teaspoon powdered chicken bouillon
1 cup cloudy cider
1 teaspoon apple cider vinegar
1 teaspoon corn starch
1/2 cup heavy cream or half-and-half
1/4 teaspoon dried tarragon
Salt and pepper to taste

Directions:

1) Heat oil in a large saucepan over medium heat until it shimmers. Add shallots and cook, stirring, until they soften and color slightly, about 3 minutes. Add mushrooms and cook until they soften. Add half of apples and toss to coat. Sprinkle chicken with salt and pepper and turn heat to medium-high. Add chicken to pan and cook, stirring, until chicken is no longer pink, about 5 minutes. Remove pan from heat. Add brandy and return pan to heat. Boil until brandy nearly cooks away, about 1 minute. Transfer chicken mixture to a plate with a slotted spoon.
2) Add cider and chicken bouillon powder to pan and cook until mixture become syrupy, about 2 minutes. Return chicken and accumulated juices to pan. Dissolve cornstarch in cream. Add cream, tarragon, remaining apples and cider vinegar to pan. Bring contents of pan to a simmer, reduce heat and cook gently for 5 minutes longer or until chicken is heated through. Serve immediately. Yield: 4 servings.


One Year Ago Today: Braised Kale with Pasta


Two Years Ago Today: Chocolate Peanut Butter Torte

Wednesday, January 30, 2013

Citrus Salad with Poppy Seed Dressing


From the kitchen of One Perfect Bite...We had a really drab day today. The fog lingered until early afternoon and the sun never did poke through the clouds. I decided to create internal sunshine using some of our Christmas bounty. We receive fruit-of-the-month baskets throughout the year, and while I puzzle over what to do with all the pears and tropical fruit we receive, I never worry about the boxes of citrus. This recipe is one of many that I have for simple citrus salads, and while the limes may make it too tart for some, it has a lovely pucker quality that I know many of you will enjoy. If you are a trumpet player, the limes can be replaced with additional orange and grapefruit segments. This is the type of recipe whose ingredients need not be set in stone, so let common sense guide any additions or substitutions you make to it. It is, however, important not to stray too far from the recipe for the salad dressing. It is special, but it comes with a caution. Dress the salad just before it is served. It loses its visual appeal quickly and you don't want to serve your family a cold hot mess. The recipe was developed by Grace Parisi for Food and Wine magazine and the salad she created is delicious. Here is how it is made.

Citrus Salad with Creamy Poppy Seed Dressing...from the kitchen of One Perfect Bite courtesy of Food and Wine magazine

Ingredients:
6 oranges
2 red grapefruits
2 limes
1 large shallot, very thinly sliced
1/2 cup coarsely chopped flat-leaf parsley
1 teaspoon finely grated lemon zest
2 tablespoons freshly squeezed lemon juice
1/4 cup crème fraîche or sour cream
2 tablespoons pure maple syrup
1 teaspoon poppy seeds
Salt

Directions:
1) Using a sharp knife, carefully peel oranges, red grapefruits and limes, removing all bitter white pith. Working over a small bowl to catch fruit juices, cut in between membranes to release sections. Cut lime and grapefruit sections into thirds and leave orange sections whole. Transfer all citrus to a serving bowl and add sliced shallot and chopped parsley. Reserve citrus juice for another use.
2) In another small bowl, whisk lemon zest with lemon juice, crème fraîche, maple syrup and poppy seeds. Season dressing lightly with salt. Pour the dressing over fruit, toss salad gently and serve right away. Yield: 6 servings.

Make Ahead The poppy seed dressing can be refrigerated overnight. Whisk gently before tossing with the citrus.


One Year Ago Today: Chicken Cutlets Pojarski


Two Years Ago Today: Chocolate Cheesecake Squares


Three Years Ago Today: Raspberry Streusel Muffins

Tuesday, January 29, 2013

Julia's Everyday Soupe à l’Oignon (Onion Soup)


From the kitchen of One Perfect Bite...The Silver Fox has been a truly good sport for the last week or so. Our meals have been soft and lightly seasoned, which, as you might suspect, is the culinary equivalent of purgatory for a man who knows his way around the herb garden. I swear I heard him groan as I was putting together the umpteenth pot of Hawaiian Long Rice this morning, so when he went out for his walk, I hit the pantry shelves and made our favorite version of French onion soup for him. The soup was developed by Julia Child and it was the first of her recipes that I made. It comes from The French Chef Cookbook which recorded and tracked the dishes she made for her first televised cooking program. The instructions, then and now, are easy to follow and make wonderful dishes. This soup is no exception. While the onions must be cooked until they form a slurry, this recipe is as easy as they come and the resulting soup will rival any bistro special. Julia's recipe is featured below, She begins it with this note:

"The onions for an onion soup need a long, slow cooking in butter and oil, then a long, slow simmering in stock for them to develop the deep, rich flavor which characterizes a perfect brew. You should therefore count on 2-1/2 hours at least from start to finish. Though the preliminary cooking in butter requires some watching, the actual simmering can proceed almost unattended."

Soupe à l’Oignon (Onion Soup)...from the kitchen of One Perfect Bite courtesy of Julia Child's The French Chef's Cookbook

Ingredients:
1-1/2 pounds (5 cups) thinly sliced yellow onions
3 tablespoons butter
1 tablespoon vegetable oil
1 teaspoon salt
1/2 teaspoon sugar
3 tablespoons flour
2 quarts brown stock or canned beef bouillon, or 1 quart of water and 1 quart of stock or bouillon
1 cup dry red or dry white wine or dry white vermouth
1 bay leaf
1/2 teaspoon driedsage
Salt and pepper
3 tablespoons cognac
Rounds of hard-toasted French bread
1 to 2 cup Swiss or Parmesan cheese, grated

Directions:

1) In a heavy-bottomed, 4-quart saucepan, cook onions slowly with butter and oil for 15 to 20 minutes, or until onions are tender and translucent. Uncover, raise heat to moderate, and stir in salt and sugar (the sugar helps the onions to brown). Cook for 30 to 40 minutes, stirring frequently, until the onions have turned an even, deep, golden brown. Sprinkle in flour and stir for 3 minutes.
2) While onions are cooking, bring the stock to a boil. Take onions off heat and stir in boiling stock. Add wine, bay leaf and sageand bring to a simmer.  Simmer partially covered for 30 to 40 minutes or more, skimming occasionally. Remove bay leaf and adjust salt and pepper to taste..
3) Just before serving, stir in cognac. Place rounds of bread in a soup tureen or soup cups, pour hot soup over the bread, and pass the cheese separately. Yield:6 to 8 servings.


One Year Ago Today: Applesauce Spice Cakes


Two years Ago Today: Killer Nachos


Three Years Ago Today: Lemon Poppyseed Bread

Monday, January 28, 2013

Madeleines a l’ancienne - Old-Fashioned Madeleines


“Remembrance of things past is not necessarily the remembrance of things as they were.”
                                                        Marcel Proust

From the kitchen of One Perfect Bite...I want to begin with a spoiler alert for the romantics among you. I have been known, usually without malice, to burst a bubble or two. Tonight I fear I'm going to do that to lovers of Proust and his beloved madeleines. I suspect that everyone knows that the madeleine is the shell-shaped confection that inspired his legendary reverie in Remembrance of Things Past. You'll recall, I'm sure, the scene in the book where the narrator dips a madeleine into a cup of tea. Bits of the cookie settle into the tea and when it is stirred, a spoonful contains crumbs that release the flood of memories that fill the rest of the novel. There is one small problem. That doesn't happen when you soak a typical madeleine in tea. There are purists who, in the interest of transparency, test such things and they say the Proustian madeleine does not exist. I suspect he used Proustian poetic license, but some guys just can't get a break. It seems that scholars agree that an early version of Remembrance of Things Past was inspired by a piece of toast. I can't write much about toast, but I can share this wonderful and unusual recipe for madeleines with you. It is unusual because the soft cookies are leavened with yeast. Don't let that scare you off.  They are really easy to make. I really love these petite cakes and I consider the recipe I'm featuring tonight to be a treasure. Don't stress about the use of European butter if it is not readily available. I often make these using standard sweet butter. While European butter has 3% more butterfat than brands typically found in the supermarket, the madeleines made with 80% will bedelicious as well. The recipe that follows comes from Saveur magazine.

Madeleines a l’ancienne - Old-Fashioned Madeleines

Ingredients:
3/4 cup + 2 tablespoons sugar
1 tablespoon + 1/2 teaspoon yeast
1 lemon, for zest
1-3/4 cups flour
1/2 cup unsalted European-style butter, melted + butter for molds
4 eggs
salt to taste

Directions:

1) In a pastry bowl, combine whole eggs and sugar until mixture turns white and sugar is completely dissolved.
2) Add flour, salt, and yeast with a spatula. Then add lemon zest. Add melted butter. Set aside.
3) Brush madeleine molds with melted butter, then dust with flour, shaking out any excess.
4) Using a pastry bag or a spoon, fill each madeleine mold 3/4 full.
5) Set filled pans aside and let them rest for at least 20 minutes. During this time pre-heat oven to 350 degrees F.
6) Cook for 8 minutes, or until pale golden brown. Let sit for 5 minutes. Turn cookies out and continue to cool on a wire rack. Yield: 24 to 30 madeleines.

Cook's Notes:
1) Let madeleines sit for 2 hours before serving. Store in a dry place.
2) For best results let dough rest for 2 hours before placing in molds.


One Year  Ago Today: Sweet and Spicy Bacon Wrapped  Breadsticks


Two Years Ago Today: Dulce de Leche Ice Cream


Three Years Ago Today: Game Day Chili-Mac Skillet

Sunday, January 27, 2013

Chocolate and Peanut Butter Puddin' Pie


From the kitchen of One Perfect Bite...This is a wonderful family treat. We don't have it often because it is so rich and calorie laden, but my gang really enjoys it when I make it for them. I originally found the recipe for the pie in Saveur magazine. While I've made changes to it over time, the base recipe is still theirs. I no longer use the pie crust that was part of the original recipe because I found it to be tough. This sometimes happens   with an all-butter crust. Butter crusts tend to be crisper and less tender than ones made with a mixture of butter and shortening. Shortening is 100% fat, while butter consists of  20% water and 80% fat. The higher amount of fat in shortening results in a more tender crust because fat tenderizes by coating flour particles so that gluten can't form, and by trapping air between flour molecules to give the crust a layering or flakey effect. This really is not a difficult dessert to make, especially if you use  a commercially prepared crust as a starter. This dessert is so rich that you'll never miss the  butter crust.The filling is a peanut butter mousse that is topped with a chocolate pudding. It's probably best that we not speak of the whipped cream topping as it  could cost me my reputation for nutritional awareness. Obviously, the cream could be replaced with a whipped topping, but if you're going to make something so awfully wonderful it doesn't pay to stint. Have a small piece less often and enjoy it. If you love the chocolate and peanut butter you will really enjoy this pie. Here is how it is made. 

Chocolate and Peanut Butter Puddin' Pie
...from the kitchen of One Perfect Bite inspired by Saveur magazine

Ingredients:

Crust
1-1/4 cups all-purpose flour
1/2 teaspoon kosher salt
1 tablespoon granulated sugar
6 tablespoons chilled unsalted butter, cut into 1/4-inch pieces
4 tablespoons chilled vegetable shortening
3 to 4 tablespoons ice water
Topping
2 cups heavy cream
2 tablespoons sugar
1 teaspoon vanilla extract
Filling
3/4 cup smooth peanut butter
8 ounces semisweet chocolate, chopped
1/2 teaspoon kosher salt
1 cup light brown sugar
1/4 cup cornstarch
4 egg yolks
2 cups milk
2 tablespoons butter
1 tablespoon vanilla

Directions:

1) Mix flour, salt and sugar in bowl of food processor fitted with steel blade. Scatter butter pieces over flour. Cut butter into flour with five 1-second pulses. Add shortening and continue pulsing until flour is pale yellow and resembles coarse corn meal, with butter bits no larger than small peas, about 4 more 1-second pulses. Turn mixture into medium bowl. Sprinkle 3 tablespoons ice water over mixture. With blade of a rubber spatula, use folding motion to mix. Press down on dough with broad side of spatula until dough sticks together, adding up to 1 tablespoon more ice water if dough will not come together. Shape dough into ball with your hands, then flatten into a 4-inch-wide disk. Dust lightly with flour and wrap in plastic. Refrigerate 1 hour before rolling.
2) Preheat oven to 425 degrees F. Roll dough 1/8-inch thick on a floured surface. Transfer to a 9-inch pie plate, trim edges, prick with a fork. Cover with parchment; fill with dried beans. Bake for 20 minutes. Remove paper and beans and bake until golden brown, 10–12 minutes. Let cool.
3) To make topping: Whisk together cream, sugar, and 1 teaspoon vanilla to stiff peaks. Set aside.
4) Place peanut butter and chocolate in separate bowls. In a 4-quart saucepan, whisk together 1/2 teaspoon salt, brown sugar, cornstarch, yolks, and milk. Bring to a simmer over medium heat, cooking until custard thickens, about 2–3 minutes. Remove from heat and whisk in butter and vanilla. Mixture will be lumpy. Strain through a sieve, and divide custard evenly between peanut butter and chocolate, whisking each mixture until smooth. Fold half of whipped cream into peanut butter, then spread evenly in pie crust and chill for 20 minutes. Spread chocolate over top and chill until set, at least 45 minutes. Spread remaining whipped cream over pie. Yield: 8 to 10 servings.


One Year Ago Today: Roasted Cauliflower with Golden Raisins and Pine Nuts


Two Years Ago Today: Mexican Chocolate Brownies


Three Years Ago Today: Magyar Gulyas

Saturday, January 26, 2013

Super Bowl Hot Vegetable Dip


From the kitchen of One Perfect Bite...I know it is a bit early, but the Super Bowl is next week-end and I wanted to share this recipe with you while there is still time for it to be considered as a new game go-with. I found the recipe on the Whole Foods website and gave it a test run this afternoon. The recipe was simple to begin with, but I made it simpler still, by using pre-packaged ingredients that did away with the need to peel or slice or dice anything at all. The Silver Fox, who is in charge of provisions for the next week or so, came home from the store with a 12-ounce bag of cauliflower florets, a 6-ounce bag of baby spinach and a 12-ounce bag of shredded cheese. That wasn't what I had on the list, but this is one of those occasions where I applaud his independence and take-charge mien. I cooked the cauliflower in the microwave and then threw everything into the bowl of a food processor. Save for wait-time, the whole process took about 5 minutes of my time. I know you all will enjoy this dip, but vegetable lovers will be in heaven. The dip has layered flavors and the only change I made to the original version was to add the juice of a small lemon to the mixture before it was warmed. You'll want to adjust salt and pepper to your own tastes. This is best served with sturdy chips or vegetable sticks. If there is any of the dip remaining after the game, it can be thinned with milk or cream and used to dress pasta. I hope you'll give this recipe a try. It's worth 5 minutes of your time. Here is how the dip is made.

Super Bowl Hot Vegetable Dip...from the kitchen of One Perfect Bite courtesy of Whole Foods

Ingredients:
Florets from 1/2 head cauliflower (about 2-1/2 cups), steamed until very soft and cooled
4 ounces 1/3 less fat cream cheese
1/4 cup mayonnaise
1 fresh jalapeño peppers, seeded and finely chopped
2 cloves garlic, chopped
3/4 teaspoon salt
12 ounces (about 3-1/2 cups) shredded Cheddar-Jack cheese
3 lightly packed cups (about 5 ounces) baby spinach leaves
Optional: Juice of 1 small lemon

Directions:
Heat oven to 375 degrees F. Pulse cauliflower in a food processor until very smooth. Add cream cheese, mayonnaise, jalapeño, garlic, salt and all but 1/2 cup of the cheese shreds and pulse until very smooth. Add spinach and pulse until chopped. Addlemon juice if using. Adjust salt to taste. Scrape into a lightly greased 1-quart ovenproof baking dish or casserole, sprinkle with remaining cheese and bake until hot and bubbling, about 35 minutes.


One Year Ago Today: Crock-Pot: Cuban Pork and Black Beans


Two Years Ago Today: Crock-Pot Pork Posolé


Three Years Ago Today: Mexican Skillet Corn Bread

Friday, January 25, 2013

Ferran Adrià's Tortilla Española (Spanish Potato Frittata)


From the kitchen of One Perfect Bite...In an earlier post, I mentioned that the recipes I'd be featuring for the week would be very simple. I neglected to mention that one of them was developed by a man who is an undisputed master in the culinary world. Tonight's recipe is the creation of Ferran Adrià who made the now defunct el Bulli a culinary mecca. Everyone who loves Spanish cooking is familiar with the lusty Spanish potato frittata, or Tortilla Española. It's an omelet that is made with layers of thinly sliced and fried potatoes, so there is a lot of work involved in its preparation. Adrià wanted to simplify the procedure and began to experiment. In one of those Eureka moments he seems to have more often than the rest of us, he decided to use store-bought thick-cut potato chips instead of the older peel, cut and fry variety dictated by tradition. In order to produce potatoes that would have the proper consistency, he hydrated them in the omelet mixture before cooking the frittata and his version of Tortilla Española was born . I love the simplicity of this recipe and I make it often for breakfast, brunch or dinner. This recipe is a real time saver and the only caution I have to share with you regards its cooking time. Please follow the times suggested in the recipe. If the frittata overcooks it will be dry and you'll wonder what the fuss is about. Despite the warning, I really hope you'll try the Tortilla Española. It is delicious. Here's how it is made.

Tortilla Española (Spanish Potato Frittata)...from the kitchen of One Perfect Bite courtesy of Ferran Adrià and Saveur magazine

Ingredients:

4 ounces (about 2-1/4 cups) crushed thick-cut potato chips, like Cape Cod brand
2 ounces thinly sliced serrano ham or prosciutto
1/4 cup finely chopped canned piquillo peppers or pimentos
1 tablespoon fresh thyme leaves or 1 teaspoon dry
8 eggs, lightly beaten
Kosher salt and freshly ground black pepper, to taste
2 tablespoons olive oil

Directions:

1) Heat broiler to high.
2) Combine potato chips, ham, peppers, thyme, eggs, and salt and black pepper in a bowl and let sit to allow chips to soften in eggs, about 5 minutes.
3) Heat oil in a 10-inch nonstick skillet over medium-high heat; add egg mixture and cook, without stirring, until bottom begins to brown, about 3 minutes. Transfer to broiler, and broil until set and golden on top, about 3 minutes. Cut into wedges to serve. Yield: 6 to 8 servings.


One Year Ago Today: Tortellini with Garlic and Sage Butter


Two Years Ago Today: Sonoran Hot Dogs


Three Years Ago Today: Mexican Black Bean and Vegetable Soup

Thursday, January 24, 2013

Gold Beach Winter Chowder


From the kitchen of One Perfect Bite...If you have 15 minutes and a few basic ingredients in your freezer, this lovely winter chowder will lure you to your kitchen the way the sirens lured the Argonauts to the Sirenuse. You'll need a pound of frozen shrimp, a pound of frozen corn and some potatoes to get started. Several times a year a local grocery chain sells 2 pound bags of extra large shrimp for around $12. I usually buy 6 bags at a time, so I always have shrimp in my freezer for a quick weeknight meal. When I saw this recipe in Family Circle magazine, I knew I had to give it a try and I pulled a pound of shrimp from my stash. I did make a few changes to the original version of the recipe. I substituted Yukon Gold potatoes for consistent color and frozen shoepeg corn for tenderness, I also swapped a cup of chicken broth with a quickly made shrimp stock. The stock was embarrassingly simple to make. I covered the shells from a pound of shrimp with three cups of water and boiled them until the liquid was reduced to one cup. I used that cup to replace a cup of stock in the Family Circle recipe. Forty-five minutes later, I had a chowder that was thick and creamy and thoroughly enjoyable. I have one caution. This should be served shortly after it is made. The corn and the shrimp toughen when they are reheated and the chowder, while still good, is just never quite the same. This is a wonderful family recipe and it is perfect for a winter night. It is quick and uncomplicated to make and if your family enjoys chowder, I think they'll love this one. Here's how it is made.

Gold Beach Winter Chowder...from the kitchen of One Perfect Bite inspired by Family Circle magazine

Ingredients:
2 tablespoons unsalted butter
2 small leeks, cleaned and sliced
2 large Yukon gold potatoes (about 12 oz), peeled and cubed
1 cup shrimp stock
2 cups reduced-sodium chicken broth
4 cups frozen corn kernels (shoepeg if possible), thawed
1-1/2 cups half-and-half
2 tablespoons cornstarch
2 teaspoons Old Bay seasoning
1 sweet yellow pepper, cored, seeded and thinly sliced
1 sweet orange pepper, cored, seeded and thinly sliced
1 pound medium shrimp, shelled, deveined and cut with scissors into thirds
1 tablespoon lemon juice
1/2 teaspoon hot sauce

Directions:
1) Shell shrimp. Place shells in a medium pot. Cover with 3 cups water and boil until liquid is reduced to 1 cup. Drain shells reserving stock.
2) In a large pot melt butter over medium heat and add leeks; cook 8 minutes, stirring occasionally. Add potato, shrimp and chicken broth and corn kernels. Simmer 15 minutes, stirring occasionally.
3) Combine half-and-half and cornstarch; stir into pot. Add Old Bay seasoning and bring to a simmer. Add peppers and shrimp; simmer 5 minutes, stirring occasionally. Stir in lemon juice and hot sauce. Serve immediately. Yield: 4 to 6 servings.


One Year Ago Today: West African Peanut Soup  - Groundnut Stew


Two Years Ago Today: Conchas - Mexican Shell-Shaped Sweet Rolls


Three Years Ago Today: Drop Biscuits with Cheddar Cheese and Garlic Butter

Wednesday, January 23, 2013

Classic Folded Crêpes with Lemon Sugar and Fresh Lemon Wedges


From the kitchen of One Perfect Bite..."Bring out your dead." The line comes from Monty Python and the Holy Grail and it popped into my head in the doctor's office this morning. Plague Flu has hit our community with a vengeance and there wasn't an empty chair in the waiting room of his large practice. I, alas, occupied one of the chairs. Flu had not felled me, but bronchitis claimed me for its own. I'll be fine in a couple of days, but I plan to take things easy, so I hope you won't be disappointed with a few days of really simple recipes. As it happens, the dessert I'm featuring tonight is one of my all-time favorites and it certainly falls into that really simple category. I normally make the crêpes myself and I am including the recipe I use for them in tonight's post, but, truth be told, I used the store-bought variety for our dessert this evening. If you decide to try the crêpes using a commercial variety, you will still want to take a look at the recipe, which contains instructions for filling and folding them. If you have 8 large crepes on hand you can call this dish your own, and, interestingly enough, a few spoonfuls of lemon sugar and a squeeze of fresh lemon juice will produce a dessert even sophisticated guests will love. I make lemon sugar by stirring the finely grated zest of one large lemon into two cups of sugar. I store it in a mason jar on my pantry shelf and use it for tea as well as desserts. The third required element for this dessert is a quantity of lemon wedges whose juice is squeezed over still warm crêpes. You'll have to try this treat in order to understand why I hold it in such high regard. The crêpes are spare, simple and scrumptious and I know those of you who try them will love them as much as I do. It is best to serve them warm. Here's how they are made.

Classic Folded Crêpes with Lemon Sugar and Fresh Lemon Wedges...from the kitchen of One Perfect Bite courtesy of America's Test Kitchen

Ingredients:
1/2 teaspoon vegetable oil
1 cup (5 ounces) unbleached all-purpose flour
1 teaspoon sugar, plus 8 teaspoons lemon sugar for sprinkling
1/4 teaspoon table salt
1-1/2 cups whole milk
3 large eggs
2 tablespoons unsalted butter, melted and cooled
1 lemon, cut into wedges

Directions:

1) Place oil in 12-inch nonstick skillet and heat over low heat for at least 10 minutes.
2) While skillet is heating, whisk together flour, 1 teaspoon sugar, and salt in medium bowl. In separate bowl, whisk together milk and eggs. Add half of milk mixture to dry ingredients and whisk until smooth. Add butter and whisk until incorporated. Whisk in remaining milk mixture until smooth.
3) Using paper towel, wipe out skillet, leaving thin film of oil on bottom and sides. Increase heat to medium and let skillet heat for 1 minute. After 1 minute, test heat of skillet by placing 1 teaspoon batter in center and cook for 20 seconds. If mini crêpe is golden brown on bottom, skillet is properly heated; if it is too light or too dark, adjust heat accordingly and retest.
4) Pour 1/4 cup batter into far side of pan and tilt and shake gently until batter evenly covers bottom of pan. Cook crêpe without moving it until top surface is dry and crêpe starts to brown at edges, loosening crêpe from side of pan with rubber spatula, about 25 seconds. Gently slide spatula underneath edge of crêpe, grasp edge with fingertips, and flip crêpe. Cook until second side is lightly spotted, about 20 seconds. Transfer cooked crêpe to wire rack, inverting so spotted side is facing up. Return pan to heat and heat for 10 seconds before repeating with remaining batter. As crêpes are done, stack on wire rack.
5) Transfer stack of crêpes to large microwave-safe plate and invert second plate over crêpes. Microwave on high power until crêpes are warm, 30 to 45 seconds (45 to 60 seconds if crêpes have cooled completely). Remove top plate and wipe dry with paper towel. Sprinkle upper half of top crêpe with 1 teaspoon sugar. Fold unsugared bottom half over sugared half, then fold into quarters. Transfer sugared crêpe to second plate. Continue with remaining crêpes. Serve immediately, passing lemon wedges separately. Yield: 8 crêpes - 4 servings.


One Year Ago Today: Bang Bang Chicken


Two Years Ago Today: Soft Whole Wheat Dinner Rolls


Three Years Ago Today: Chocolate Peppermint Pie

Tuesday, January 22, 2013

Three Cup Chicken


From the kitchen of One Perfect Bite...This is but one of many versions of a Taiwanese dish called Three Cup Chicken. It gets its name from the ratio of the three main ingredients used to make it. The chicken is always made with equal portions of soy sauce, rice wine and sesame oil. I have several recipes for the dish in my files, but I rely on this one because it is so fast and easy to prepare. While it lacks the gorgeous color of the more classic braises, it delivers a wonderfully flavorful and unpretentious meal with a fragrance that draws people to the table. Cooking lore tells us the dish was first cooked for an official before his execution. It was made by a prison warden who had limited resources and he made the sauce for that dish using three wine cups, intended for worship, to measure the ingredients. Today, recipes use various measures of the basic three ingredients, but they must always be equal to each other for the dish to be called three-cup. I relied heavily on this dish when I was working and it would appear on my table once or twice a month. While it is best made with thigh meat, the breast can also be used if you cut back on the cooking time. I always serve this dish with steamed rice and just-wilted spinach. My family enjoys this dish and I think yours will too. Here is how Three Cup Chicken is made.

Three Cup Chicken
...from the kitchen of One Perfect Bite courtesy of Ching-He Huang

Ingredients:
1 tablespoon vegetable oil
5 cloves garlic, finely chopped
One 1-inch piece fresh ginger, peeled and sliced into thin coins
1 pound boneless, skinless chicken thighs (about 6), cut into 1/2-inch pieces
1/4 cup light soy
1/4 cup Shaoxing rice wine or dry sherry
1/4 cup toasted sesame oil (see Cook's Note)
1 tablespoon brown sugar
1 small handful Thai basil leaves, or Italian basil, plus extra for garnish

Directions:

1) Heat a wok or large skillet over high heat. When it is hot add vegetable oil and cook until oil smokes. Add garlic and ginger and stir-fry quickly for a few seconds. Quickly add chicken and let it sit in pan for 30 seconds before stir-frying until it browns, about 2 to 3 minutes.
2) Add soy sauce, rice wine and toasted sesame oil, Reduce heat to medium and cook for 6 minutes. Stir well and add brown sugar. Bring to a boil, then turn down heat to medium-low and simmer until sauce is reduced to a thick, sticky consistency and the chicken is cooked through, about 5 minutes. Turn off heat, stir in basil leaves and allow them to wilt slightly. Serve immediately. Yield: 2 to 4 servings.

Cook's Note: It's important to use toasted sesame oil, which reduces as it cooks, and not pure sesame oil, which will continue to cook and not reduce or thicken. The final dish should be slightly sticky.


One Year Ago Today: Milk Chocolate and Caramel Mousse Pie


Two Years Ago Today: Maine Shrimp Chowder


Three Years Ago Today: Baked Portobello Parmesan - A Dieter's Delight

Monday, January 21, 2013

An Eggless Buttermilk Coffee Cake with Blackberries


From the kitchen of One Perfect Bite...The really simple recipe was developed by Julia Moskin for The New York Times. It is a riff on the buttermilk cake that is sold by Cranberry Island Kitchens in Portland, Maine. The original version of the cake was baked in individual mussel-like molds. The Times riff was baked in loaf pans, while mine baked in a 13 x 9-inch cake pan. Can there be a riff of a riff? I clipped this recipe last fall to use for our next family vacation. We inevitably find ourselves in huge old houses that have scads of bedrooms but kitchens in which only Wilma Flintstone would be comfortable. This recipe caught my eye because it requires only a bowl and spoon to prepare and it sounded perfect for summer breakfasts. I gave the cake a try and was happy enough with the results to save the recipe in my vacation file. I hadn't planned on making it again until the gang was assembled, but this weekend we had a breakfast guest who is allergic to eggs. I remembered the cake and pulled out the recipe to serve for breakfast on Sunday morning. I thought this cake would be perfect for her. Oregonians are a bit like squirrels, but we stash blackberries as well as hazelnuts for winter use. I used them in the cake, but I doubled the amount the recipe called for. Because I used a baking pan, I had more surface area to cover and a cup of blackberries looked pretty foolish sitting on the cake batter. The blackberries added a lovely nip that helped balance the sugar in the cake, and my friend, who generally has tea, toast and orange for breakfast, loved having something different for a change. I wanted to share it with you, because there are not a lot of recipes for eggless cakes floating through cyberspace. I thought you might like to add this one to your files. Please make a mental note that the flour is sifted before measuring and then sifted again when it is combined  with the baking soda. This is a nice, almost effortless cake that I think your family will enjoy. Here is how it is made.

Eggless Buttermilk Coffee Cake with Blackberries...from the kitchen of One Perfect Bite courtesy of The New York

Ingredients:
1 tablespoon butter, for greasing the pans
1 cup vegetable or canola oil
1-3/4 cups sugar, plus 2 tablespoons for sprinkling
2 teaspoons nutmeg
1 teaspoon salt
4 cups sifted flour, plus extra for dusting pans
1 teaspoon baking soda
1-1/3 cups buttermilk
1 cup ripe blueberries, raspberries, or blackberries (optional)

Directions:
1) Heat oven to 325 degrees. Grease and lightly flour two 9-by-5-inch loaf pans or a 9-by-13-inch rectangular pan.
2) In a bowl, mix oil, 1-3/4 cups sugar, nutmeg and salt. Sift flour and baking soda together and add to bowl. Mix in buttermilk and pour batter into prepared pans. If using berries, pour in half of batter, sprinkle on berries and pour remaining batter on top.
3) Sprinkle the 2 tablespoons sugar over the surface and bake 30 to 40 minutes, or until a tester comes out clean. Let cool in the pan. Yield: 12 servings.


One Year Ago Today: Round-Up of Food to Celebrate the Year of the Dragon


Two Years Ago Today: Spaghettini with Garlic and Lemon


Three Years Ago Today: Black Bread

Sunday, January 20, 2013

Orange-Scented Buttermilk Cake


From the kitchen of One Perfect Bite...I must start by telling you that this cake is as delicious as it sounds, but then I quickly have to add that the devil is lurking in the details. I found the recipe in the December issue of Food and Wine magazine. It caught my eye, so I scanned the recipe, but as I read it I found a discrepancy in the amount of an ingredient that was to be used. I went to the online version of the recipe seeking clarification, but that just muddied the water. The problem centered on the amount of liquid to be used in preparation of the cake. Both versions of the recipe specified 1-1/4 cups of buttermilk, but the magazine version used just 3/4 cup of it. I decided to proceed using quantities based on standard cake formulations that I learned years ago for recipe competitions. A little food science never hurts, and if ever someone asks you to make a cake without a recipe it can be a life saver that's worth a buck or two. The trick lies in the weight of ingredients rather than their volume. When the weight of flour equals the weight of sugar, and the weight of the eggs equals the weight the fat, and the total weight of all liquid ingredients, including eggs, equals the weight of sugar, you'll have a cake, if you remember to add some baking powder, soda and salt. Based on that, I decided to use the magazine quantities and the recipe below reflects that choice. The original version of the recipe can be found here. I must warn you that this is not a pretty cake, but it is light and moist and delicious. It is important to line the pans you use to make the loaves. The large amount of sugar used in this recipe makes the cakes prone to sticking, but a parchment liner makes easy work of removal. I hope you'll give this recipe a try. This is a perfect dessert for a large group. Here is how the cakes are made.

Orange-Scented Buttermilk Cake...from the kitchen of One Perfect Bite courtesy of Food and Wine magazine

Ingredients:

3-1/4 cups cake flour, sifted, plus more for dusting
1 tablespoon baking powder
1/2 teaspoon baking soda
1 teaspoon salt
1/2 teaspoon ground cinnamon
2 sticks unsalted butter, softened
2 cups granulated sugar
1-1/2 teaspoons finely grated orange zest
4 large eggs, at room temperature
1/2 cup sour cream, at room temperature
1-1/2 teaspoons pure vanilla extract
3/4 cup buttermilk, at room temperature
Confectioners’ sugar, for dusting

Directions:

1) Preheat oven to 350 degrees F. Generously coat three 8-by-4-inch loaf pans with butter. Line bottom of pans with parchment paper. Butter parchment paper and dust pans with flour. Arrange pans on a baking sheet.
2) In a medium bowl, whisk cake flour with baking powder, baking soda, salt and cinnamon.
3) In bowl of a stand mixer fitted with paddle attachment, beat butter with sugar and orange zest at medium-high speed until fluffy, about 4 minutes. Add eggs one at a time, beating well between additions and scraping down the sides of bowl. Beat in the sour cream and vanilla.
4) At low speed, beat in dry ingredients in 3 additions, alternating with buttermilk and beginning and ending with dry ingredients; gently fold just until blended.
Scrape batter into prepared pans and smooth tops; gently tap once to release any air. Bake loaves for about 45 minutes, rotating the baking sheet halfway through, until a cake tester inserted in the center of each loaf comes out with a few moist crumbs attached.
5) Transfer the loaves to a rack for 20 minutes, then turn them out onto rack and set them right side up to cool. Dust with confectioners’ sugar, slice and serve. Yield: 3 loaves (21 slices).


One Year Ago Today: Pork and Fennel Meatballs


Two Years Ago Today: Lemon Pound Cake


Three Years Ago Today: Mexicalli Pizza
Related Posts with Thumbnails

Printfriendly