Sunday, September 30, 2012

Spiced Applesauce Cake with Cinnamon Cream Cheese Icing


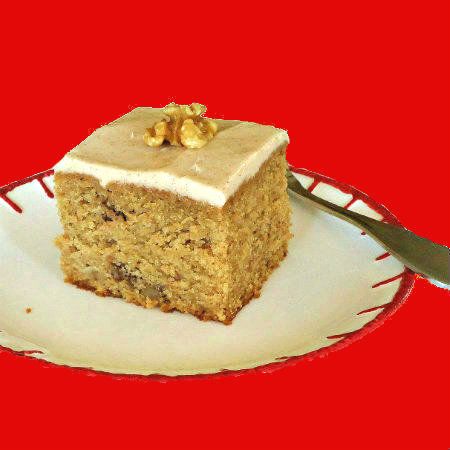
From the kitchen of One Perfect Bite...When the scent of apples and spice start wafting through my kitchen, I'm reminded of just how alluring I find this time of year to be. The other seasons have their charms, to be sure, but for those of us who love to cook, the promise of fall bounty lures us to the fields and orchards and ultimately back into kitchens that have been on hiatus for the summer. My favorite apples are now ripe and ready for the picking, so we spent some time today picking apples and plotting what to do with them once we had them home. I have a real weakness for apple desserts and this applesauce cake came to mind. It is pleasing to both the eye and the palate and it is not difficult to make. I'll go on record as saying this is my all-time favorite applesauce cake, at least for tonight. The cake was developed Andrea Albin for Gourmet magazine and it is a fantastic fall creation. The cake is moist, spicy and topped with a layer of a cream cheese icing so good that it's been known to make grown men weep. This is the kind of cake that, once tried, you'll make over and over again. It really will be love at first bite. The cake is easy to make and, on the odd chance you have leftovers, you'll be happy to know it is a great keeper. Do make sure the spices you are using are still at the peak of flavor. While spices can't go bad, they can lose their oomph and fall is a great time to replace them. I really hope you'll give this recipe a try. Here's how this cake and its icing are made.

Spiced Applesauce Cake with Cinnamon Cream Cheese Frosting
...from the kitchen of One Perfect Bite courtesy of Andrea Albin and Gourmet

Ingredients:
Cake
2 cups all-purpose flour
2 teaspoons baking powder
1/2 teaspoon baking soda
1/2 teaspoon salt
3/4 teaspoon cinnamon
1/2 teaspoon ground ginger
1/8 teaspoon ground cloves
1 stick unsalted butter, softened
1 cup packed light brown sugar
1 teaspoon pure vanilla extract
2 large eggs
1-1/2 cups unsweetened applesauce
1/2 cup walnuts (optional), toasted (see Tips), cooled, and chopped
Frosting
5-oz. cream cheese, softened
3 tablespoons unsalted butter, softened
1/4 teaspoon pure vanilla extract
1 cup confectioners sugar
1/2 teaspoon cinnamon

Directions:
1) Move rack to center of oven. Preheat oven to 350 degrees F. Butter an 8 or 9-inch square cake pan.
2) To make cake: Whisk together flour, baking powder, baking soda, salt, and spices. Beat butter, brown sugar, and vanilla with an electric mixer at high speed until pale and fluffy, 2 to 3 minutes. Add eggs 1 at a time, beating well after each addition, then beat in applesauce. At low speed, mix in flour mixture until just combined, then stir in walnuts (if using). Spread batter evenly in pan and bake until golden-brown and a wooden pick inserted into center comes out clean, 40 to 45 minutes. Cool in pan 15 minutes. Run a knife around edge of cake to loosen, then invert onto a plate. Reinvert cake onto a rack to cool completely.
3) To make frosting: Beat cream cheese, butter, and vanilla with an electric mixer at high speed until fluffy. Sift confectioners sugar and cinnamon over cream cheese mixture, then beat at medium speed until incorporated.
4) Spread frosting over top of cooled cake. Yield: 6 to 9 servings.


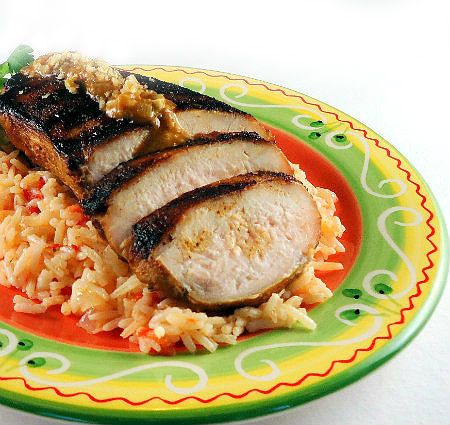
One Year Ago Today: Chicken Thighs with Garlic and Lime


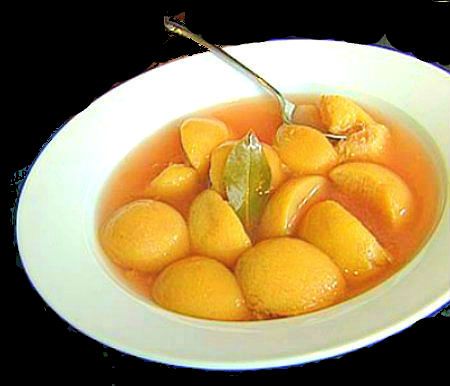
Two Years Ago Today: Clam Chowder


Three Years Ago Today: Kobe Kiwi Wings with Japanese Relish

Saturday, September 29, 2012

Pumpkin-Spice Cake with Cream Cheese Frosting


From the kitchen of One Perfect Bite...I've made this cake more times than I can count. It's fast and easy to prepare and the frosted cake is really quite delicious. My calendar fills up quickly in the fall. I'm busy with meetings and committees that manage to keep my 9 x 13-inch baking pan in nearly constant use. The Silver Fox jokes that it in an election year  it never gets put away. That's a bit of an exaggeration, bit I will confess it does get used a lot.  I've  learned over the years, that people, especially volunteers,  tend to look for things that are not there. They may not eat a piece of cake but they want to know it's there. It makes them feel appreciated and I want them to know they are.  So, to please them, while keeping my own sanity, I tend to bake very simple things that look  more complicated than they actually are. This dump cake is well-traveled  and well-received. The original recipe was developed in the Pillsbury test kitchen and it is a gem of simplicity. The cake, which feeds a lot of people,  takes minutes to prepare and it is disappearingly delicious. If you have not already done so, I hope you will give this seasonal cake a try. Here's the recipe.

Pumpkin-Spice Cake with Cream Cheese Frosting...from the kitchen of One Perfect Bite courtesy of Pillsbury

Ingredients:
Cake
4 eggs
2 cups granulated sugar
1 cup vegetable oil
1 can (15 oz) pumpkin
2 cups all-purpose flour
2 teaspoons baking powder
1 teaspoon baking soda
1/2 teaspoon salt
2 teaspoons ground cinnamon
1/2 teaspoon ground ginger
1/4 teaspoon ground cloves
1 cup raisins, if desired
Cream Cheese Frosting
1 package (8-oz) cream cheese, softened
1/4 cup butter, softened
2 to 3 teaspoons milk
1 teaspoon vanilla
4 cups powdered sugar
1/2 cup chopped walnuts, if desired

Directions:
1) Preheat oven to 350 degrees F. Spray a 15 x 10 x 1-inch pan with cooking spray.
2) Combine eggs, granulated sugar, oil and pumpkin in a large bowl and whisk until smooth. Stir in flour, baking powder, baking soda, salt, cinnamon, ginger and cloves. Stir in raisins if using. Spread in pan.
3) Bake 25 to 30 minutes or until toothpick inserted in center comes out clean and cake springs back when touched lightly in center. Cool completely, about 2 hours.
4) In medium bowl, combine and beat cream cheese, butter, milk and vanilla with electric mixer on low speed until smooth. Gradually beat in powdered sugar, 1 cup at a time, on low speed until smooth and spreadable. Spread frosting over cake. Sprinkle with walnuts. Cut to desired size. For bars, cut into 7 rows by 7 rows. This recipe will make 49 bars. Store covered in refrigerator.


One Year Ago Today: Couscous and Cranberry Salad


Two Years Ago Today: Zucchini Muffins


Three Years Ago Today:  Bierstube Pork Chops

Friday, September 28, 2012

Grilled Peruvian Chicken with Chili and Walnut Sauce


From the kitchen of One Perfect Bite...While it may seem a bit strange to see soy sauce used as an ingredient in a Peruvian recipe, Peru has been home to large numbers of Japanese expatriates since the late 1800s. Over the years, Asian flavors and ingredients have co-mingled with those of Peru and Europe, and the fusion has created one of the most diverse cuisines in the world. This grilled chicken entree is simple to prepare, but, with an assist from a soy marinade and an unusual sauce, it packs an enormous, though heatless, flavor punch. A long marination is not necessary and the chicken can be on the table in less than an hour. While the recipe suggests the use of an outdoor grill, I prefer to use a griddle pan and cook the chicken in my kitchen. There is a large grill sitting just outside my kitchen door, but I can't bring myself to fire it up when I'm only cooking for the two of us. I heat my grill pan, which is a ridged cast iron affair, until it is blazing hot and then effectively pretend it is an outdoor grill. The chicken cooks about 6 minutes per side and if you want grill marks, don't fiddle with it while it is in the pan. I keep my fingers crossed when I grill indoors. My fire alarms are so sensitive that I should donate them to the government to use as an early warning system at facilities housing our nuclear arsenal. Evil doers would be stopped dead in their tracks. The sauce, which is thickened with a bread crumb panade, is interesting and it comes together quickly as well. This is a really nice recipe, though I prefer it with the aji verde sauce that you can find here. I serve this with the tomato rice we made earlier in the week. I suspect those of you who try this recipe will like it. Here's how the grilled chicken and its sauce is made.

Grilled Peruvian Chicken with Chili and Walnut Sauce...from the kitchen of One Perfect Bite courtesy of Cuisine at Home

Ingredients:

Marinade
1/4 cup low-sodium soy sauce
2 tablespoons fresh lime juice
1 tablespoon ground cumin
1 tablespoon extra virgin olive oil
1 teaspoon dried oregano
1 teaspoon chili powder
4 boneless, skinless chicken breast halves, trimmed (6-8 oz each)
Sauce
1/2 cup fresh bread crumbs
1/4 cup milk
1/2 cup diced onion
1 tablespoon minced garlic
1/2 teaspoon ground cumin
1/2 teaspoon chili powder
1/2 teaspoon annatto powder or paprika
1/2 cup low-sodium chicken broth
2 tablespoons fresh lime juice
2 tablespoons grated Parmesan cheese
1 tablespoon ground walnuts
1/4 cup chopped walnuts
2 tablespoons chopped fresh cilantro

Directions:
1) To make marinade: Combine soy sauce, lime juice, cumin, oil, oregano, and chili powder in a large bowl or plastic bag. Add chicken. Marinate in refrigerator while preparing sauce.
2) To make sauce. Soak bread crumbs in milk in a bowl. Heat olive oil in a saute pan. Add onion and garlic to pan and saute for 3 minutes. Stir in cumin, chili powder, and annatto and saute for 30 seconds longer. Add broth and bread crumbs and bring to a boil. Remove pan from heat. Stir in lime juice, Parmesan, and 1 ground walnuts. Keep mixture warm.
4) Remove chicken from marinade. Discard marinade. Grill chicken covered, over direct heat, 6 minutes on each side or until chicken reaches 160 degrees. Serve chicken with rice and sauce, garnishing with walnuts and cilantro. Yield: 4 servings.


One Year Ago Today: Creamy Corn Casserole


Two Years Ago Today: Mushroom Galette


Three Years Ago Today: Apple Slice

Thursday, September 27, 2012

Hot and Sweet Orange Glazed Chicken Tenders


From the kitchen of One Perfect Bite...This is a blissfully simple meal that I occasionally make for the Silver Fox when I'm pressed for time and have to get dinner on the table quickly. It requires a handful of ingredients that I usually have in the pantry, and I keep a package of tenders in the freezer just for those nights when I need a dinner that is fast and easy to prepare. While this is a simple recipe, the chicken is delicious and looks good enough to serve to guests. Pepper jelly is the base of the pan sauce that is used to glaze the chicken and it adds kick and color to what would otherwise be a bland dish. I like to serve these tenders and their sauce with a quick side of rice or couscous. I have an arsenal of thirty minute meals, but this one is one of my favorites. The sauce gets me every time. I hope you'll give it a try. Here's how the chicken is made.

Hot and Sweet Orange Glazed Chicken Tenders...from the kitchen of One Perfect Bite

Ingredients:
1-1/4 lbs chicken tenderloins
1/2 cup flour
1/2 teaspoon salt
1/4 teaspoon freshly ground black pepper
2 tablespoons vegetable oil
2 tablespoons green onions or shallots, finely chopped
1 clove garlic, finely chopped
1/2 cup orange juice
3 tablespoons pepper jelly
1/4 cup red bell pepper, diced

Directions:

1) Combine flour, salt and pepper on a plate and stir with a fork to combine. Heat oil in a large pan over medium-high heat.
2) Lightly dredge chicken in flour. Working in two batches, add tenderloins to pan and cook until they are light golden brown, about 2 minutes per side. Transfer to a plate.
3) Lower heat and add onions and garlic to pan. Cook, stirring frequently, until soft and translucent, about 3 to 5 minutes. Add orange juice and pepper jelly, stirring until jelly melts and mixture is well combined. Stir in red bell pepper.
4) Return chicken to pan, turning pieces several times to coat with sauce. Cover and cook until sauce has thickened, about 3 minutes. Serve immediately: Yield: 4 servings.


One Year Ago Today: Cauliflower and Walnut Cream Soup


Two Years Ago Today: Kinpira Gobo - Japanese Burdock


Three Years Ago Today: Guacamole

Wednesday, September 26, 2012

Vegetable Strata


From the kitchen of One Perfect Bite...This strata is a wonderful way to use the produce that floods green markets at this time of year. Better still, the dish is relatively easy to make. While there is some chopping involved, the strata comes together quickly and the finished dish makes a wonderful entree for a brunch or light supper. The recipe, which comes from Fine Cooking, is straight forward and easy to follow, and you'll have no problem with this dish, if you follow the recipe instructions. If you want to extract the most flavor from the vegetables, make sure they are browned before they are layered into the casserole. The browning is simple to accomplish if you do not crowd the pan and let the vegetables sit undisturbed for a couple of minutes before you flip them over. Unlike most strata, this one can be baked as soon as it is assembled, and that makes it a great candidate for a weeknight meatless meal. This is a nice recipe, and, if you are partial to egg dishes, I really think you'll like this one. Here's how it is made.

Vegetable Strata...from the kitchen of One Perfect Bite courtesy of Fine Cooking Magazine

Ingredients:

About a dozen 1/2-inch-thick slices French or Italian bread (enough to cover the bottom of your pan), day-old or lightly toasted
1 clove garlic, lightly crushed
Kosher salt and freshly ground black pepper
2 cups milk or a mixture of milk and cream
5 large eggs
1/2 cup freshly grated Parmigiano-Reggiano, divided
Pinch dried red pepper flakes
1 loosely packed cup basil leaves, chopped
2 tablespoons olive oil
1 small onion, finely chopped
2 medium summer squash or zucchini, or 1 of each
2 ripe tomatoes

Directions:

1) Heat oven to 350 degrees F. Lightly butter an 8x8-inch baking dish. Rub top of each slice of bread with garlic clove. Lay slices in dish in one layer, cutting them into pieces where necessary. Season with salt and pepper.
2) Measure milk in a 1-quart measure, preferably one with a spout. (Or measure it and transfer it to a bowl.) Add eggs, half of the cheese, red pepper flakes, and a generous amount of salt and pepper. Whisk vigorously to beat eggs and to combine. Add basil and stir gently. Set aside.
3) In a large sauté pan, heat oil over medium high heat. Add onion; cook, stirring occasionally, until it softens and colors lightly, about 5 minutes. Meanwhile, trim the squash, cut them lengthwise into quarters and, holding quarters together, slice them into pieces about 1/3 inch thick. Stir squash into onions, spread in a single layer, and let sit undisturbed for 1 to 2 minutes to encourage browning; check color before you turn them.
4) Meanwhile, halve and seed tomatoes. Coarsely chop them. When squash is lightly browned on both sides and crisp-tender, add tomatoes, stir to toss, and take vegetables off the heat.
5) With a slotted spoon, transfer vegetables to baking dish, spreading them evenly over bread. Give milk and egg mixture a stir and gently pour it all into the dish. Top with the remaining cheese. Bake until milk and egg mixture sets, about 40 to 45 minutes. Let cool at least 5 minutes, slice into squares with the edge of a spatula, and use the spatula to lift out the pieces. Yield: 4 to 6 servings.


One Year Ago Today: Banana Muffins


Two Years Ago Today: Sweet Pickles


Three Years Ago Today: Salmon Chowder

Tuesday, September 25, 2012

Arroz Brasileiro (Brazilian Tomato Rice)


From the kitchen of One Perfect Bite...This recipe is fairly new to me, but since I've found it, Brazilian rice has become a favorite of mine. I found the recipe in an old issue of Cuisine At Home while searching for side dishes that could be served with some of the Peruvian entrees I wanted to test. The two countries share a common border and their cuisines are similar, so I was open to combining dishes from both countries on one plate. This recipe caught my eye because it was prepared in such a unique way. Most tomato rice recipes that I've tried, cook the tomatoes along with the rice. The Brazilian version adds fresh tomatoes to the rice just before serving. Rice cooked this way is flecked with tomatoes rather than red in color and the grains of rice remain separate and do not clump together. Because I prefer a drier rice, I dice fresh tomatoes into 1/2-inch cubes and allow the pieces to drain while the rice cooks. Despite its scant ingredient list, this recipe makes a remarkably flavorful rice that is delicious. I heartily recommend it to you and hope you will give it a try. Here's how the rice is made.

Arroz Brasileiro - Brazilian Tomato Rice ...from the kitchen of One Perfect Bite courtesy of Cuisine At Home

Ingredients:
1 tablespoon extra virgin olive oil
1 cup diced onion
1-1/4 cups water
1 tablespoon minced garlic
2/3 cup dry medium grain rice
1/2 teaspoon kosher salt
1 cup seeded diced tomato, drained

Directions:
Heat olive oil in a saucepan set over medium-high heat. When oil shimmers, add onion
and saute for 3 minutes. Stir in water and garlic. Bring to a boil. Add rice and salt and cover pan. Reduce heat to low and simmer rice for 20 minutes. Remove from heat and let sit, covered, for 10 minutes. Fluff rice with a fork and stir in tomatoes. Yield: 4 servings.


One Year Ago Today: Rubarb Meringue Pie


Two Years Ago Today: Pickled Plums


Three Years Ago Today: Pumpkin Cupcakes with Maple Cream Frosting

Monday, September 24, 2012

Baked Shells with Cauliflower and Cheese


From the kitchen of One Perfect Bite...If you are looking for a meatless entree to serve tonight, I think you'll enjoy this hearty baked pasta casserole. The shells, which are combined with cauliflower and two types of cheese, take everyday mac n' cheese to a whole nother level. The pasta is rich and delicious but I'd be remiss if I didn't tell you that it is not quick to prepare. There are three steps to the recipe and while none of them is hard, they take some time to complete and you'll have to plan accordingly. I can assure you that your efforts will be rewarded at the table. The dish comes from the Moosewood Restaurant and this recipe can be found in the collective's latest cookbook, New Recipes from from Moosewood Restaurant. While I'm posting the recipe as it was written, I wanted you to know that I cut back on the quantity of onions it called for. My brain refused to let my hands chop 4 cups of onions for a pound of pasta, so I settled for 2 cups and cooked them until they were translucent. That worked well for me. One of these days, I'll get the courage to try the recipe with the full compliment of onions, but I didn't feel like experimenting with aromatics tonight. While I used fresh tomatoes to make the casserole, a good canned variety can be substituted if you are pressed for time or tomatoes are out of season. I hope you'll try this recipe. I know the mix of ingredients sounds a bit strange, but the combination makes for a delicious meatless meal. Here's how the shells are made.

Baked Shells with Cauliflower and Cheese...from the kitchen of One Perfect Bite adapted from New Recipes from Moosewood Restaurant

Ingredients:
Bechamel Sauce
1/2 cup butter
1/2 cup flour
1 quart warm milk
1-1/2 tablespoons Dijon mustard
pinch fresh nutmeg
salt and pepper to taste
Casserole
1/4 cup vegetable oil
4 cups chopped onions (I used 2 cups)
3 garlic cloves, minced
1/2 cup fresh basil, chopped
1 large head cauliflower, cut into florets
6 ripe tomatoes, chopped (or 3 cups canned, drained and chopped)
3 tablespoons fresh lemon juice
1 pound medium pasta shells
1 cup freshly grated Parmesan cheese
1-1/2 cup shredded mozzarella or mild provolone cheese
seasoned bread crumbs

Directions:
1) Preheat oven to 375 degrees F. Lightly grease or oil a 13 x 9 x 2-inch baking pan.
2) To prepare Bechamel sauce: Melt butter in heavy sauce pan. Whisk in flour until a smooth paste is formed. Add warm milk slowly, whisking until  sauce begins to thicken. Add  mustard, nutmeg, salt, and pepper and let  sauce thicken further on low heat. Remove from heat and cover.
3) Saute  onions, garlic, and basil in oil. When onions are translucent, add  cauliflower and saute for 5 minutes more. Add tomatoes and simmer until the cauliflower is tender.
4) Cook  pasta  per package instructions until al dente. Drain.
5) Combine pasta, vegetable mixture, Bechamel sauce and lemon juice in a large bowl. Put half of pasta mixture in prepared baking dish. Sprinkle with half of each cheese. Add remaining pasta mixture and top with remainder of the cheeses. Top with bread crumbs. Cover pan and bake for 30 minutes. Uncover and continue baking until top is golden and casserole is bubbling, about 15 minutes longer. Yield: 6 to 8 servings.


One Year Ago Today: Spiced Corn on the Cob


Two Years Ago Today: White  Chocolate and Lime Cookies


Three years Ago Today: Summer Rolls

Sunday, September 23, 2012

Orange Pumpkin Sheet Cake


From the kitchen of One Perfect Bite...I paid a visit to the pumpkin patch today. Surreptitiously, the trip was to select pumpkins to line the stairs that lead to entry of our home. The real reason was to watch the children pick their Halloween pumpkins. When our children were small, Halloween was second only to Christmas in terms of the excitement it generated, and certain rituals quickly became associated with the holiday. So, hot or cold, wet or dry, preparations always began with a trip to the pumpkin patch where they were set loose to find their own version of the perfect pumpkin. They could have any pumpkin they wanted as long as they could carry it back to the scales without assistance. One of my children, who to this day, swallows life in great gasping gulps, always picked the largest pumpkin in the field and, of course, was left to puzzle how it move it. Today, I was reminded of that as I watched a four year old try to move a pumpkin nearly his size through the fields. My deja vu aside, I was also struck by how much children still love this holiday. As we move closer to Halloween, those of you who are asked to bake for it, might want to keep this simple dump cake in mind. It makes enough cake to feed the immediate world and it is very, very easy to make. I have one caution to share with you, and that regards the browning of the butter that is used in the icing. Don't let it get away from you. Remove it from the heat as soon as it turns a light golden brown. It will burn if you blink. This cake is wonderfully flavorful. Pumpkin pie spice and the juice and zest of an orange combine to give the cake a unique taste that sets it apart from others of its kind. The cake is light and refreshing and the frosting is delicious. I know those of you who try the cake will enjoy it. Here's how it is made.

Orange Pumpkin Sheet Cake...from the kitchen of One Perfect Bite courtesy of Pillsbury Test Kitchens

Ingredients:
Bars
2 cups all-purpose flour
1-1/2 cups granulated sugar
2 teaspoons baking powder
1 teaspoon baking soda
2 teaspoons pumpkin pie spice
2 teaspoons grated orange peel
1/4 teaspoon salt
1/2 cup vegetable oil
1/2 cup orange juice
1 cup canned pumpkin (not pumpkin pie mix)
2 eggs
Lightly Browned Butter Frosting
1/3 cup butter (do not use margarine)
2 cups powdered sugar
1/2 teaspoon vanilla
2 to 4 tablespoons milk

Directions:
1) Heat oven to 350 degrees F. Grease bottom and sides of 15 x 10 x 1-inch pan with shortening and dust with flour, or spray with baking spray with flour.
2) Dump all bar ingredients into bowl of an electric stand mixer and beat  on low speed, scraping bowl as necessary, until ingredients are moistened. Increase speed to medium and beat for 2 minutes longer. Bake 23 to 27 minutes or until toothpick inserted in center comes out clean. Cool completely, about 1 hour.
3) In 2-quart saucepan, heat butter over medium heat, stirring constantly, until light golden brown. Remove from heat. Stir in powdered sugar, vanilla and enough milk until smooth and spreadable. Immediately spread frosting over cooled bars. Refrigerate about 15 minutes or until set. For bars, cut into 8 rows by 6 rows. If desired, garnish each bar with orange peel strip. Yield: 48 bars.


One Year Ago Today: Maida Heatter's Popovers


Two Years Ago Today: Tomato Claufoutis


Three Years Ago Today: Okanagan Apple Bread

Saturday, September 22, 2012

Quick Pickled Peaches


From the kitchen of One Perfect Bite...The tablecloths are ironed and I've just finished seasoning a pork loin that is the size of a small pig. We are having guests for dinner tonight and the pork loin is going to be the centerpiece of our feast. In order to keep the kitchen reasonably clear of last minute activity, I'm going to use the outdoor grill and slowly spit roast the pork. I'll serve it with a sauce made from a spicy peach chutney that I prepared earlier in the week and I have pickled peach halves that I'm going to use as a garnish. Pickled peaches are not easy to find west of the Mississippi, so if you want them, they have to be special ordered or made at home. Peaches are still being harvested in Oregon and they have been especially flavorful this year. I thought they'd be perfect for both chutney and a quick pickle. I found a terrific recipe for pickled peaches in Alice Water's wonderful cookbook, Chez Panisse Fruit. Her pickles are quick and delicious. They are not processed and they are table ready in 24 hours. The recipe is easy to follow and the peaches are unbelievably good. They are perfect to serve with pork or game birds and I know that those of you who try them will really be pleased. Here's how they are made.

Pickled Peaches...from the kitchen ofOne Perfect Bite courtesy of Alice Water's

Ingredients:
3 peaches
2 cups water
1/2 cup red wine vinegar
1/4 cup red wine
2 tablespoons honey
1/2 teaspoon peppercorns
4 cloves
2 allspice berries
1/2 stick cinnamon
1 bay leaf

Directions:

1) To peel peaches, lower them a few at a time into boiling water for a minute or so, and immediately refresh them in a bath of ice water. When cool, use a paring knife to remove skins, which should slide off easily. Cut peaches in half and remove pits.
2) To make pickling solution, combine water, vinegar, wine, honey, peppercorns, cloves, allspice, cinnamon and bay leaf in a heavy-bottomed pot or saucepan. Bring to a boil, reduce heat and simmer for 5 minutes.
3) To pickle peaches, add peach segments and cook just until tender, about 3 to 5 minutes. Test with a toothpick or tip of a sharp knife to make sure they are cooked through. They will turn brown if undercooked. Carefully remove peaches with a slotted spoon; they will be quite delicate. Let pickling mixture cool slightly and then strain over peaches. Cover and refrigerate overnight or for up to a week. Yield: 6 pickled peach halves.


One Year Ago Today: Rice and Mixed Bean Salad


Two Years Ago Today: Zucchini Fritters


Three Years Ago Today: Pilgrim Hat Cookies for Kids by Kids

Friday, September 21, 2012

Tomato Pie


From the kitchen of One Perfect Bite...Tomatoes are coming in with a vengeance now and I'm really scrambling to find new ways to use them. Save for pizza, I've never had a tomato pie, and this one came to my attention while I was searching for recipes that used tomatoes. The pie was featured in Woman's Day magazine and I've made it twice since finding the recipe. The tart in tonight's photos is the result of a slight change made to the original recipe. Specifically, I replaced large tomato wedges with an equal weight of cherry and grape tomatoes. The change worked well, but I must admit that I actually liked the original version better than my own. While they made for a less colorful pie, I think the meatier tomato wedges give the tart a better texture. The pie is nicely spiced, and, if you use a commercially prepared crust, you'll find it really easy to prepare. It will need to sit a few minutes before it is cut, but the crust will become soggy if it is allowed to sit for too long a time. This is a really nice way to use any excess tomatoes you may have. I hope you will give the recipe a try. Here's how the tomato pie is made.

Tomato Pie
...from the kitchen of One Perfect Bite courtesy of Woman's Day magazine

Ingredients:

1 9-inch unbaked pie crust
2 leeks (1/4 pound), root ends trimmed, tops cut so about 1 in. pale green remains
3 teaspoons olive oil, divided use
2 tablespoons minced garlic
2 tablespoons fresh oregano leaves
1 teaspoon each salt and pepper
1/4 cup Italian seasoned bread crumbs
1 cup Mexican-style shredded Cheddar Jack
2 large (about 1-1/4 pound) tomatoes, each cut in 12 wedges or an equal weight of plum or cherry tomatoes

Directions:
1) Heat oven to 450 degrees F. Line a 9-inch pie plate with crust and bake for 9 minutes as the package directs. Cool. Lower oven temperature to 350 degrees F.
2) Meanwhile cut leeks lengthwise in quarters; thinly slice. Put in bowl of water; stir to loosen grit; lift to colander to drain.
3) Heat 2 teaspoons oil in a large nonstick skillet over medium heat. Add leeks; sauté 6 minutes or until soft. Add garlic, oregano, salt and pepper; sauté until fragrant. Remove to a plate. Wipe skillet with paper towels. Add remaining 1 teaspoon oil and bread crumbs to skillet. Stir 3 minutes or until lightly toasted.
4) Sprinkle 1 cup leek mixture over bottom of crust; sprinkle with cheese. Lay tomato wedges around edges and in center. Top with rest of leek mixture; sprinkle crumbs around edge.
5) Bake 35 minutes, or until hot and tomatoes are soft. Remove from oven; let stand at least 5 minutes, but no more than 1 hour, before serving. Serve within 1 hour of baking or the crust may get soggy. Yield: 6 servings.


One Year Ago Today: Spiced Potato Wedges


Two Years Ago Today: Grilled Flank Steak with Coffee Sauce


Three Years Ago Today: Half Moon Pies and Harvest Moon Pudding

Thursday, September 20, 2012

Pie-Spiced Apple Cookies


From the kitchen of One Perfect Bite...These moist and chewy cookies are hard to resist if you enjoy apple pie. They are packed with fruit and nuts and flavored with the same spices as America's favorite pie. They are wonderfully fragrant and even smell like apple pie as they bake. The recipe first appeared on the blog The Naptime Chef and it has also been featured on food52. I'm not sure the cookies will be a favorite of the cookie-jar set, but if you enjoy an adult biscuit with your coffee or tea, these are definitely worth trying. The cookies are delicious and simple to make, but I suspect you'll need to bake them for a few minutes longer than is suggested in the recipe. My cookies needed a full 15 minutes to set and brown. You might also want to cutback on the amount of cloves used in the recipe. I used the full amount for my first batch of cookies and thought it was a bit overpowering. I cut the measure in half for the next batch and was much happier with the results. I  also added mace and ginger to the dry ingredients to bolster the reduced quantity of cloves.  I suspect that a commercial pie spice mixture would also work well here. This is a homely cookie that makes no pretense to be something it is not, but I can promise you that its flavor will trump its gnarly appearance. I hope you'll give the recipe a try. Here's how the cookies are made.

Pie-Spiced Apple Cookies...from the kitchen of One Perfect Bite courtesy of Katie Sanford as featured on The Naptime Chef and food52

Ingredients:
1 cup raisins
1/2 cup shortening
1-1/3 cups dark brown sugar
1 egg
1/4 cup whole milk
2-1/4 cups all-purpose flour
1 teaspoon baking soda
1 teaspoon ground cinnamon
1/2 teaspoon ground cloves
1/2 teaspoon ground nutmeg
1/2 teaspoon salt
1 cup chopped walnuts
1 cup unpeeled apple, finely chopped

Directions:
1) Preheat oven to 350 degrees F. Line cookie or sheet cake pans with parchment paper.
2) Place raisins in a small saucepan. Cover with water and bring to a boil. Remove from heat and let sit for 5 minutes. Drain and set aside.
3) Combine shortening and brown sugar in bowl of an electric stand mixer fitted with a paddle attachment. Beat until fully combined. Beat in egg and milk. sugar until full combined. Add egg and milk and mix ingredients well.
4) Whisk flour, soda, cinnamon, cloves, nutmeg and salt together in another bowl. With mixer on low speed, slowly add dry ingredients, scraping bowl necessary, until everything is fully combined.
5) Stir chopped apple, raisins and walnuts into batter with a wooden spoon.
6) Drop cookies by rounded teaspoonfuls about 2-inches apart onto cookie sheets. Press tops of cookies down slightly with two fingers to flatten slightly.
7) Bake for 12-14 minutes or until cookies hold their shape and edges are slightly browned. Yield: 3 dozen cookies.


One Year Ago Today: Curried Corn and Chicken Soup


Two Years Ago Today: Glazed Boston Cream Cake


Three Years Ago Today: Zucchini Cornbread


Wednesday, September 19, 2012

Cauliflower and Scallions with Turmeric, Chili and Mustard Seeds


From the kitchen of One Perfect Bite...Bins filled with cauliflower and broccoli are battling for space in our local farmer's markets. I happen to love both vegetables, but I generally lose my enthusiasm for them when there is no variety in the way they are prepared. I'm always on the lookout for new ways to serve them, and when I come across a recipe that has possibilities, I'll give it a try. I stumbled on the blog, Jane Spice, while looking for new ways to prepare cauliflower. While there, I found a recipe for a spicy version of cauliflower that would add some balance and punch to the, otherwise, plain meal I had planned for dinner. I had all the ingredients I needed on hand  and the recipe seemed simple to make, so the dish was added to our menu. Cauliflower prepared in this fashion has wonderful color and borrows from the flavors of Indian cooking. I really enjoyed this dish and will make it again. It is, however, assertive, so you'll want to be careful about what you serve it with. It is fast and easy to prepare and I think you, too, might enjoy it. It definitely will quick-start your appetite and stimulate your taste buds.. I hope you will give it a try. Here's how it is made.

Cauliflower and Scallions with Turmeric, Chili and Mustard Seeds ...from the kitchen of One Perfect Bite courtesy of Fresh from the Farm and Garden by The Friends of the UCSC Farm and Garden and janespice.com

Ingredients:
1 small head cauliflower
1-2 bunches scallions
3 tablespoons canola or safflower or other light cooking oil
1/2 teaspoon mustard seeds
1/2 teaspoon turmeric
1 or 2 jalapeño chiles, or other spicy chile or 1/4 teaspoon red pepper flakes
Salt to taste
1/3 cup hot water

Directions:
1) Separate cauliflower into very small florets. Wash and drain. Trim scallions and chop into 1/4 inch pieces.
2) Heat oil. When oil is very hot, add mustard seeds. Stir constantly for about a minute. Add turmeric, chiles, salt, and scallions, stirring rapidly. Cook for half a minute or so before adding cauliflower. Stir to mix everything well, add the water, and simmer, covered, on low for 15-20 minutes, until cauliflower is tender. Increase heat to evaporate any liquid.


One Year Ago Today: Apple Streusel Muffins


Two Years Ago Today:  Bouillabaise de Poulet - French Country Chicken Stew


Three Years Ago Today: Red Pepper Hummus
Related Posts with Thumbnails

Printfriendly