Wednesday, August 8, 2012

Tortellini with Spinach and Parmesan Cream Sauce


From the kitchen of One Perfect Bite... I've been out of commission for most of the day. My head feels like a watermelon and I suspect the odds of my winning the day's Miss Congeniality contest are nil. It's nothing serious, just a nasty summer cold and medication that has given me sleeping sickness. The Silver Fox, bless him, made dinner tonight, and that proves two things. He is, of course, a great guy, but it also speaks volumes about how easy this dish is to prepare. The recipe comes from the Taste of Home site and it was perfect for our appetites tonight. He pretty much followed their recipe, but used fresh basil in place of dry and replaced the heavy cream with a non-fat half and half. After the fact, we both think the dish also could use less spinach. Half the frozen block would be plenty and 1 pound of wilted fresh baby leaves would be even better. I suspect that when made with a full compliment of heavy cream, this dish rivals the richness of an Alfredo sauce. It nice to have recipes like this in the hopper for insanely busy days. They are fast and delicious, and, if you can get past all that heavy cream, you can have dinner on the table in minutes. This recipe will not be to all tastes, but it is definitely worth a try. Here's how the dish is made.

Tortellini with Spinach and Parmesan Cream Sauce ...from the kitchen of One Perfect Bite inspired by Taste of Home Magazine

Ingredients:
1 package (16 ounces) frozen cheese tortellini
1 small onion, chopped
2 tablespoons olive oil
3 garlic cloves, minced
1 can (14-1/2 ounces) diced tomatoes, undrained
1 package (10 ounces) frozen chopped spinach, thawed and squeezed dry
1-1/2 teaspoons dried basil
1 teaspoon salt
1/2 teaspoon pepper
1-1/2 cups heavy whipping cream
1/2 cup grated Parmesan cheese
Additional grated Parmesan cheese, optional

Directions:

1) Cook tortellini according to package directions. Meanwhile, in a large skillet, saute onion in oil until tender. Add garlic; cook 1 minute longer. Add tomatoes, spinach, basil, salt and pepper.
2) Cook and stir over medium heat until liquid is absorbed, about 3 minutes. Stir in cream and cheese. Bring to a boil. Reduce heat; simmer, uncovered, for 8-10 minutes or until thickened.
3) Drain tortellini; toss with sauce. Sprinkle with additional cheese if desired. Yield: 6 servings


One Year Ago Today: Orange Glazed Banana Bread
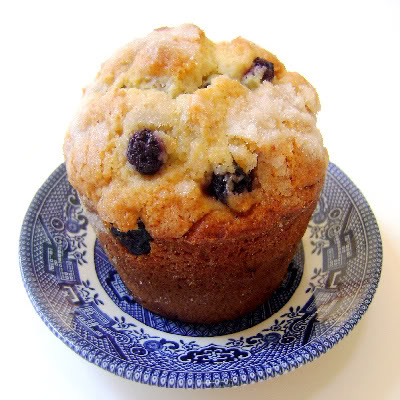


Two Years Ago Today: Blueberry-Corn Muffins


Three Years Ago Today: Roasted Red Pepper and White Bean Spread


Tuesday, August 7, 2012

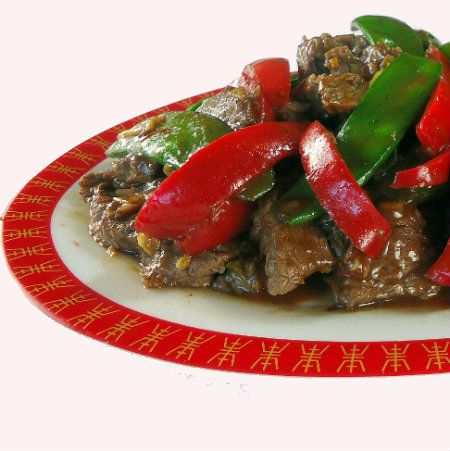
Chili Beef Stir-Fry with Bell Peppers and Snow Peas


From the kitchen of One Perfect Bite...Where's the peck of pickled peppers Peter Piper picked? Chances are it's been transformed and can be found in my freezer and pantry. It's been a busy day, but I've put-by enough peppers to last us through another year and have enough left over to provide a special meal or two this week. I love to shop farmer's markets in late summer when eggplant, peppers and fennel fill bins and shelves and provide color that the Impressionists would envy. There is something about harvest season that whips up my pioneer spirit and makes me want to cook, turning the kitchen of this hillside chalet into a homestead kitchen, at least for a day or two. I fired up the the grill this morning and spent about three hours roasting peppers to freeze and pickle. I made a bit of relish and several trays of stuffed peppers for winter meals, and by the time the day was done I had one lonely red pepper still waiting to be used. It has been really warm here, and while air conditioning cools the house and kitchen, it can't restore appetites dulled by heat. This stir-fry is perfect for anytime of year, but the speed with which it can be made, makes it a perfect candidate for a light warm weather meal. It was also a great way to use that last pepper. The recipe is easy and the dish comes together quickly, but it is important to have all the ingredients set to go before you begin to cook. There is nothing more unappealing than a stir-fry in which the vegetables have been over-cooked. So, please don't start until you have everything set to go and have a sense of what comes next. I hope you will give this recipe a try. It was developed by Grace Young for Fine Cooking Magazine and it is delicious. Here is how the chili beef stir-fry is made.


Chili Beef Stir-fry with Bell Peppers and Snow Peas...from the kitchen of One Perfect Bite inspired by Grace Young and Fine Cooking Magazine

Ingredients:

3/4 pound flank or flat iron steak
3 tablespoons Shaoxing rice wine or dry sherry, divided use
1 tablespoon minced fresh ginger
2 teaspoons soy sauce
1-1/2 teaspoons cornstarch
Kosher salt and freshly ground white pepper
1 teaspoon + 2 tablespoons peanut or vegetable oil, divided use
2 tablespoons hot bean sauce (also called chili bean sauce), chili garlic sauce, or Sriracha
2 tablespoons hoisin sauce
1 tablespoon minced garlic
6-ounces snow peas, strings removed (about 2 cups)
1 medium red bell pepper, stemmed, seeded, and cut into 1/2 x 2-inch strips
8 medium scallions, thinly sliced on the diagonal (about 1 cup)

Directions:
1) Cut beef with grain into 2-inch-wide strips, and then cut each strip across grain into 1/4-inch-thick slices. Transfer to a medium bowl. Add 1 tablespoon rice wine, ginger, soy sauce, cornstarch, 1/4 teaspoon salt, and 1/8 teaspoon pepper to beef. Stir until cornstarch is no longer visible. Add 1 teaspoon oil and stir until beef is lightly coated.
2) In a small bowl, stir hot bean sauce, hoisin sauce, and remaining 2 tablespoons rice wine. Heat a 14-inch flat-bottom wok over high heat until a bead of water vaporizes within 1 to 2 seconds of contact. Add 1 tablespoon of remaining oil, swirl to coat, add garlic, and stir-fry until fragrant and light golden, about 10 seconds. Push garlic to sides of wok and carefully add beef, spreading it evenly over bottom and sides of wok in a single layer. Cook, undisturbed, for 1 minute, letting beef begin to sear, then stir-fry with the garlic until beef is lightly browned but not yet cooked through, about 1 minute. Transfer beef and garlic to a plate.
3) Add remaining 1 tablespoon oil to wok and swirl to coat pan. Add snow peas, bell pepper, and scallions, then sprinkle with 1/2 teaspoon salt and stir-fry until snow peas are bright green, about 1 minute. Return beef and any accumulated juice to wok. Add hot bean sauce mixture. Stir-fry until beef is just cooked through and vegetables are crisp-tender, 30 seconds to 1 minute more. Serve immediately. Yield: 4 servings.


One Year Ago Today: Butterscotch Swirl Bundt Cake


Two Years Ago Today: Thai-Style Steamed Salmon with Tamarind-Ginger Glaze


Three Years Ago Today: Mediterranean Chocolate Cake with Lemon and Olive Oil

Monday, August 6, 2012

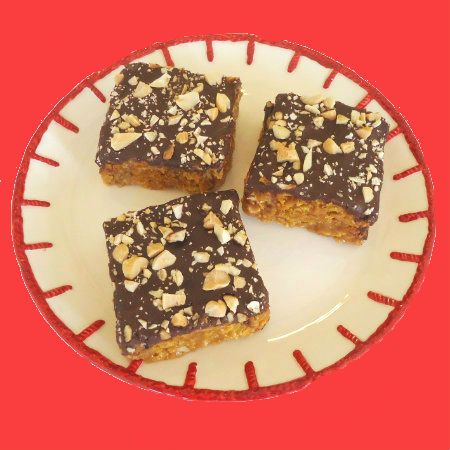
Crispy No-Bake Corn Flake Peanut Butter and Chocolate Bars


From the kitchen of One Perfect Bite...If your cookie monsters like rice krispies treats, I suspect they'll really enjoy these simple no-bake cookie bars. Corn flakes add texture and audible crunch to this confection that is made with a near-perfect pairing of peanut butter and chocolate. I found the recipe on Serious Eats and it was developed by Yvonne Ruperti, who blogs at Shophousecook. This treat, actually more like a confection than a cookie, is almost effortless to make, and the batch quickly disappeared from my kitchen, where anything made with the peanut butter and chocolate combo never has a chance to stale. Kids will love these, and those over ten can actually make them for themselves -  if you can stand the mess they are sure to make as they assemble and eat them. Kids of all ages love these, so, if you are young at heart, I hope you'll give this recipe a try. Here's how the cookies are made.

Crispy No-Bake Corn Flake Peanut Butter and Chocolate Bars ...from the kitchen of One Perfect Bite courtesy of Yvonne Ruperti and Serious Eats: Recipes

Ingredients:

4 tablespoons (1/2 stick) unsalted butter
1 cup creamy peanut butter
1/2 cup light corn syrup
1/3 cup light brown sugar
Pinch salt
4 cups corn flakes, lightly crushed
1/3 cup salted peanuts, chopped, divided use
1 teaspoon pure vanilla extract
4 ounces bittersweet chocolate, finely chopped

Directions:
1) Line a 8 x 8-inch baking pan with foil. In medium saucepan over medium heat, melt butter. Add peanut butter, corn syrup, brown sugar, and salt and continue to cook, stirring, until melted and smooth.
2) Stir in corn flakes, 1/4 cup peanuts, and vanilla until just combined. Spoon into prepared pan and smooth top.
3) In heatproof bowl over pan of barely simmering water (or in microwave), heat chocolate until just melted. Spread over top. Sprinkle with remaining chopped peanuts. Chill until firm, about 2 hours. Remove from pan and cut into 2-inch squares. Yield: 16 squares.


One Year Ago Today: Crispy Oven-Baked Parmesan Fish Fillets  with Homemade Tartar Sauce


Two Years Ago Today: Lavender Cheesecake Squares


Three Years Ago Today: Roasted Red Pepper and White Bean Spread

Sunday, August 5, 2012

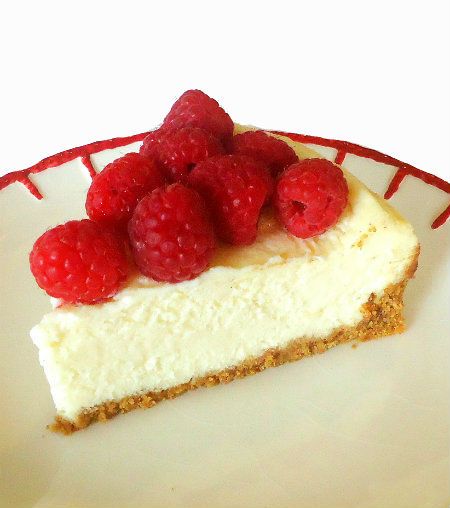
Crock-Pot Cheesecake


From the kitchen of One Perfect Bite...If men climb mountains because they're there, is it fair to say that cooks try new recipes for the same reason? I suspect so. You all know I have a special weakness for cheesecake. It's been featured here over a dozen times and I'm still not ready to let it rest. When the recipe for this one appeared on my radar, my curiosity was piqued. I've used a slow cooker for many things, but never dreamed of using it to make a real dessert. This cheesecake sounded like a perfect dish with which to begin my experiments. The recipe was developed by Beth Hensberger for Food and Wine magazine. Beth creates wonderful recipes and the magazine keeps me current and connected to the cooking mainstream, so I knew the recipe would, at the very least, be sound. The cheesecake looked delicious and a quick scan of the ingredient list confirmed just how easy it would be to make. I decided to use low-fat dairy products in the cake, and, because too much of it can be harsh, I cut the quantity of almond extract in half. I replaced the missing portion with a teaspoon of good vanilla. The recipe featured below does not reflect the changes that I made. I was pleasantly surprised by this cheesecake. While the top of the cake forms a caldera, it can be filled with berries and the finished product is quite attractive and guest-worthy. I know that those of you who try this recipe will be really pleased with the results. Its size makes it perfect for today's smaller families and the use of low-fat dairy products keeps calories reasonably under control. I hope you, too, will give this cheesecake a try. Here's how it is made.

Crock-Pot Cheesecake...from the kitchen of One Perfect Bite courtesy of Beth Hensberger and Food and Wine Magazine

Ingredients:
3/4 cup graham cracker crumbs
2 1/2 tablespoons unsalted butter, melted
1/4 teaspoon cinnamon
2/3 cup plus 1 tablespoon sugar
Salt
12 ounces cream cheese, at room temperature
1 tablespoon all-purpose flour
2 large eggs
1 teaspoon pure almond extract
1 cup sour cream

Directions:
1) Mix graham cracker crumbs with melted butter, cinnamon, 1 tablespoon of the sugar and a pinch of salt in a medium bowl. Press crumbs over the bottom and 1 inch up the side of a 6-inch springform pan that's 3 inches deep. I used an 8-inch springform pan.
2) In a standing mixer fitted with a paddle, combine cream cheese, flour, remaining 2/3 cup of sugar and 1/4 teaspoon of salt. Beat at medium-high speed until smooth, about 2 minutes. Scrape down sides of bowl, add eggs and almond extract. I used a combination of 1/2 teaspoon almond and 1 teaspoon vanilla extract. Beat at medium speed until blended. Add sour cream and beat until smooth. Pour batter into springform pan.
3) Fill a 6- to 7-quart round or oval slow cooker with 1/2 inch of water and position a rack in bottom. I used boiling water and jury rigged a rack with wads of aluminum foil. Set cheesecake on rack. Cover slow cooker with a triple layer of paper towels, then cover towels with lid. Turn cooker to high and cook for 2 hours without peeking. DO NOT PEEK. Turn off heat and let stand until slow cooker has cooled, 1 hour.
4) Remove lid and paper towels and transfer cheesecake to a rack to cool to room temperature, about 1 hour. Cover cheesecake with plastic wrap and refrigerate until chilled, at least 4 hours.
5) Heat a sharp, thin-bladed knife under hot water; dry knife. Carefully run the knife around edge of the cheesecake. Release the spring and lift cheesecake out of the mold. Cut into wedges and serve decorated with berries, if desired. Yield: 6 to 8 servings.


One Year Ago Today: Shrimp and Grapefruit Cocktail


Two Years Ago Today: Broccoli and Cauliflower Gratin


Three Years Ago Today: Onion and Fennel Bisque

Saturday, August 4, 2012

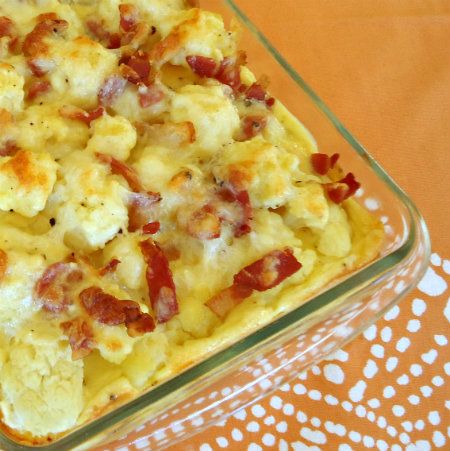
Cauliflower Gratin


From the kitchen of One Perfect Bite...I first saw this recipe in Leite's Culinaria shortly after Dorie Greenspan's book, Around My French Table, was published. I printed off the recipe but did nothing with it until the purchase and perusal of her book again brought it to mind. August marks a flood of broccoli and cauliflower in local markets and the need to use cauliflower that had been purchased moved this recipe center stage. This gratin is very easy to make, and it is quite good. My only problem is that I think this creamy, almost quiche-like, creation is too rich to be served as a side dish. That makes me a party of one, because most other reviewers think it is a perfect accompaniment to any type of roast meat. While I would not serve it as part of a dinner, I do think this rich gratin is perfect for lunch or a light supper. The dish is best served warm and eaten on the day it is made. While it can be re-heated, the gratin becomes more strongly flavored the longer it sits and the leftovers might be a hard sell. If you are looking for new ways to serve cauliflower, I urge you to give this recipe a try. I think you'll really enjoy the gratin. Here's how it is made.

Cauliflower Gratin...from the kitchen of One Perfect Bite courtesy of Dorie Greenspan

Ingredients:
Butter for the baking dish
1 cauliflower (a medium head, about 2 1/2 pounds or so)
1/4 pound bacon, cut crosswise into slender strips
1/3 cup all-purpose flour
5 large eggs, lightly beaten
1 cup heavy cream
2/3 cup whole milk
Salt and freshly ground pepper
Freshly grated nutmeg
3 ounces Gruyère (you can use Emmenthal or even Swiss in a pinch), grated

Directions:
1) Adjust oven rack to center position and preheat the oven to 425 degrees F. Generously butter a 9 x 13-inch ovenproof dish and place it on a rimmed baking sheet lined with a Silpat or parchment paper.
2) Bring a large pot of salted water to a boil. Cut florets from cauliflower, leaving about an inch or so of stem. Drop florets into boiling water and cook until fork-tender, anywhere from 4 to 10 minutes, depending on the size of the florets. (Alternatively, you can steam the florets over salted water.) Drain and rinse cauliflower florets under cold running water to cool them and pat them completely dry.
3) While cauliflower is cooking, toss bacon strips into a heavy skillet, place skillet over medium heat, and cook just until bacon is browned but not crisp. Drain and pat dry.
4) Spread cauliflower in buttered pan and scatter bacon over surface.
5) Place flour in a bowl and gradually whisk in eggs until blended. Slowly whisk in cream and milk. Season mixture with salt, pepper, and nutmeg and stir in about 2/3 of cheese. Pour mixture over cauliflower and bacon, shaking pan a little so that liquid settles between florets. Scatter remaining cheese over the top.
6) Bake cauliflower-bacon gratin for about 25 minutes, or until puffed and golden and a knife inserted in center comes out clean. If top isn’t as brown as you’d like, run gratin under the broiler for a couple of minutes.
7) Gratin is best just from oven or when warm, although it can be enjoyed at room temperature, just like a quiche. You really should eat cauliflower-bacon gratin freshly made, but if you’ve got leftovers, cover and refrigerate them, then let them come to room temperature or warm briefly and gently in oven. Yield: 10 small servings.


One Year Ago Today: Peanut Butter and Jelly Cake


Two Years Ago Today: Refrigerator Dill Pickles


Three Years Ago Today: Rhubarb and Red Berry Pie


Friday, August 3, 2012

Pease Porridge Pasta


From the kitchen of One Perfect Bite...A very busy and over-scheduled day meant that dinner tonight would have to be a quick and simple affair. I've wanted to try this recipe for a while now and this was the perfect evening to give it a trial run. The ingredients required to make it can be found in any well-stocked kitchen and the dish takes minutes to prepare. I'm happy to report that despite its simplicity, the pasta is also delicious and will become a regular feature in my kitchen. The pea puree that gives this dish its flavor is a bit like a pesto, but because it is served hot, it can become gummy if it is allowed to sit around too long. The pasta should be served as soon as all the ingredients are combined and I recommend you keep additional pasta water on hand to moisten the penne if required.  If you can't find small sugar snap peas, snow peas make a great substitute. The lemon zest used here is vital to the success of this recipe. It adds zing and brightens the flavor of a dish that could be one note given its emphasis on peas. The recipe was originally developed for Gourmet magazine, where it was called Sugar Snap and Green Pea Penne. While descriptive, I thought that name lacked imagination, so it became Pease, Porridge Pasta. I really liked this dish and I think you might too. Here's how it is made.

Pease Porridge Pasta...from the kitchen of One Perfect Bite inspired by Gourmet Magazine

Ingredients:
1/4 pound sugar snap peas, trimmed
2 cups frozen peas (10-oz.)
1-1/2 cups water, divided use
1-1/2 teaspoons grated fresh lemon zest
2 medium garlic cloves, minced and mashed to a paste with 1/2 teaspoon salt
1/4 cup extra virgin olive oil
1 pound penne
1/4 cup grated Parmigiana Reggiano

Directions:

1) Cut sugar snaps diagonally into thirds.
2) Bring frozen peas and 1/2 cup water to a boil in a small saucepan. Reduce heat and simmer, covered, until peas are tender, about 3 minutes. Transfer peas and cooking liquid to a blender. Add zest, garlic paste and oil. Puree.
3) Cook penne in a 6 to 8-quart pot of well-salted boiling water until al dente. Add sugar snap peas and boil for an additional 30 seconds, reserving 1 cup of pasta water, drain penne in a colander.
4) Add cheese and 1/3 cup reserved pasta water to pea sauce in blender jar. Puree until very smooth.
5) Toss penne and sugar snap peas in large bowl. Add pea puree and toss until penne is well-coated. Thin sauce, as necessary, with reserved pasta water. Season to taste with salt and pepper. Pass additional cheese at table if desired. Yield: 4 generous servings.


One Year Ago Today: Corn and Barley Salad


Two Years Ago Today: Grapefruit and Avocado Salad with Poppy Seed Dressing


Three Years Ago Today: Cajun Shrimp Etouffee

Thursday, August 2, 2012

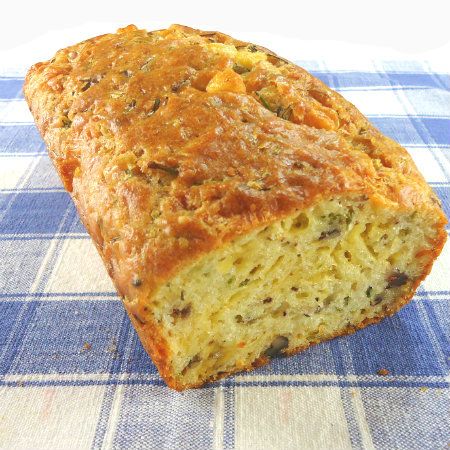
Savory Cheese and Chive Bread


From the kitchen of One Perfect Bite...I was given a copy of Dorie Greenspan's Around My French Table earlier this summer. As soon as it arrived, I curled up on the sofa, and like a child paging through a Christmas catalogue, marked my favorites and plotted the order in which my choices would be tried. The bread I am featuring tonight was on that list. The photo that accompanied the recipe was gorgeous and highlighted a deep gold pebbly crust that was unique and gave the bread an irresistible, come-hither air. I was finally able to make the bread today and I am generally pleased with the result. The bread, which is delicious, does, indeed, have gorgeous color and its aroma will make stomachs start to growl as it wafts through the kitchen and adjoining rooms. I couldn't wait for it to cool enough to slice. It's meant to be served as an appetizer and its cheesy goodness makes it perfect to serve with drinks at an informal gathering. I let the bread sit for 45 minutes before I had my first bite. It had wonderful flavor, but I was unhappy with the appearance of the sliced bread. The surface had holes and tunnels that are usually an indication that a dough has been over-mixed. I knew that was not the case, so I did a search to find other photos of the bread and see what others had come up with. As it turns out, my results were not unique. Most of the breads I found had the same holes and tunnels, so it is probably safe to say they are a characteristic of this bread, probably caused by slow melting cheese. I will, however, give the recipe another try in an attempt to produce a more finely grained loaf. I'll keep you posted if the results are significantly different. I think those of you who try the bread will really like it. It is easy to do and makes an unusual cocktail appetizer. Here's how it is made.

Savory Cheese and Chive Bread...from the kitchen of One Perfect Bite courtesy of Dorie Greenspan

Ingredients:
Unsalted butter, for greasing the pan
1-3/4 cups flour
1 tablespoon baking powder
1/2 to 1 teaspoon salt (depending on what cheese you're using)
1/4 teaspoon freshly ground white pepper (may substitute a pinch of cayenne pepper)
3 large eggs, at room temperature
1/3 cup whole milk, at room temperature
1/3 cup extra-virgin olive oil
1 generous cup (about 4 ounces) coarsely grated Gruyere, Comte Emmental or cheddar cheese
2 ounces Gruyere, Comte, Emmental or cheddar cut into very small cubes (1/2 to 3/4 cup)
1 bunch chives, minced (1/2 cup; may substitute thinly sliced scallions)
1/3 cup walnuts, toasted

Directions:
1) Position a rack in middle of oven; preheat to 350 degrees. Use butter to grease an 8 x 4-1/2 x 2-3/4-inch loaf pan, preferably Pyrex.
2) Whisk flour, baking powder, salt to taste and pepper together in a large bowl.
3) Whisk eggs in a medium bowl for 1 minute, until foamy, then whisk in milk and oil.
4) Pour egg mixture into flour mixture; use a sturdy flexible spatula or wooden spoon to gently mix together until moistened, then stir in grated and cubed cheese, chives and walnuts to form a thick dough. Transfer to loaf pan and spread to make dough even on top. Bake for 35 to 45 minutes or until bread is golden and a slender knife inserted into center comes out clean.
5) Transfer pan to a wire rack to cool for 3 minutes, then run a round-edged knife along edges of pan to loosen loaf. Turn it out and cool right side up before cutting and serving. Yield: 1 loaf.


One Year Ago Today: Stove-Top Barbecued Chicken "Ribs"


Two Years Ago Today: Schnecken

Wednesday, August 1, 2012

Lamb Roasted in the Style of Bordeaux


From the kitchen of One Perfect Bite...I had reservations about posting this recipe on several counts. Not everyone likes lamb and this recipe, developed by Paula Wolfert, uses ingredients that are expensive and not always easy to find. I decided to feature the recipe because the Silver Fox and I both love this entree and I thought at least a few of you might like to give the recipe a try. In a perfect world, this dish would be made with a bone-in leg of lamb. Despite the fact that huge flocks of sheep graze here in Oregon, a whole leg of lamb is next to impossible to find, and I usually have to settle for a boned roast. That makes for easy carving, but makes the use of a meat thermometer an absolute necessity to keep the meat from overcooking. This recipe calls for goose or duck fat, ingredients that I suspect are not gathering dust in your pantries. I understand that some butchers stock it, but I have not been able to find either ingredient in our local markets. I have, however, found an online source that you can link to here. Fortunately, goose and duck fat can be frozen, so I buy a year's supply at a time and tuck it in among the other eclectic items in my freezer. While, in theory, any red-wine vinegar can be used to baste and sauce the lamb, I am partial to one that comes from the Bordeaux region of France. I think it makes a smoother, less acidic sauce. It, too, can be purchased online and you can find it here. Once you have the proper ingredients, this lamb is very easy to prepare. It is studded with garlic, rubbed with goose fat and basted with a vinegar marinade as it cooks, all of which contribute to its great flavor. I do hope you will try this recipe which comes from Paula Wolfert's, The Cooking of Southwestern France. The lamb is wonderful with roast potatoes and I really think you will enjoy it. Here's how it is made.

Lamb Roasted in the Style of Bordeaux...from the kitchen of One Perfect Bite courtesy of Paula Wolfert

Ingredients:
1 whole bone-in leg of lamb (about 5-1/2 pounds)
2 large garlic cloves, peeled and cut into thin slivers
1 teaspoon coarse kosher salt, plus more as needed
1/2 teaspoon freshly ground pepper, plus more as needed
2 tablespoons rendered goose or duck fat
2 tablespoons grapeseed or peanut oil
3/4 cup red wine vinegar
2 tablespoons finely chopped shallots
1 cup water
3/4 cup low-sodium chicken stock

Directions:
1) Trim off  fell and excess  fat  from lamb, leaving a thin layer of fat. Make about 10 incisions near  leg bone and insert garlic slivers. Rub meat with  measured salt and pepper, then coat with  fat and oil. Massage into meat. Refrigerate, loosely covered with plastic wrap, for at least 3 hours or overnight. Remove from refrigerator 2 to 3 hours before roasting.
2) Heat  oven to 500 degrees F and arrange a rack in  middle.
3) Meanwhile, combine  vinegar and shallots in a small nonreactive saucepan and bring to a boil over medium heat. Reduce  heat to low and simmer until reduced to 1/3 cup, about 20 minutes. Strain, reserving the shallots and vinegar separately.
4) Place lamb on a rack in a large roasting pan and roast until browned all over, about 25 minutes. Remove  lamb from the oven and reduce  temperature to 350 degrees F. Pour  reserved vinegar and water into  roasting pan. Return lamb to  oven and roast, basting with the pan juices every 15 minutes, until internal temperature reaches 135 degrees F to 140 degrees F,  about 1 hour. Remove  lamb to a carving board and let rest for 10 minutes.
5) Meanwhile, make shallot sauce: Add  chicken stock and reserved shallots to the drippings in roasting pan and bring to a boil,  scraping up any browned bits from bottom of  pan. Season as needed with salt and pepper. Slice lamb and serve with the shallot sauce. Yield: 6 servings.


One Year Ago Today: Lemon Sour Cream Muffins


Two Years Ago Today: Moules Mariniere


Related Posts with Thumbnails

Printfriendly